These options appear as a subset of the section in the Paint Effects Brush Settings window, and the Attribute Editor for any brush node.
- Leaves In Cluster
-
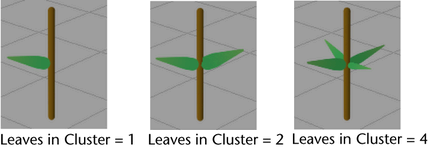
When leaves are created, they are created in radial clusters at one position around a branch or twig. This setting defines how many leaves are in each cluster.
- Num Leaf Clusters
-
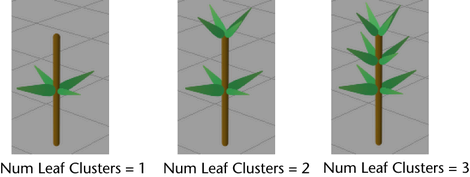
Defines the number of leaf clusters created between Leaf Start and the end of the tube or branches.
- Leaf Dropout
-
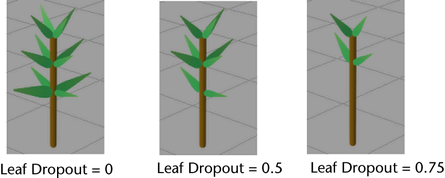
Defines the proportion of leaves that are randomly “pruned” to give a more natural look. If Leaf Dropout is 0, then Paint Effects produces exactly the same number of leaves each time it creates them. If Leaf Dropout is 1, all leaves are pruned.
- Leaf Location
-
Use these options to restrict leaves to secondary branches or just twigs.
- Leaf Length
-
Defines the length of each leaf, in worldspace units.
- Leaf Base Width, Leaf Tip Width
-
These settings define the width of the leaf at its base and tip, respectively. The leaf width changes linearly between these two values.
- Leaf Width Scale
-
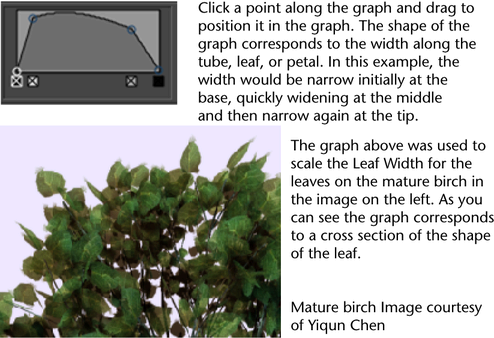
This allows you to use a graph to control the width from base to tip of leaves, rather than using a simple linear interpolation between two values. When combined with the Mesh BrushType you can define shapes like spheres, as well as control the profile of a leaf. Width Scale is applied as a scale to the current width and defaults to 1.0 so that previous presets work with it.
- Leaf Start
-
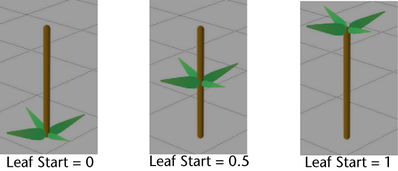
Defines the point along the tube where leaves first appear. For example, if Leaf Start is set to 0.5, then leaves appear half way up the tube (measured in segments). Decreasing this value pushes the leaves towards the base of the tubes.
- Leaf Angle 1, Leaf Angle 2
-
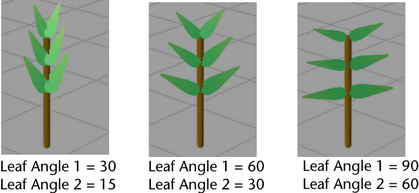
These settings define the range of angles that the leaves will make with their source branch. The first leaf cluster created (closest to the root) uses Leaf Angle 1, and the last leaf cluster created (closest to the tip) uses Leaf Angle 2. The angles of the leaf clusters change linearly in between these two clusters.
- Leaf Twist
-
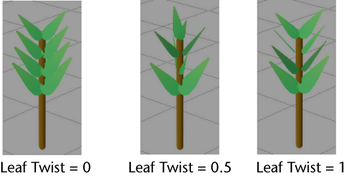
Defines how much leaves twist around their source branch. If the value is 0, all the leaf clusters emerge in a straight line along the branch. Positive or negative values make successive clusters emerge from points twisting around the source branch.
- Leaf Forward Twist
-
Turn this check box on so the broad or flat side of a leaf is always oriented towards the camera. Textures are similarly affected so that they always face the camera. For more information, see Forward Twist in the Twist brush settings section of Paint Effects Brush Settings.
- Leaf Bend
-
Defines the amount of bend that is used to curl up leaves in the U direction (along the length).
- Leaf Curl
-
Use the Curl attribute to bend leaves in the V direction (along the width). This is perpendicular to the Leaf Bend direction. Create and move points along the ramp to define the curl of the leaf. The ramp controls the curl from root to tip of the leaf. The left side of the ramp is the base of the leaf and the right is the tip. Controlling the curl from base to tip can help define the natural shape of leaves, as well as prevent interpenetration within a cluster. The mid line value on the ramp (0.5) represents zero curvature. Many leaf shapes have curvature that is constantly changing. For example, Iris petals or Mistletoe leaves can be simulated by a wavy curl ramp.
- Leaf Face Sun
-
Sets the degree to which the leaves follow the position of the sun. The attribute is based on phototropism, which is the movement or growth of a plant in response to the direction of a light source. When set to 0, the leaves are not affected by the direction of the sun. When set to 1, the leaves turn fully toward the sun. See the Sun Direction attribute in the Growth brush settings section of Paint Effects Brush Settings.
- Leaf Twirl
-
This controls the initial rotation of a leaf relative to the branch. For example, by default a group of leaves at the top of a palm tree would twist sideways. With Leaf Twirl you can rotate them to a proper orientation with the flat side facing the ground.
- Leaf Segments
-
Defines the number of segments in the leaf. If a leaf has multiple segments it can bend in response to forces.
- Leaf Flatness
-
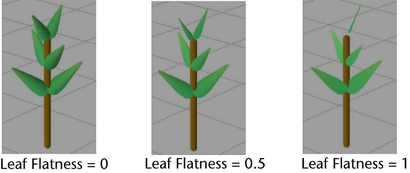
Defines how flat the leaves are. If Leaf Flatness 0, the leaves are tubes. If it is 1, the leaves are completely flat.
- Leaf Size Decay
-
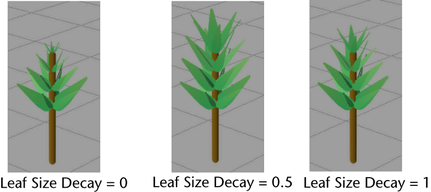
Defines the size factor applied to each leaf. If the value is 1, all leaves are the same size. As this value decreases, leaves towards the tips of branches are smaller. If you set the value to be greater than 1, the leaves towards the tops are larger
- Leaf Size Rand
-
Specifies a value that randomizes leaf size. The Leaf Length, Leaf Base Width and Leaf Tip Width attributes are scaled by the same random value so that the leaf maintains its shape. Higher values generate more size variance between the largest and smallest leaves.
Tip: To improve how Leaf Hue Rand, Leaf Sat Rand, and Leaf Val Rand values are distributed on a branch, set Leaf Size Randomization to a positive value. - Leaf Stiffness
-
Force attributes may affect leaves either too strongly or too weakly. The number of segments in a leaf relative to the base segment count determines how much forces will affect the shape. The Stiffness attribute gives you an independent way of controlling how much the forces, such as Gravity, Random, and Turbulence, affect leaves. Stiffness affects the way forces act on the leaf. If the Stiffness is set to 1, forces have no effect. If Stiffness is set to 0.5 (the default), forces have the same effect per segment that they do on the main branches. If Stiffness is set to 0, forces totally affect the leaf like a limp spaghetti noodle. If you have no forces, such as Spiral and Twist, Stiffness will have no effect.
- Leaf Translucence
-
This setting is available only when Illuminated is turned on. See the Illumination brush settings section of Paint Effects Brush Settings. The Translucence value controls how much the leaves transmit and diffuse light. Light shining on the back of translucent leaves can light up the front, although you still may not be able to see through them. To make the leaves completely opaque, set this to 0. To allow more light to diffuse through, set the value closer to 1.
- Leaf Specular
-
This is the specular intensity value exclusively for leaves and it controls the brightness of the shiny highlights on illuminated paint. A value of 0 produces no highlights, while higher values produce brighter highlights. This setting is available only when Illuminated is turned on. See Specular in the Illumination brush settings section of Paint Effects Brush Settings.
- Leaf Color 1, Leaf Color 2
-
The colors for the base and the tip of the leaves, respectively. Colors in between are linearly interpolated.
Tip: If you are painting in the Paint Effects panel (canvas or scene painting view), you can change the Leaf1 and Leaf2 settings from the toolbar by clicking the L1 and L2 color boxes and selecting the color from the ColorChooser. Adjust the color values using the sliders. - Leaf Hue Rand, Leaf Sat Rand, Leaf Val Rand
-
These attributes define how much random variation Maya applies to leaf colors when creating new tubes. Low values ensure that all leaves are created using colors very close to Leaf Color 1 and Leaf Color 2. Increasing these values causes more random variation. You can control randomness of the Hue, Saturation, and Value individually.
- Leaf Use Branch Tex
-
Turn this option on to apply the same texture used on branches to the leaves. Turn this option off to apply a different texture to the leaves.
- Image Name
-
Type the directory location and name of the image you want applied to leaves or click the folder icon and select the image. The alpha of the image is used. The texture will fit the bounds of the leaf exactly.
- Terminal Leaf
-
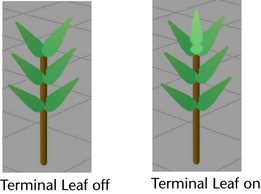
Turn this option on to add a single additional leaf to the ends of each branch and twig.
