To export a clip or a sequence:
- Do one of the following:
- Right-click the clip to export and select Export. And then, using the Media Export window, navigate to the export's destination.
- From the MediaHub, drag-and-drop the file from the Media panel to the location displayed in the browser.
- Select an Export type and a Format Preset.
- Click Export.
Flame prepares the export job. Once that preparation is done, the rest of export happens in the background and frees up Flame for your use.
You can export multiple clips in one operation:
- Use Ctrl-click to select multiple clips to export.
- Select a folder, a reel, or a library from the Media panel to export all of its contents. If it contains a folder structure, that structure also gets exported.
To export an RGBA movie file or file sequence, first create a Matte Container. You can:
- Use the Create Matte Container option in the MediaHub. The resulting clip will be a Matte Container and the Comp effect will be disabled.
- Use the Create Matte Container Tools and select the Contain option.
- Use the Add Matte option in the Timeline FX ribbon to create a Matte Container, but make sure to mute the Comp effect before exporting.
Multi-Channel Export

- When enabled, all Versions Tracks of a clip are used to create a Multi-Channel OpenEXR file.
- When disabled, only the Primary Version is used to generate an RGB or RGBA media file (RGBA is generated from a Matte Container OR from any Timeline FX generating a Matte).
To export a multi-channel clip:
- From the Export menu, enable Advanced Options.
- Select File Sequence as the Export Type.
- Select one of the OpenEXR Format Presets.
- Enable the Multi-Channel button.
“_custom” is appended to the Format Preset name.
- Set the other export parameters, as required.
- Click Export.
- The name of the Version Track defines the channel's name in the OpenEXR file sequence.
- If the Version Track name is undefined (i.e. *), the name of the first segment of the Version is used.
- The RGBA channel can be created by naming the Track or Segment with <name> and <name>_alpha.
Reducing Time and Footprint of Video Exports
When you export a clip as a file sequence (using the Video Options), or when you export it as part of a Sequence Publish where the media is exported as a file sequence, you can use the Link Original Media options to accelerate the export and minimize used storage space.
Link Media Export Options
- Link Media: Use this option to publish content and link back to the source media files when possible. This option creates links based on the destination file format, not matter the resolution, bit depth, or compression. This is the most permissive Link Media option.
- Link Media (Resolution): Creates links instead of new media for frames that are unedited, and with a destination resolution matching that of the source media files. Edited frames or frames with a different resolution from the source media files result in Flame writing new media files to disk. The resolution is set in the Resolution Presets box in the Media Export window; Same as Clip uses the resolution of the exported sequence, not the resolution of the source media.
- Creates links instead of new media for frames that are unedited, and with a destination resolution, bit depth, and compression matching that of the source media files. Edited frames or frames with a different resolution, bit depth, or compression from the source media files result in Flame writing new media files to disk.
-
Link Media (Bit Depth):
Similar to the option Link Original Media available in previous versions (2018 and earlier). Creates links instead of new media for frames that are unedited, and with a destination resolution
and bit depth matching that of the source media files. Edited frames or frames with a different resolution or bit depth from the source media files result in
Flame writing new media files to disk. The bit depth is set in the Bit Depth box in the Media Export window.
Important: If you use a Media Export preset created in a previous version of the application, Link Media (Bit Depth) option is used to replicate the behavior of that legacy preset.
- Link Media (Compression): Creates links instead of new media for frames that are unedited, and with a destination resolution, bit depth, and compression matching that of the source media files. Edited frames or frames with a different resolution, bit depth, or compression from the source media files result in Flame writing new media files to disk.
- Generate Media: Always create new media, no matter what. Use this option when the exported files' metadata, such as timecode, must be accurate.
Because unedited frames are not recreated but only referenced in the exported sequence, the export takes less time to complete, and saves storage space by avoiding media duplication. The mechanism used to create links is described in How Media Linking Works.
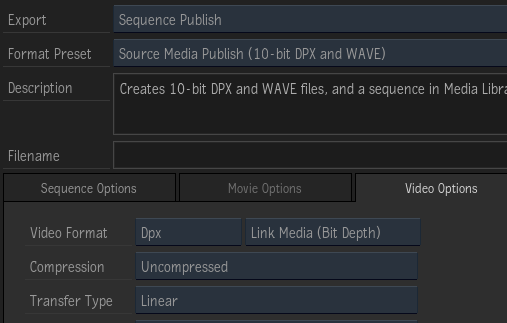
Simple example of Link Media (Bit Depth):
- You import a sequence of 50 .dpx files, with a bit depth of 10-bit.
- Of that sequence, you colour correct only the first 10 frames.
- You export that sequence as a Sequence Publish, using the format preset Source Media Publish (10-bit DPX and WAVE). Notice under Video Options the Link Original Media option set to Link Media (Bit Depth)
- The export results are: 10 new .dpx files created by Flame, and 40 .dpx files referencing the original files. Since these last 40 files are referenced and not copied or moved, the export process is that much faster.
Because media linking uses tools enabled by the operating system (see below), there are some additional requirements for media linking to work. If the export settings fail to meet the requirements set by the selected Link Media Option, the media link cannot occur and new media files are created. These requirements are in addition to those set by the selected Link Media option.
Requirements for successful media linking:
- The sequence must be exported to the volume where the source media is stored. It does not have to be the same directory, but the volume itself must be the same. If the destination for the export is not the same volume, then Flame creates new media files for every frame.
- The sequence must be exported in the file format of the source media: DPX to DPX, OpenEXR to OpenEXR.
If the source media is not available, Flame can link to the media cache instead, but on the following conditions:
- The Project's Cache and Renders setting is set to Uncompressed.
- You export the sequence to the volume used to store the media cache (the framestore).
- And if you select Link Media (Bit Depth) or Link Media (Compression), you also select the DPX or OpenEXR compression indicated by the asterisk (*) in the Compression drop-down box. The asterisk indicates the compression format used by the media cache.
How Media Linking Works
For the link media mechanism, Flame uses the hard link mechanism found in POSIX-compliant operating systems such as the Linux and the macOS X operating systems.
To understand the hard link, you must first understand how a file is stored on a volume. On a file system, for reasons of efficiency, data and the organization of files on a volume are managed separately.
Consider a .dpx file named original.dpx. When the operating system ask the file system to write this file to disk, the following happens:
- The file system sends the image content of original.dpx to the hard drive and asks it to write it down somewhere. This data consumes a certain amount of storage.
- The hard drive sends back to the file system the physical address where the data is stored.
- The file system stores this address, called inode, along with other relevant metadata (file name, file location within the directory hierarchy, creation date) in what we call a file, that is displayed by the operating system as original.dpx.
For the user a file is the data. But for the file system, file and data are two separate entities. It is the operating system that creates the illusion for the user. But this illusion is quite useful: moving a file between folders changes the path in the file's metadata, without actually moving the data. The file hierarchy displayed by the file system (folders and files) bears little resemble with how the data is stored on the volume: moving a file around does not change its inode, or address.
Going further, one can create a new file, called linked_file.dpx. This file has its own file name, creation date, file path. But it is assigned the same inode as original.dpx: both files point to the same content. But no actual data is duplicated. The operating system presents both files separately. This is what's called creating hard links.
- You can easily see how many reference counts are on a file by typing the following in a shell: ls -li
- The command returns something similar to the following lines:
-rw -rw -rw 1 user users 8.0M Jan 5 09:47 solo_file.dpx
-rw -rw -rw 2 user users 8.0M Jan 5 09:49 linked_file.dpx
- The specifics are not important. What is important is the number next to the Unix file permission (-rw -rw -rw): it displays the number of files that refer to the same inode. The number 1 on the solo_file.dpx line indicates this the sole file to refer to its inode. Deleting this file actually frees up storage.
- For linked_file.dpx, the 2 indicates the inode is referenced by 2 files: linked_file.dpx and another one. Deleting linked_file.dpx does not delete the original reference, nor does it free space on the file system: you need to delete both linked_file.dpx and original.dpx. An inode is only delete when every file referencing it has been deleted.
And that is what happens with the Media Linking. By assigning inodes to new files for those frames that have not changed, Flame avoids data duplication. And saves time, since creating a new file is much faster than writing the a whole media frame.
Notes about hard links:
- Hard links can only be done on the file system where the original files are located.
- A hard link shares the same file properties as the original file.
For example, you wish to publish DPX content that was modified in Flame. But changes to the files' metadata such as timecode and tape name are not reflected in the hard link media.
Also, managed media created in Flame (renders, caching, etc.) do not contain any timecode nor tape name when created as DPX or OpenEXR. Creating Hard Links to be used in third party applications might need to be used with file name information for timecode since the files will not contain the original media attributes.
- Overwriting a hard link does not erase the original file but creates a new file instead.
Setting Link Media to Work Across Different Volumes
Hard links used by Link Media require that the original media file and the hard link are both created on the same volume. It is a limitation actually inherited from the file system: inodes cannot be shared between multiple file systems. In cases where you absolutely need to create links across file systems, you can use soft links. On macOS, a soft-link is also known as an alias.
A soft link is a direct link to a file: if file linked_file.dpx is soft linked to file original.dpx, file linked_file.dpx essentially stores the path to file original.dpx. It does not duplicate any inode information! This means that:
- If file original.dpx is moved, file linked_file.dpx cannot access its contents anymore.
- If file original.dpx is renamed, file linked_file.dpx cannot access its contents anymore.
- If file original.dpx is erased, file linked_file.dpx cannot access its contents anymore.
- If file original.dpx is overwritten, file linked_file.dpx now uses the new content.
In the end, you only want to use soft links because your workflow requires using multiple volumes. And as long as you are aware of the limitations, this workflow can work.
Soft links are disabled by default.
To enable soft links:
- Open the file /opt/Autodesk/sw/cfg/stone+wire.cfg.
- Search for the line # SymlinkAcrossFilesystems=True
- Remove the # to uncomment it.
- Save and close the file.
- From the command line, restart Stone+Wire. Enter:
/opt/Autodesk/sw/cfg/sw_restart
-
It is possible to define the type of media Stone+Wire encodes for managed media (caching, proxy and renders).
Export Tips
- Muted tracks are not exported.
- You do not have to render your whole sequence before exporting it: Flame automatically renders only the media required for the export.
- Minimize the space taken on your storage by using
Export in Foreground.
For File Sequence and Movie, foreground export lets you export media without requiring you to re-render. This options make so Flame does not need to allocate frames on the framestore because content is streamed directly to the exported file, reducing the time to export.
For Sequence Publish exports, when the media needs to be packaged, Flame renders before exporting for the segments that must be pre-rendered. For example, using the Flattened tracks option with Timeline FX requires rendering prior exporting, as do segments with a BFX or Resize.
- When exporting with Export Between Marks, you can have pre-roll and post-roll black by setting the in and out marks to include some empty track. Each frame of included empty track creates a frame of black on the export.
- When exporting a single frame as a file sequence, consider setting the Frame Padding field to zero to export that frame without any file numbering. And if you export a multi-frame clip as a file sequence by mistake without Frame padding, Flame detects this and automatically assigns a frame padding of 8 digits to correctly export the clip.
- When working with CODEX files, you cannot use the Link Original Media option in Media Export to create file system links to the original media files because Flame cannot generate 12-bit packed DPX, the format used by CODEX recorders. Flame will instead create new 12-bit unpacked DPX files.
- OpenEXR exports include Tape name and Keycode data in the exported files' header.
- DPX metadata
- The frame rate is written to the DPX file header, in both the TV rate and Movie rate fields.
- The Drop Frame mode of 29.97 fps files is written to the DPX file header. Limitations from the DPX SMPTE-specifications prevent the drop frame mode from being specified in files using a timecode higher than 30 fps.
- In ProRes exports, Flame corrects the aspect ratio to match the Apple-defined standard. For PAL 16x9, the standard pixel aspect ratio is 118:81. For a frame of 720x576 this gives a an aspect ratio of ~1.82 = (720 / 576) x (118 / 81).
- MXF DVPro: a PAL export is always F2; a NTSC export is always F1. Fields are translated if required.
Support for MXF XDCAM 422 Short GOP
MXF XDCAM 422 exported by Flame are encoded based on Sony's XDCAM format, and all start with a full Group of Pictures (GOP). Some broadcasters use a different flavour of XDCAM 422, where the media start with a short GOP (starting on an I-frame). You can meet these encoding requirements by setting an environment variable. You can configure either or both Background and Foreground exports to use this alternate encoding.
For Foreground Export, edit the application's .cshrc.
- Close Flame.
- In a shell, type: cd /opt/Autodesk/<application>
- With a text editor, edit the file .cshrc
- Add the following ligne to the .chsrc:
setenv DL_MXF_MPEG2_I_FRAME_FIRST 1
- Save the file and restart
Flame.
Encoded MXF XDCAM 422 will now be encoded starting on a I frame. To return to the previous setting, delete the line setenv DL_MXF_MPEG2_I_FRAME_FIRST 1 from the .cshrc.
For Background Export, you need to configure the Backburner Server process.
-
On Mac OS:
- Open the file /Library/LaunchDaemons/com.autodesk.backburner_server.plist
- Add the following lines following the first
<dict> line:
<key>EnvironmentVariables</key>
<dict>
<key>DL_MXF_MPEG2_I_FRAME_FIRST</key>
<string>1</string>
</dict>
- Restart the Backburner Server service using the Service Monitor.
-
On Linux:
- Open the file /etc/init.d/backburner_server
- Add the following line after the initial comments:
export DL_MXF_MPEG2_I_FRAME_FIRST=1
- Restart the Backburner Server service using the Service Monitor.