Render To Texture (also known as Texture Baking) is a procedure for capturing various aspects of 3ds Max geometry scene objects' surfaces to bitmaps using the production renderer. The Default Scanline renderer supports this functionality.
The actual 3ds Max Render To Texture tool available through the Main Menu>Rendering>Render To Texture menu item is implemented as a scripted tool.Its source code can be found in the following subfolder of the 3ds Max installation:
..\ui\macroscripts\Macro_BakeTextures.mcr
In addition, some Render To Texture methods used by the network version of the tool can be found in the file
..\stdplugs\stdscripts\RTT_methods.ms
Render To Texture Components
Here is a short overview of the MAXScript classes, interfaces, properties and methods used in the process and how to use them to create your own texture baking tools:
Bake Elements
The main object class involved in the texture baking process is the Bake Element.
It implements an object capable of capturing a specific channel out of the production renderer, for example Diffuse, Lighting, Ambient Occlusion, Normals, Shadows and so on.
INodeBakeProperties Interface
The geometry objects whose surfaces will be baked have to be set up for the process using the INodeBakeProperties Interface exposed by all scene nodes.
This interface is used to add one or more Bake Elements to specific nodes, enable the baking and control some other related parameters.
Production Renderer
The production renderer, including the Default Scanline renderer, has to be called via MAXScript in a special mode invoked via
render rendertype:#bakeSelected
Unwrap UVW
For the baked texture to be usable, the object being rendered has to provide good texture coordinates without any overlapping.
The Render To Texture script shipping with 3ds Max provides controls over the automatic application and setup of Unwrap_UVW Modifiers to ensure the texture coordinates are usable for baking. You might have to ensure the same in your own script, unless your object has good UV coordinates to work with.
Projection Mapping
In some cases, especially when generating Normal Maps, the surface being rendered is a high-resolution version of an object, while the target object being mapped is a lower-resolution version. In this case, the texture coordinates of the low-resolution object have to be generated by projecting from the high-resolution one.
The Interface: INodeBakeProjProperties, the Projection Modifier and the Project_Mapping ReferenceTarget are the main elements of the Projection Mapping system of 3ds Max.
Shell Material
The Shell Material has been specifically designed to be used together with the Render To Texture tools. It can hold two different materials, typically the original material and the baked material. Either one can be used in the Viewport or in the Renderer.
Developing a Simple Render To Texture Script
The following example shows the basic steps to create a custom Render To Texture script.
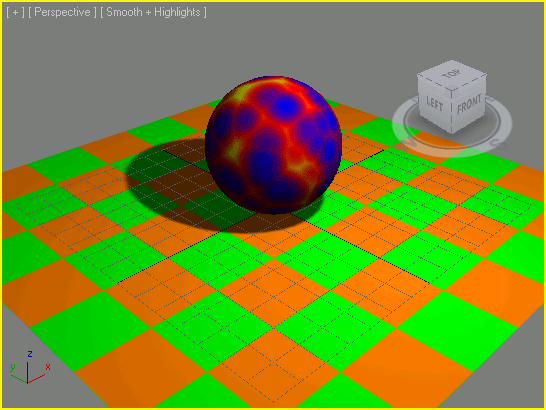
The script creates a simple scene containing a textured sphere on a textured plane lit by a shadow-casting omni light.
Then it bakes the Diffuse and Lighting Elements of both objects to TGA files on disk and creates a Shell Material containing the old material in the one slot and the baked material in the other.
The Baked material uses a Composite map to combine the diffuse and the lighting information into a single diffuse map.
In this simple case, the texture coordinates of both objects are procedurally generated by the geometry primitives and are usable for baking. Also, no projection mapping is required in this simple case.
|
SCRIPT |
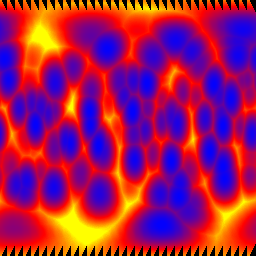
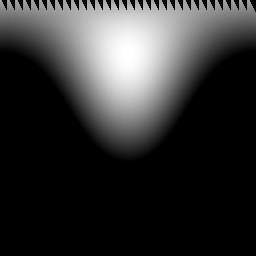
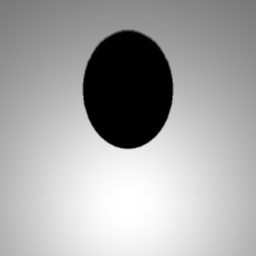
fn BakeDiffuseAndLighting obj size = ( --Clear all render elements obj.iNodeBakeProperties.removeAllBakeElements() --Preparing the Bake Elements: be1 = diffusemap() --instance of the bake element class be1.outputSzX = be1.outputSzY = size --set the size of the baked map --specifythe full file path, name and type: be1.fileType = (getDir #image+"\\"+obj.name+"_diffuse.tga") be1.fileName = filenameFromPath be1.fileType be1.filterOn = true --enable filtering be1.shadowsOn = false --disable shadows be1.lightingOn = false --disable lighting be1.enabled = true --enable baking be2 = LightingMap() -- instance of the bake element class be2.outputSzX =be2.outputSzY = size --set the size of the baked map --specifythe full file path, name and type: be2.fileType = (getDir #image+"\\"+obj.name+"_lighting.tga") be2.fileName = filenameFromPath be2.fileType be2.filterOn = true --enable filtering be2.shadowsOn =true --enable shadows be2.enabled = true --enable baking --Preparing theobjectfor baking: obj.INodeBakeProperties.addBakeElement be1 --add first element obj.INodeBakeProperties.addBakeElement be2 --add second element obj.INodeBakeProperties.bakeEnabled = true --enabling baking obj.INodeBakeProperties.bakeChannel = 1 --channel to bake obj.INodeBakeProperties.nDilations = 1 --expand the texturea bit select obj --we are baking the selection, so we select the object --Call the renderer to bake both elements: render rendertype:#bakeSelected vfb:off progressBar:true outputSize:[size,size] theComp = CompositeTextureMap() --create a composite map theComp.add() --add a second layer theComp.blendMode = #(0,5) --set second layer to Multiply --Create two maps, one with the diffuse, one with the lighting map theMap1 =bitmaptexture filename:be1.fileType theMap2=bitmaptexture filename:be2.fileType theComp.mapList = #(theMap1,theMap2) --composite the two maps theComp.opacity = #(100,70) --set the lighting map to 70% opacity --Create a standard self-illum material using the Composite map bakedMat = standard diffusemap:theComp selfIllumAmount:100 --Assign a Shell Material to the object, --keep the old material as original material, --set the new bakedMat as the baked material: obj.material = Shell_Material originalMaterial:obj.material\ bakedMaterial:bakedMat viewportMtlIndex:1 renderMtlIndex:1 --Show the textures of the baked material in the viewport showTextureMap obj.material obj.material.bakedMaterial true )--end fn resetMaxFile #noprompt--reset the scene to start from scratch --Create a shadow casting white Omni light theLight = omniLight pos:[0,-60,100] rgb:white theLight.baseobject.castshadows = true --Create a mapped sphere object above the ground plane theObject = Sphere segs:32 mapcoords:true pos:[0,0,25] --Create a Cellular map and assign via Standard material to object theMap = cellular cellColor:blue divColor1:red divColor2:yellow size:15 theObject.material = standard diffusemap:theMap --Call the Bake function with the object and the desired size BakeDiffuseAndLighting theObject 256 --Create a mappedplaneobjecton theground plane theObject = Plane width:200 length:200 mapcoords:true --Create a checker map and set the tiling to 4x4, then assign to object theMap = checker Color1:green Color2:orange theMap.coordinates.uTiling = theMap.coordinates.vTiling = 4 theObject.material = standard diffusemap:theMap --Call the Bake function with the object and the desired size BakeDiffuseAndLighting theObject 256 --Delete the light from the scene and deselect everything delete theLight max select none |
|
RESULTS |
|
After running the script, the following four baked textures will be written to the Images folder and will appear on the scene objects in the viewports: |
|
 |