The Surface Brush tool is an alternative to the Volume Brush that behaves more like you might expect if you are coming from tools like Mudbox or ZBrush, but with the addition of our dynamic meshing capabilities. Unlike in Volume Brush, which used a 3D sphere and 3D space deformation, the Surface Brush uses a 2D "disc" on the surface as the brush effect region, and applies a surface displacement to the vertices inside this region. This allows for a few effects that are not possible in the Volume Brush.
Conceptually this is similar to the difference between Unwrap and Sphere modes of the Select Tool, and in fact the grey disc-shaped region you see in Select is precisely the disc-shaped region we use inside the Surface Brush. However we do not show that disc-shaped highlight because it can interfere with your perception of the surface shape, instead we show a 3D circle, but this is only a visual reference.
Brush Operations
The set of Operations available in Surface Brush are listed in the Brushes flyout panel, shown below. Note that we have kept names consistent between Surface and Volume Brush, so if a brush has the same name, it is doing the same thing, only the area of effect is different.

Draw: Similar to other 3D sculpting tools, this locally displaces the vertices inside the brush along a fixed direction, defined by the average normal over the brush region.
Draw2: A variant of Draw that has a stronger directional effect.
Draw3: In this Draw variant, the surface is incrementally displaced to a maximum height within the brush stroke, but subsequent strokes are overlapped. The maximum height is defined by the radius of the brush stamp. Note, however, that the smoothing inherent in our dynamic meshing will pull the surface back down around the stamp edges if you move the cursor slowly.
DrawMax: Same behavior as Draw3, however the displacement is set directly to the maximum height. As a result, the Strength slider is used to control the maximum height, relative to the brush stamp size. When Smooth is set to 0, This brush gives perhaps the closest behavior to other sculpting tools.
Inflate: Vertices are pushed along their individual normal directions.
PaintVertex: Paints vertex colors using the selected color. Note that this brush by default still does refinement, so if you use a very small brush, additional vertices will be added to be able to capture the stroke.
SmoothColor: This operation is similar to Gaussian smoothing in an image texture, but applied to the vertex colors of the mesh.
BubbleSmooth: A smoothing brush that smooths "outwards", instead of shrinking. This is a much safer type of smoothing for 3D sculpting novices, as thin shapes will not collapse like they do in other sculpting tools.
ShrinkSmooth: The standard smoothing brush included in nearly all 3D sculpting programs.
RobustSmooth: This is a variant of ShrinkSmooth that properly handles variable triangle density. However, it is much more computationally intensive than standard smoothing, and often smooths quite slowly if the mesh does have highly variable resolution.
Falloff
The Falloff flyout allows you to select different falloff shapes that modulate the Strength of the Operation you are using. This is similar to the Volume Brush, except that the profiles are representative of 2D bump-shaped functions, rather than 3D volumetric fields. Essentially, if you were to apply a DrawMax stamp to a very highly tessellated plane, without refinement, you should see a bump whose cross-section looks like the Falloff icon.

One difference with Volume Brush is the box-shaped falloff on the far left, which completely disables the effect of the Falloff, so it is one everywhere. This is useful when using Stencils, and also gives the operations a sort of clay-brush feel that experienced 3D sculptors may be familiar with.
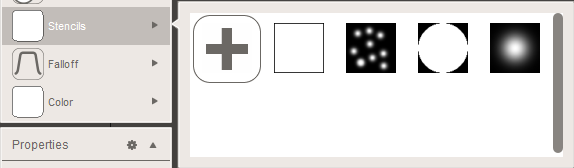
Stencils
The Falloff is quite a limited way to control the brush shape. Since the Surface brush is based on a 2D disc on the surface, we can map an image to that 2D region, and hence can support alpha-masks or stencils. Meshmixer only includes a few options, but if you click on the + button you can import your own images in various formats. Note that you need to import square images in power-of-two resolutions (ie 64x64, 128x128, 256x256, etc).
Stencils can be used to create many effects that would be impossible otherwise, but often require some brush configuration. For example, if you simply want to use a grayscale image to emboss a plane, you can do that with a Stencil and DrawMax, but to get the best result you should manually Remesh the plane to the appropriate density, disable Refinement, and disable Flow.
Main Panel
The main panel for the Surface Brush is shown below. We discussed the Strength, Size, Symmetry, and Flow parameters in the main Sculpt Tool topic.

The Spacing parameter allows you to set a minimum distance between brush stamps. By default this is zero, and we apply stamps as fast as we can compute them. As this value is increased, we will wait until the brush has travelled a certain distance before applying another stamp. When Spacing = 1, this distance is a full brush diameter.
The Lazyness parameter influences the smoothness of your brush stroke. When Lazyness is 0, the brush stamps are applied directly below the cursor positions. As you increase lazyness, the brush stamps will "lag" behind your cursor, as if the brush location were connected to your cursor with a stretchy rubber band. The higher the setting, the slower the brush will move, and as a result your strokes will be significantly smoother.
Filters
The Surface Brush also has a Filters panel, however the effect of these filters is identical to the Volume Brush; see that page for details.