Cameras
Cameras in 3ds Max Interactive are your way of viewing your 3d scenes. Because they are necessary to see your world at all, they are one of the most essential parts of 3ds Max Interactive. Every project uses at least one camera, but often a project will use many different cameras to render the scene from different perspectives.
For video tutorials on controlling game cameras, check out Controlling Game Cameras.
Create a camera from the Create panel.
In the Flow Editor, assign your camera as the active camera.

Click the Play icon
 in the Toolbar, and you can now press C to assume your new camera.
By default, the interactive engine sets up clipping planes with expected distances for general real world scale. This may not be ideal for your project and sometimes you'll need to adjust your clipping planes accordingly.
To adjust clipping planes in the viewport:
- Click the gear icon in viewport, then select Viewport Options.
- Set the Near Range and Far Range according to your needs.
To adjust clipping planes:
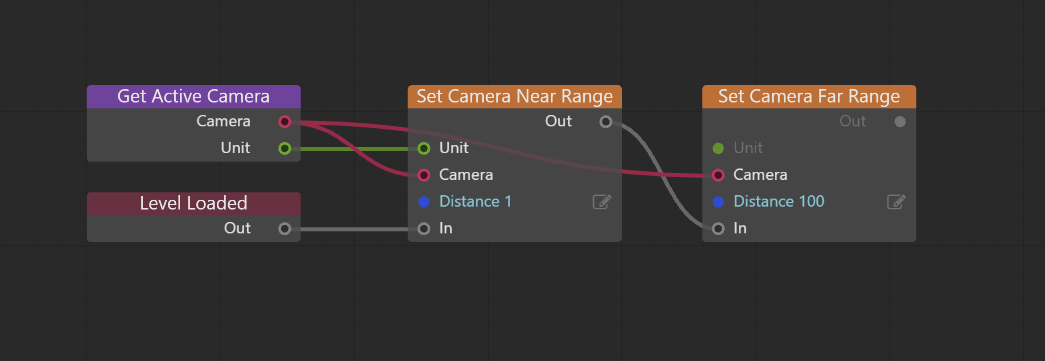
In Level Flow, access the camera with the Get Active Camera node, then use the Set Camera Near Range and Set Camera Far Range nodes to set distances as needed.

You can control camera movement with many different methods.
- Use Story to animate cameras. See Create simple animations with the Story Editor.
- Use Flow or Lua to move the position of cameras. See the Camera category in the Flow Node Reference or Lua API Reference.
- Link cameras to units that have animated paths or motion.
The default “fly mode” cameras found in some of the default Template projects can be useful to switch to and from. Unfortunately, because they are not level units they can be tricky to get at. You can use this simple bit of Flow code to store those cameras for use later on. Use this trick to store any camera so that you can return to it.
