About all the settings and options
Simulation Utility LT cannot create new PRM files, but users with a license of Local Simulation can create PRM files for custom processing conditions and for new materials. Once created, a PRM file can be used for any future simulations that involve the same combination of material properties and processing parameters.
In the New Process Parameters dialog, on the Physical tab, enter the processing conditions used to build the components of interest.
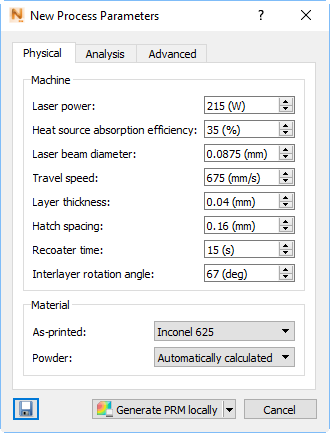
The physical process parameters used by the Simulation Utility to create a new PRM file are as follows:
- Laser power [W]: The nominal laser heat input of the powder bed system for the simulated build.
- Heat source absorption efficiency [%]: The percentage of energy absorbed by the part during processing.
- Laser beam diameter [mm]: The size of the laser spot size as it impinges upon the powder surface, and is roughly equivalent to half of the melt pool diameter.
- Travel speed [mm/s]: The speed of the laser passes.
- Layer thickness [mm]: The nominal thickness of the powder bed layers.
- Hatch spacing [mm]: Also known as Gap Width, this is the distance between the centers of two parallel laser passes.
- Recoater time [s]: The time it takes the recoater blade to spread a new layer of powder and return to its resting position.
- Interlayer rotation angle [degrees]: The angle the laser passes are rotated each layer.
Also on the Physical tab of the New Process Parameters dialog, the Material drop-down menu lists the materials that are included with Simulation Utility. New materials can be added in two ways:
- On the Home tab, click , and enter the temperature-dependent physical properties for the new material. For PRM generation, Thermal Conductivity, Density, Specific Heat, Coefficient of Thermal Expansion, Elastic Modulus, and Plasticity data are required at a minimum.
- In the
Processing Parameters dialog, click New
 , and then on the
Physical tab, on the
As-printed drop-down menu, choose
Custom and import a material property text file. This file must be in a particular format, using the template provided in the
Local Simulation installation folder
C:\Program Files\Autodesk\Local Simulation <version>\doc\material_template.txt, also available in the
Material Template topic in this Help. Materials imported this manner are not added to the Material Library.
, and then on the
Physical tab, on the
As-printed drop-down menu, choose
Custom and import a material property text file. This file must be in a particular format, using the template provided in the
Local Simulation installation folder
C:\Program Files\Autodesk\Local Simulation <version>\doc\material_template.txt, also available in the
Material Template topic in this Help. Materials imported this manner are not added to the Material Library.
Powder Properties
By default, powder properties, shown at the bottom of the New Process Parameters dialog, are approximated in PRM generation simulations using scaling factors. The powder property scaling factors are:.
- Powder Thermal Conductivity = Solid Thermal Conductivity × 1E-2
- Powder Specific Heat Capacity = Solid Specific Heat Capacity × 1
- Powder Elastic Modulus = Solid Elastic Modulus × 1E-4
- Powder Thermal Emissivity = Solid Thermal Emissivity × 1.8
To directly determine the powder properties, choose Custom and import a powder properties text file.
Analysis tab
On this tab, you can specify the type of analysis covered by the PRM file. As specified above there are three possible types of PRM file: Stress and distortion, Hot spots and lack of fusion, or both Stress and distortion and Hot spots and lack of fusion. Stress and distortion is the default setting. If you want to enable Hot spots and lack of fusion analysis, then the three temperature fields are activated for use.
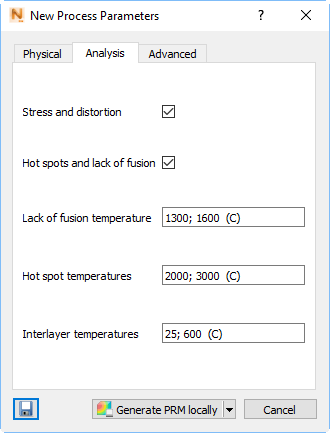
For each of the following three temperature settings, you can enter multiple temperatures, separated by semi-colons, as shown above.
Lack of fusion temperature: Specify one or more temperatures below which the powder material will not fuse.
Hot spot temperatures: Specify one or more temperatures above which the powder is considered overheated. Different temperatures can represent the points at which particular undesirable phenomena occur.
Interlayer temperatures: Specify one or more temperatures that represent the material temperature at the start of laying down a new layer. Providing more values creates a PRM with higher resolution, but increased run time.
Best practices - To determine what interlayer temperatures are necessary it is suggested that the part level geometry or geometries that are of interest for that combination of processing conditions are simulated using a standard stress and distortion PRM and choosing the Thermal Only Analysis type in the Solver Settings menu. Determine from the simulation(s) the peak temperatures that may be experienced. This should be used for the upper interlayer temperatures, rounded up to the next 100°C. The lowest temperature should be set to the ambient temperature, typically 25ºC. To determine what other temperatures should be used, plot the thermal properties of the material in question with respect to temperature. Add additional interlayer temperatures where observable non-linearties occur.
Export button
 exports
thermal.in and
mechanical.in files, to be used to generate PRM files from the command line or batch simulation mode.
exports
thermal.in and
mechanical.in files, to be used to generate PRM files from the command line or batch simulation mode.
Advanced tab
This tab provides options to protect the intellectual property in your PRM or to adjust the numeric relaxation used for by the solver during PRM generation.
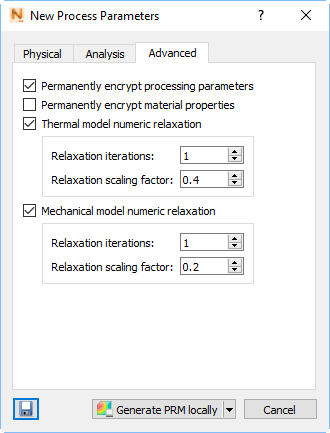
Permanently encrypt processing parameters - By default, when a part-level simulation is run, the processing conditions used to generate the PRM file used are written to the log files. If the processing conditions are proprietary, users may want to encrypt them. Checking this box will encrypt the processing parameters in the PRM file and they will not be written to the log files. This choice is persistent, so once selected, all PRM files will have their processing parameters encrypted until the user deselects this option.
Permanently encrypt material properties - By default, when a part-level simulation is run, the material properties used to generate the PRM file used are written to the log files. If the material properties are proprietary, users may want to encrypt them. Checking this box will encrypt thematerial properties in the PRM file and they will not be written to the log files. This choice is persistent, so once selected, all PRM files will have their material properties encrypted until the user deselects this option.
Thermal model numeric relaxation and Mechanical model numeric relaxation - The options are used to control the under relaxation of the Newton-Raphson solver during PRM generation.
Relaxation Best Practices
- Generally, the default values above should lead to a converged solution.
- Before attempting to improve convergence using the relaxation controls, it is suggested the user increase Laser Beam Diameter input. This value has minimal impact upon the part-level stress and distortion predictions. Use a value up to twice as large as what is given by the machine.
- If the thermal or mechanical PRM generation analysis fails, it is recommended that the Relaxation iterations for that analysis type be increased to 2.
- Reducing the Relaxation scaling factor will also aid convergence, but not as effectively as increasing the iterations.
- Increasing relaxation may slow the simulation speed.
- Scaling factors below 0.1 or above 0.5 are not recommended.
- Relaxation iterations above 3 are not recommended.
- If the PRM generation does not converge using the maximum recommended relaxation, of 3 iterations and a 0.1 scaling factor, there may be problems with custom processing conditions or custom material properties.
PRM execution
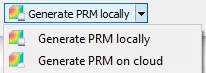
After entering all required options and selecting whether to generate the PRM file locally or on the cloud, you are prompted to save the file to a name of your choosing, and then the PRM generation process will start. The
Job Manager opens when PRM generation starts, so you can check the progress of the operation and click
View Logs
 for more detail. If you generate the PRM file on the cloud, it will automatically be added to your Processing Parameters Library, but only after the file is completely generated.