Welcome to the 2021.1 release of the Flame Family products!
|
The Explorer is now available in every environment, from MediaHub to Tools, and makes it easier than before to move Selectives between segments. For more information, see Explorer. |

|
Comparing to reference media is now easier, with side by side comparison, improved compare options in the Player, and references that resize to the current resolution. For more information, see Compare Workflow. |
Additional information:
- Many new feature videos (as well as other workflow videos) are available on the
Flame Learning Channel. This channel is updated frequently, so be sure to subscribe.
Links to 2021 videos are denoted by this icon:

- In this What's New topic,
 indicates a new feature or enhancement that was suggested and voted up by Flame Family users on the
Feedback portal (also accessible directly from
).
indicates a new feature or enhancement that was suggested and voted up by Flame Family users on the
Feedback portal (also accessible directly from
).
- Make sure to check out Flame Central, the hub for all your Flame family links.
- Looking for the Release Notes for Flame Family 2021.1? Click here: Flame Family 2021 Release Notes.
Welcome Screen
Want to get only the highlights of the release? Let the Welcome Screen show you to the new features. It opens the first time you launch a Flame Family product.
Or access it anytime from .
For details on all the new features and enhancements in this release, follow these links:
- Action Selective
- Action/GMask Tracer
- Action/Image/GMask Tracer
- Image
- Compare Workflow
- Dolby Vision® Support
- Effects Environment
- Explorer
- MediaHub
- Media Export
- Media Import
- Media Panel
- Paint
- Player
- Python API
- Security
- Tangent Panels
- Timeline
Action Selective
You can now use Select Previous Selective and Select Next Selective keyboard shortcuts without first selecting a Selective node.
Action/GMask Tracer
A new FBX mode representing a generic human head is now available. Align it to a person's face and perform projection for skin clean-up and other tasks. Use
and then open PBS_TRIANGLES > HumanHeadGeneric.fbx.
Action/Image/GMask Tracer
Zoom changes. The mouse scroll wheel or the trackpad scroll now zooms the viewport instead of the camera. To zoom the camera, use Ctrl+Alt+Drag inside the viewport.
Setting Defaults
You can now set default values for the following settings for GMasks used in Action, Image and GMask Tracer:
- Softness
- Blur
- Auto Tangents
- Auto Adjust
- Equal Length
These defaults are set in the .
Widget transparency. You can now set a default value for the Transparency of the widgets displayed in Action viewports.
.
Image
To open or close the Priority editor in Image, you must now use the Priority button; bottom swipe no longer works.
Compare Workflow
Side-by-side compare everywhere. The Side By Side compare mode is now available in the Batch and the Effects environments. The
Select Side by Side Mode keyboard shortcut is also available for the keyboard and Tangent panels but is not assigned.
Cycle Compare. You can now cycle through the Compare modes:
- Pause/Break on CentOS
- F15 on macOS
Secondary track compares. You can now set the Secondary Track as the reference with the Compare with Secondary Track keyboard shortcut on a keyboard or a Tangent panel. The shortcut is not assigned.
Improvements to the Compare Mode in the Player
Grab references from the Player. You can now grab a reference from the Player from any compare mode. Use .
Compare to Grabbed References. You can now use grabbed references in the Player. Select a grabbed reference using .
Auto-resize reference. In any Compare mode, a reference automatically resizes to the resolution of the Primary Track. You set the resize method, resize algorithm, ratio option using .
Setting the Primary Track. You can now use the Reference box to set the Primary and Secondary tracks.
Split Mode Updates
Direct manipulation.You now manipulate the Horizontal, Vertical and Angle Split bar directly in the Player, using the same widgets as the one used in Batch and Effects. Because of this, the Position and Angle numeric fields have been removed.
Reset with a button.You can now reset the position and angle of the Angle Split mode using the
Reset button or the
Compare: Reset Split Pivot keyboard shortcut (unassigned).
Pivot from the corner.The pivot now defaults to the bottom left of the image in the Player.
Grabbed Reference Window
The following improvements have been made to the Grabbed Reference preview window:
-
Go to the previous or next grabbed reference by holding the
Shift
key and using the
Display Previous Grabbed Reference
and
Display Next Grabbed Reference keyboard shortcuts.
- The image displayed in the preview window is automatically selected as the current reference when the window is closed.
- The name of the reference is displayed at the bottom right of the window.
Using the keyboard shortcuts, switch between grabbed references.
To display the previous or next grabbed reference:
- Display Previous Grabbed Reference
- Display Next Grabbed Reference
To select and display the previous or next grabbed reference in the viewport:
- Select Previous Grabbed Reference
- Select Next Grabbed Reference
New Keyboard Shortcuts
Shortcuts have been added and modified in the Player and Effects tab.
Player-specific keyboard shortcuts
- Move Split Pivot keyboard shortcut is now available.
- Reset Split Pivot keyboard shortcut is now available.
- The shortcuts used to select a Compare mode are now available from the Player. They are not assigned a default keyboard shortcut.
- The shortcuts that control the settings of the Blend, Grid, and Difference compare modes are available from the Player.
- Primary Track and Secondary Track are no longer displayed when you cycle between compare modes using the keyboard shortcut for Compare: Cycle through Compare modes.
Effects
- Compare / Stereo : Select Compare Off: Now assigned to Print Screen (CentOS) or F13 (macOS)
- Compare: Toggle Angle Split Visibility: No longer available.
Dolby Vision® Support
Dolby Vision certified. Flame Family products have been certified by Dolby Laboratories as compatible with Dolby Vision.
If you created Dolby Vision content in the 2021 release, we recommend that you recreate the content in 2021.1. While re-exporting Dolby Vision XML should be enough, we recommend starting from scratch a Dolby Vision project started in 2021: some fixes could produce slightly different results.
Custom Displays. The Custom Displays feature available in the HDR Settings menu has been disabled due to a last minute defect.
Dolby Vision XML Import/Export Display names changes. When importing a Dolby Vision XML generated by an application using a legacy configuration file, Flame shows the Mastering and Target display names from the XML. In previous versions, the display names would revert back to the current configuration file names after a restart. Now the display names from the imported XML are preserved.
- The Dolby Vision XML exported from a sequence using the legacy names now shows uses the legacy names.
- If you create a new sequence, it correctly uses the display name from the current Dolby Vision configuration file.
In versions before version 1.3 of the Dolby Vision configuration files, the Mastering displays were named differently:
| Legacy Mastering Display Name | New Mastering Display Name |
|---|---|
| Dolby Pulsar,4000-nit,P3,D65,Full | 4000-nit, P3, D65, ST.2084, Full |
| Dolby Pulsar,4000-nit,Rec.2020,D65,Full | 4000-nit, BT.2020, D65, ST.2084, Full |
| Dolby PRM32HFD-QT,2000-nit,P3,D65,Full | 2000-nit, P3, D65, ST.2084, Full |
| Dolby PRM32HFD-QT,2000-nit,Rec.2020,D65,Full | 2000-nit, BT.2020, D65, ST.2084, Full |
| Sony BVMX300 1000-nit,P3/D65,ST.2084,Full | 1000-nit, P3, D65, ST.2084, Full |
| Sony BVMX300 1000-nit,Rec.2020,D65,ST.2084,Full | 1000-nit, BT.2020, D65, ST.2084, Full |
Effects Environment
Manage segment group content. You can now Add to Group and Remove from Group from the contextual menu without first selecting a segment in the Storyboard. In this case, the operation is applied to the segment under the cursor. If there is an active selection, the operation applies to all selected segments.
Drag FX from Explorer to Context. You can now drag a Timeline FX setup from the Explorer to a viewport showing a Context view. But this requires the following criteria to be met:
-
The viewport positioner is within the range of the currently selected segment.
-
The Context view shows the output of the track containing the currently selected segment.
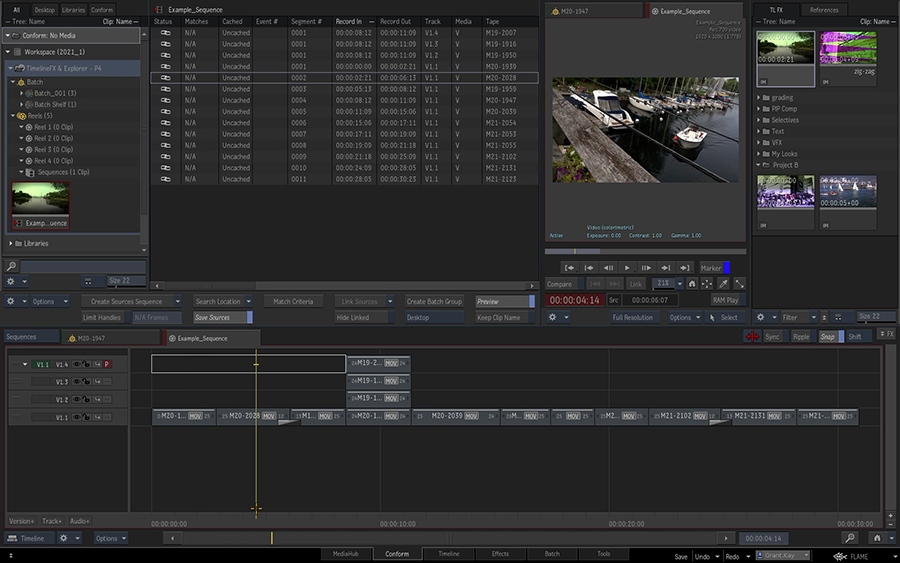
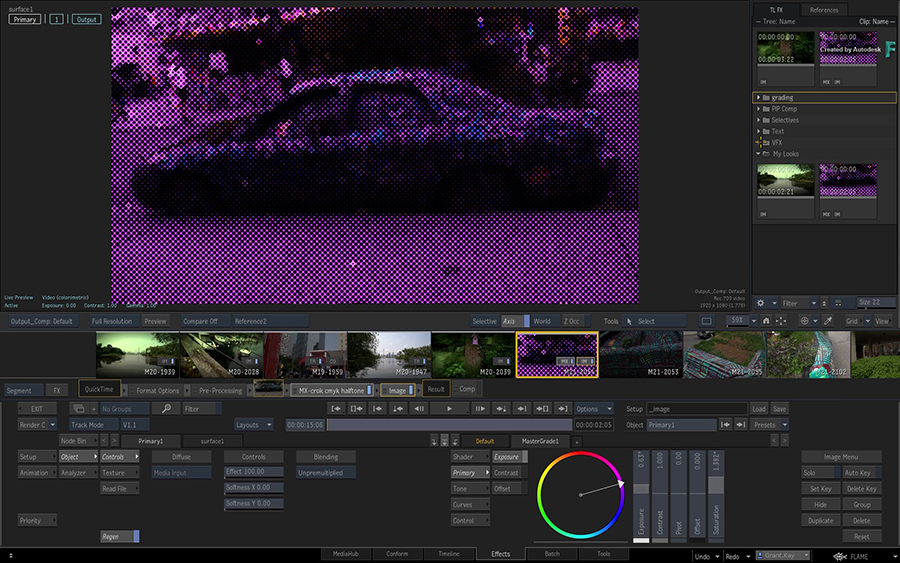
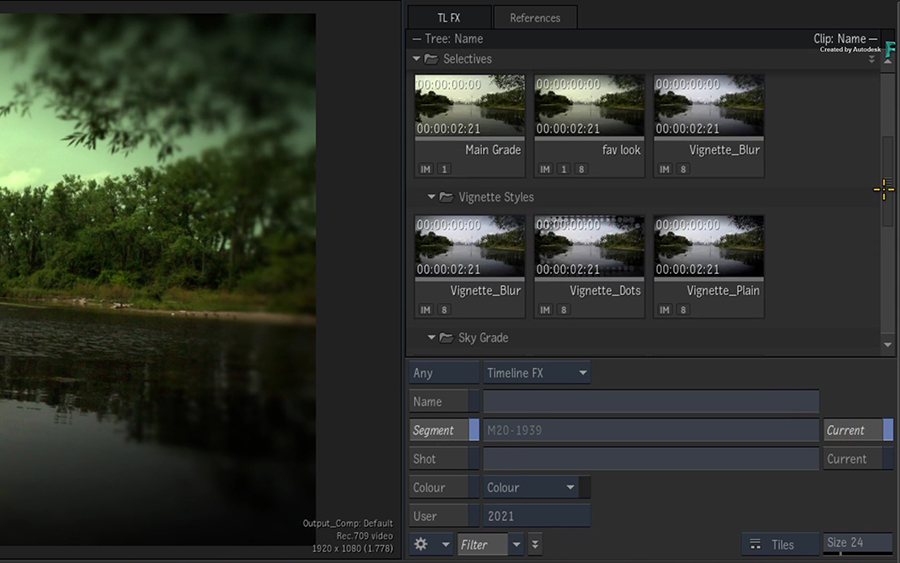
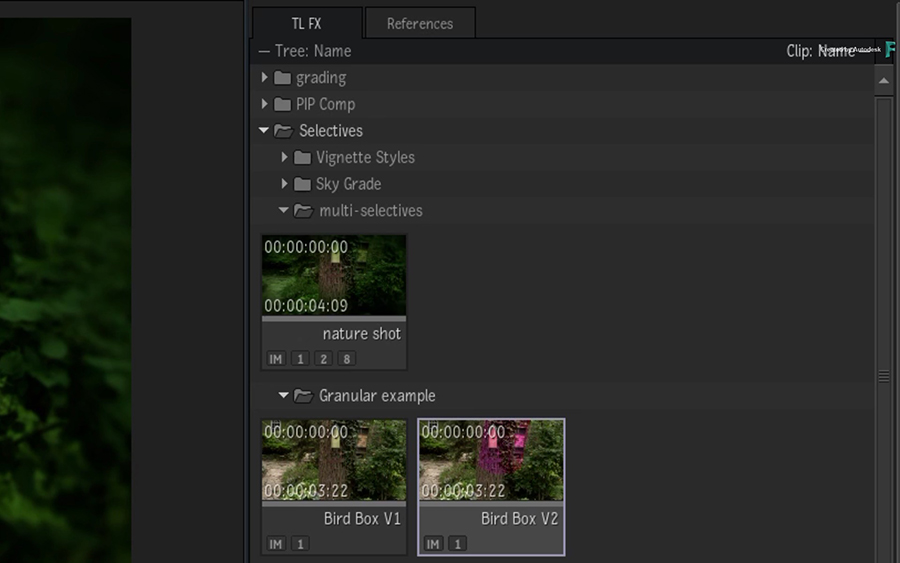
Explorer
|
|
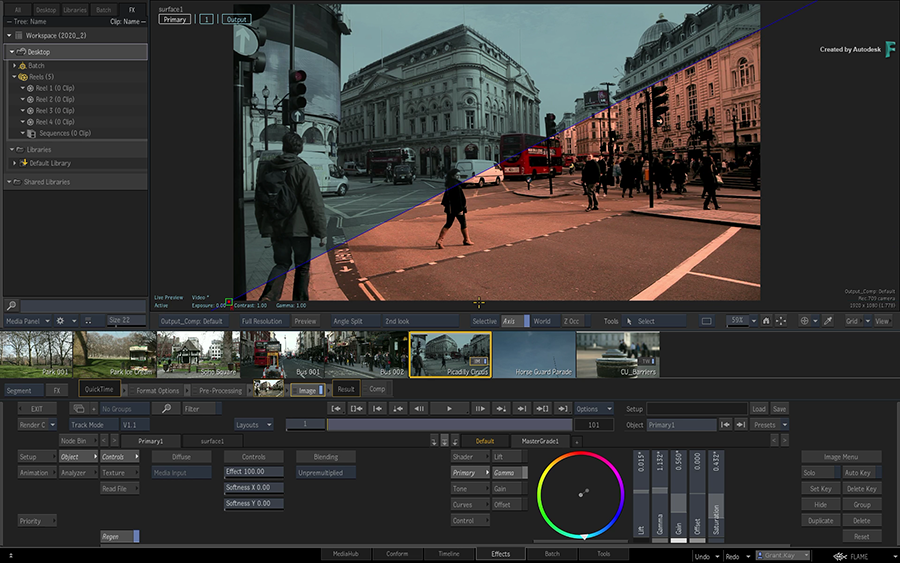
|
| Comparison workflow in context of the editorial Timeline
|
Comparison workflow in context of Grading and VFX
|
Explorer everywhere. You can now access and use the Explorer in every environment. As a result the following functions have been removed from the Media Panel:
- The TL FX Tab
- The Grabbed references Library
Because of space constraints, there are cases where the Explorer cannot be displayed:
- MediaHub: The Explorer is available only in the Projects and Archives tabs.
- Conform: On monitors with lower resolutions, the Explorer is not available when the Media Panel is full height and the Preview window is displayed. To display the Explorer, you can hide either one of them or not set the Media Panel to full height.
- Timeline or Tools: A Player panel (such as the Viewing settings or the Scopes) and the Explorer cannot be both displayed. Hide the Player panel to display the Explorer.
If you have a second monitor, you can display the on that second monitor instead and remove the above restrictions.
Matching selection. Selecting a grabbed reference using the Reference drop-down button also selects it in the References panel of the Explorer.
Selectives in Explorer
In the Effects tab, some of the Selective operations have been updated to improve consistency between the Selective Manager and drag & drop workflow.
Modifiers to use when you drag & drop a selective from the Explorer into the viewport or a segment:
- Replace Selective and Matchbox Shaders: Shift
- Replace Selective Only: Shift+Alt
- Replace Matchbox Shaders only: Shift+Command (macOS), Shift+Meta (Linux)
- Append a Selective with the Ctrl shortcut.
If you do not use the above shortcuts and a selective with the same ID already exists, a dialog window asks you for the operation to perform.
Load with a click. You can now load a Selective setup from the Explorer to the selected segments by double-clicking the Selective setup.
Explorer on a Second Monitor
You can now display the Explorer on a second monitor with . If the Media Panel is not displayed on the same monitor as the Explorer, then you can select where the Explorer appears on the screen.
You can now display simultaneously up to three different panels in the secondary monitor: the Media Panel, the Explorer and a Viewport. You can display all or just one using the Flame menu or the following keyboard shortcuts:
- Media Panel Show/Hide
- 2nd Monitor Viewport/Scopes Show/Hide. This shortcut is not assigned to a keystroke by default.
- Explorer Show/Hide
If you are in an environment other than Batch or Effects, the Scopes are displayed in the viewport by default. The Scopes viewport is always displayed in the middle when all three options are enabled at once.
MediaHub
In , you can now connect to a remote workstation on the Autodesk Network even if it cannot be detected through self-discovery:
- Right-click in the Autodesk Network list.
- Select Connect to...
- Enter the Host name or the IP address.
- Enter the Port.
You are now connected to the remote workstation and can browse its contents.
Media Export
Disabled handles. In the Sequence Options tab of the Export window, the Include Handles option is now disabled when you use the option .
Avid DNxHR Export Updates
Avid DNxHR in MXF. You can now export media as Avid DNxHR in an MXF container (OP-1a layout). The following movie export presets are now available:
- Avid Media Composer (MXF DNxHR 444 10-bit)
- Avid Media Composer (MXF DNxHR 444 12-bit)
- Avid Media Composer (MXF DNxHR HQ 8-bit)
- Avid Media Composer (MXF DNxHR HQX 10-bit)
- Avid Media Composer (MXF DNxHR HQX 12-bit)
- Avid Media Composer (MXF DNxHR LB 8-bit)
- Avid Media Composer (MXF DNxHR SQ 8-bit)
Source Media Export Presets
You can now create new media using the source attributes of the subclips of a sequence by using the new Source Media presets. These new presets are available when you perform a Sequence Publish.
The following Format Presets are available in
- DPX (10-bit)
- DPX (12-bit)
- DPX (16-bit)
- OpenEXR (16-bit fp)
- QuickTime (Apple ProRes 422 HQ)
- QuickTime (Apple ProRes 422)
- QuickTime (Apple ProRes 4444)
- QuickTime (Apple ProRes 4444 XQ)
- QuickTime (Avid DNxHR 4:4:4:4)
- QuickTime (Avid DNxHR High Quality)
- TIFF (16-bit)
The source attributes are: segment source name, source timecode, and reel name.
Media Import
Natural sorting. How multi-version clips are sorted has improved. When sorting by version in the context of pattern browsing, clips used to require padding to sort naturally. That is, versions 1, 9, and 45 would be sorted as 1, 45, 9 unless you added padding and renamed them 01, 09, 45. You no longer need to pad the version: versions 1, 9, and 45 will now be displayed in the expected order. You can still use padding.
Avid Media Files
You can now import Avid DNxUncompressed media in MXF files. DNxUncompressed is a high quality format used for finishing, and just like Avid DNxHR, DNxUncompressed is not resolution constrained. It is available in YCbCr and RGB format.
Supported YCbCr (4:2:2)
- 8-bit
- 10-bit
- 12-bit
Supported RGB (4:4:4)
- 8-bit
- 10-bit
- 12-bit
- 16-bit (seen as 32-bit fp in Flame Family products)
- 32-bit fp
Avid DNxUncompressed MXF Import Levels. When importing RGB floating point Avid DNxUncompressed MXF media files, Full range level is always used. But if you import RGB integer or YCbCr media files, you can select between Full or Legal range.
Colour space info for OP1a. Colour space information from Avid DNx files in an MXF container (OP1a) from Avid Media Composer is now is now supported.
Sony Media Files
On CentOS, the import pipeline now uses the GPU to decode SonyRAW / X-OCN, providing faster decoding and improved playback performance on all Flame Family products. MediaHub resizing and colour management also happens on the GPU.
SonyRAW / X-ONC content imported from previous releases via Project Conversion, MediaHub, or archive restore will be debayered by the GPU.
Format Option tab update:
- A new Debayering menu (was Resolution menu in previous releases)
- A new Use GPU / CPU option (GPU is the default option).
RED Media Files
RED media files support is updated and fixes some issues with Komodo clips. This update also includes a new colour decision list option for IPP2 colour science. This option allows you to disable the CDL.
When you set , the new CDL option appears in the Options Category box. From the CDL menu, you can select how to use the CDL:
- CDL Enabled: Apply the CDL metadata of the R3D/RMD sidecar file or when edited in the Format Options.
- CDL Disabled: Do not apply the CDL metadata of the R3D/RMD sidecar file or when edited in the Format Options.
- CDL As Per File: Use the CDL enabled/disabled status from R3D/RMD sidecar file to apply or not CDL metadata. This is the default option. You can always modify these parameters after importing the media with the Format Options in the Timeline FX pipeline.
Finally, the option Use Creative 3D LUT is now named Use 3D LUT to align with RED recommendations.
Media Panel
You can now resize the Media Panel in Batch.
Paint
The Toggle Hide Cursor Circle keyboard shortcut has been changed from Alt+C to Ctrl+Alt+C in the Smoke Classic user profile.
Player
To standardize keyboard shortcuts across environments, the Flame profile keyboard shortcuts used to select a Player or to open Player panels now match those in Batch and Effects.
| To Display | Old Shortcut | New Shortcut |
|---|---|---|
| Player | Ctrl+1 | Alt+1 |
| Source-Sequence | Ctrl+2 | Alt+2 |
| Triptych | Ctrl+3 | Alt+3 |
| Trim View | Ctrl+4 | Alt+4 |
| To Toggle | Old Shortcut | New Shortcut |
|---|---|---|
| Audio Desk Panel | Alt+2 | Ctrl+1 |
| Overlays Panel | Alt+3 | Ctrl+2 |
| Viewing Settings Panel | Alt+4 | Ctrl+3 |
| Markers Panel | Alt+5 | Ctrl+4 |
| Scopes Panel | Alt+6 | Ctrl+5 |
Python API
The Python API is augmented with additional attributes and properties in Action, Batch, and Project management.
For more information, see Python API documentation
Security
Wiretap server and Root access. In previous versions, a user logged in as root on a workstation could see his credential forwarded to the remote ifffs Wiretap sessions, giving it full root access on the remote machine without authentication.
This issue is now fixed. It is possible to get back the legacy behavior using the following option in the Wiretap server configuration file, located in /opt/Autodesk/wiretap/current/cfg:
- RootSquash=True (default value with the new behavior)
- RootSquash=False (legacy behavior)
The above option has to be manually added to an existing Wiretap configuration file. If that option is not present in the configuration file, then the new behaviour is the default one. Clean installs have this option set to True.
More detail in the Wiretap sample configuration file, /opt/Autodesk/wiretap/current/cfg_samples.
Tangent Panels
The following functions are now available to be mapped to your control panel using the Tangent Mapper:
- Player
- Show Primary Track with Compare Off
- Show Secondary Track with Compare Off
- Compare with Secondary Track
- Compare Off
All the Compare mode selection functions now work in the Player and Viewport:
- Effects
- Compare :Cycle through Compare modes
- Compare Off
- Compare Blend Mode
- Compare Grid Mode
- Compare Difference Mode
- Compare Vertical Split Mode
- Compare Horizontal Split Mode
- Compare Angle Split Mode
- Compare Side By Side Mode
- Player
- Compare Off
The Compare: Toggle Angle Split Visibility shortcut has been removed. It's location on the Tangent now performs the following:
- Viewing
- Reference Buffer: Split Bar Reset
Move Split Pivot is now available in both the Player and Viewport:
- Viewing
- Reference Buffer: Move Pivot
In the General section, Swipe Media Panel changes for Show / Hide Panels Using Swipe Bars.
Panels:
- 2nd Monitor / Viewport/Scopes Show Hide have been added
In the Action section, the following functions are renamed:
- Next Selective (was Next Active Selective in previous releases)
- Previous Selective (was Previous Active Selective in previous releases)
Timeline
Unlinked linked criterion. The
Is Unlinked criteria has been replaced in the Timeline Search.
- Enable Link to use the state of the link between media and its source as a criterion.
- Use Linked / Unlinked to search for segments with linked or unlinked media.
Virtual Source search. A Virtual Source criterion is now available in Timeline Search. Use it to search for segments that do not possess Source Timecode information.
Better naming. The clip created by copy-pasting a timeline segment in the Media Panel is now named after the timeline segment itself, and no longer after the sequence it comes from.
Track names in menu. The name of a Timeline track now appears in the drop-down buttons and contextual menus where you can select a track.
Shortcut change. The Close Gap keyboard shortcut changes from Ctrl+G to Space+G in the Smoke Classic user profile.