Lets you edit the animation of an object placed in the scene using the Object Placement Style Editor.
Specifically, you can use this panel to:
-
Apply acceleration or deceleration to an animated object.
-
Animate the horizontal offset; for example, to cause an animated vehicle to change lanes.
-
Animate the vertical offset of drive-through and fly-through cameras; for example, to adjust the height of a camera above a road or railway.
Open this panel from the Position Controller rollout by clicking the "E" (Edit Animation) button adjacent to any of the following placement parameters:

- Station Control
- Horiz[ontal] Offset
- Vert[ical] Offset
- Rotation
The Placed Object Animation Editor is a greatly simplified version of the standard 3ds Max Track View window. It is configured specifically to display only placement information relating to the currently selected object. When the current object selection changes, this panel closes automatically.
Interface
The Placed Object Animation Editor displays motion as a series of function curves on a graph. Motion in 3ds Max is defined by a series of animation keys, and 3ds Max automatically calculates interpolated values between each key to produce a completed animation.
The Placed Object Animation Editor interface consists of toolbars and a Key window. There is also a moveable time ruler.
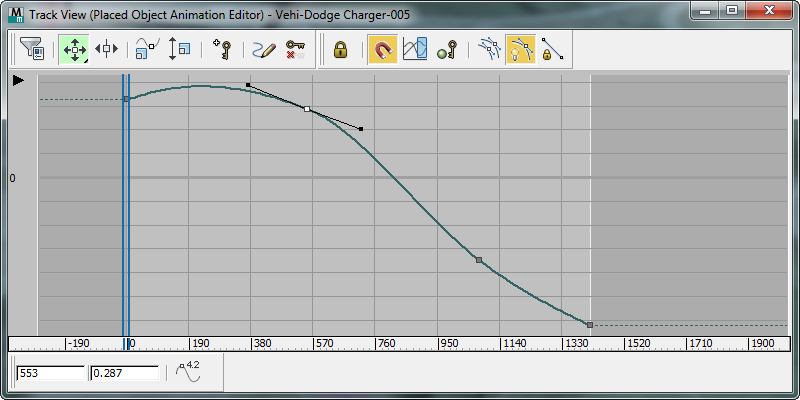
The Key (Curve) window
Each function curve displayed in this window represents the interpolated animation assigned to one of the four standard Civil View object-placement parameters:
- Station, expressed as a percentage distance along the parent shape between 0.0 and 1.0
- Horizontal Offset from the parent shape
- Vertical Offset from the parent shape or parent surface
- Rotation
Each square box along a curve represents a single animation key. You can moved, add, and remove keys, or adjust their tangents. Each modification to an animation key instantly affects the overall animation of the selected object.
Keys are displayed in gray unless you select them for editing. In this case, they are displayed in white.
The vertical axis of the graph represents one or more of the following parameters, depending on which function curves are currently displayed:
- Percentage distance along the parent shape
- Horizontal or vertical offset from the parent shape or surface
- Rotation
The horizontal scale represents the total number of frames available in the current visualization scene.
-
 [show hierarchy]
 - Click this arrow button to display the
Track View Hierarchy.
While the hierarchy is displayed, you can hide it again by clicking
 .
.
Keys toolbar
- Filters
-
 Click to open a dialog that lets you choose what to display in the Key window. See
Filters Dialog (Track View).
Click to open a dialog that lets you choose what to display in the Key window. See
Filters Dialog (Track View). - Move Keys flyout
-
-
 Move Keys Moves keys freely both horizontally and vertically.
-
 Move Keys Horizontal Moves keys only horizontally.
-
 Move Keys Vertical Moves keys only vertically.
-
-
 Slide Keys
 - Click to move keys horizontally and slide adjacent keys away.
-
 Scale Keys
 - Click to compress or expand the amount of time between selected keys.
-
 Scale Values
 - Click to increase or decrease the value of the selected keys.
-
 Add Keys
 - Click to add keys to existing curves.
-
 Draw Curves
 - Click to draw a new curve or revise an existing one by sketching directly on the key graph.
-
 Simplify Curve
 - Click to simplify a curve by reducing the number of keys on it.
Key Tangents toolbar
-
 Set Tangents to Auto
 - Sets highlighted keys to automatic tangents, as calculated by the shape of the curve around the key.
Moving the handles of an Auto tangent changes the tangent type to Spline, and makes them available for editing.
-
 Set Tangents to Spline
 - Sets highlighted keys to spline tangents. With spline tangents, you can adjust the slope by moving the key handles. To break continuity between the incoming and outgoing tangents, hold down Shift while moving the handles.
-
 Set Tangents to Fast
 - Sets highlighted key tangents to fast in, fast out.
-
 Set Tangents to Slow
 - Sets highighted key tangents to slow in, slow out.
-
 Set Tangents to Stepped
 - Sets highlighted key tangents to step in, step out.
Use step to freeze motion from one key to the next.
-
 Set Tangents to Linear
 - Sets highlighted key tangents to linear in, linear out.
-
 Set Tangents to Smooth
 - Sets highlighted key tangents to smooth.
Use smooth tangents to even up discontinuous motion.
Curves toolbar
-
 Lock Selection
 - Locks the current key selection. Once you have created a selection, turn this on to prevent something else from being inadvertently selected.
-
 Snap Frames
 - Restricts key movement to frames. Keys that are moved will always snap to frames when this is on. When this is off, you can move a key so it falls between frames and becomes a sub-frame key.
-
 Parameter Curve Out-of-Range Types
 - Use this to repeat keyframed motion beyond the range of the keys. Includes options for Loop, Ping Pong, Cycle, or Repeat relatively, as well as constant and linear. If you use Parameter Out-of-Range types, you can later create keys using Track View
 Utilities Create Out-of-Range Keys. See
Parameter Curve Out-of-Range Types.
Utilities Create Out-of-Range Keys. See
Parameter Curve Out-of-Range Types. -
 Show Keyable Icons
 - Displays an icon that defines a track as keyable or not.
-
 View All Tangents
 - Hides or displays all tangent handles on the curves. Use this to hide the handles quickly when many keys are selected.
-
 Show Tangents
 - Hides or displays tangent handles on the curves. Use this to hide the handles on individual curves.
-
 Lock Tangents
 - Locks the selection of multiple tangent handles, so you can then manipulate several handles at once. When Lock Tangents is off, you can manipulate only one key tangency at a time.
Key Stats toolbar
When you select a single animation key, you can use this toolbar to accurately manipulate the position of the selected key by typing in new values here.
- Key Time
- Shows the frame number of the selected key. You can edit this value.
- Key Value
- Shows the value of the selected key. You can edit this value.
-
 Show Selected Key Stats
 - When on, the Key window displays detailed statistics for the selected key.
Navigation toolbar
-
 Pan
Pan - Pans the Key window.
See Pan (Track View).
-
 Frame Horizontal Extents
 - Adjust the Key window so all the active time segment is visible.
-
 Frame Value Extents
 - Adjusts the Key window so the full height of curves is visible.
See Frame Value Extents.
-
 Zoom
Zoom - Zooms the Key window.
-
 Zoom Region
 - Zooms to a rectangular area of the Key window.
-
 Isolate Curve
 - Temporarily isolates a single curve.
See Isolate Curve.