Provides controls for rail objects.
Rail geometry is swept along the path of a parent shape. Changes to the geometry of the parent shape are then dynamically and automatically reflected in the geometry of the resulting rail object.

Rail objects consist of the following geometric components:
-
Post
-
Brace
-
Rail
Each of these elements is optional, and you can assign each an independent material channel.
You can store Rail object definitions as Rail Object Styles for use at a later time, and you can use them as part of a Feature Interpretation Style to apply rail objects to imported shapes automatically.
You can create Rail objects individually by selecting the desired parent shape and using the pop-up menu on the Object List rollout. Alternatively, you can develop rail object styles to generate a range of rail types to be applied to many shapes in a single operation. To do so, use the Rail Object Style Editor.
This feature was created to model highway guard rails, but it works equally well for modeling railway tracks, walls, sound barriers, and fences.
Common Settings
These controls appear on all four tabs.
Rail Object Styles group
You can save or recall predefined rail object styles.
-
 Open Style
 - Click to open a predefined Rail Object Style (ROS file).
-
 Save Style
 - Click to save the current rail settings into a Rail Object Style.
-
 Reset
Reset - Click to revert the settings on this panel back to settings stored in the current Rail Object Style. This undoes any manual changes to the panel controls.
- [file name]
- Shows the name of the current Rail Object Style (ROS file).
Parameter Instancing group
Allows the parameters of a collection of objects of the same basic type to be shared or instanced.
See Parameter Instancing for further details.
General Parameters Tab
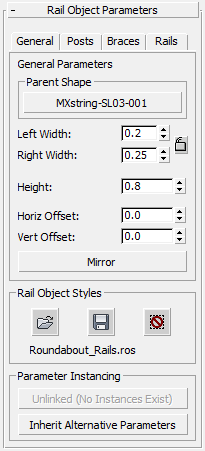
- Parent Shape
- Displays the parent shape object to which the rail object style is currently applied. To change the parent shape, click this button then select a new parent shape object in a viewport.
- Left Width / Right Width
- Set the horizontal offset from the center of the rail object for the left and right rails. These width parameters may be locked or completely independent by changing the Lock Width option.
-
 [Lock Width] When on, locks the Left and Right Width values so they are always equal.
-
- Height
- Sets the overall height of the rail object from the base (normally ground level) to the center of the brace.
- Horiz[ontal] Offset / Vert[ical] Offset
- Set the horizontal and vertical offsets of the rail object from the parent shape object.
- Mirror
- Click to invert the horizontal width and offset values. This is a useful way to convert a left-handed rail object to a right-handed version, and vice versa.
Affects the following parameters: Horizontal Offset, Left Width, Right Width, Left On, and Right On (see Rail Parameters Tab).
Post Parameters Tab

- On
- When on, the rail uses post geometry. When off, the rail has no posts.
- Flip Post
- Click to flip the post section laterally. This can be useful when using Z-profile posts with a guard rail.
- Post Section Style drop-down list
- Choose the profile of the post, which can be either Rectangular or Z Section.
- Dim[ension]s: X / Y
- Set the X and Y dimensions of each individual post.
- Post Spacing
- Sets the spacing between adjacent posts.
- Ground Depth
- Sets the depth of the post below ground level.
- Post Material Channel drop-down list
- Choose the material channel from the CivilViewRails material to apply to the post geometry.
- Cap Top
- When on, Civil View places a geometric cap on the top of the post.
- Cap Bottom
- When on, Civil View places a geometric cap on the bottom of the post.
Brace Parameters Tab
The brace is the horizontal link between the two rail elements.

- On
- When on, the rail uses braces. When off, the rail has no braces.
- Brace Section Style drop-down list
- Choose the section style of the brace, which can be either Rectangular or I Section.
- Brace Depth (x) / Brace Height (y)
- Set the horizontal and vertical dimensions of the brace.
- Brace Gap
- Sets the gap between the outer edge of the brace and the outside face of the rail. You can use this to make sure that the brace geometry is not visible through the outer face of the rails.
- Brace Material Channel drop-down list
- Choose the material channel from the CivilViewRails material to apply to the brace geometry.
Rail Parameters Tab

- Left On / Right On
- When on, the rail object includes a left rail or a right rail. When off, the corresponding rail does not appear.
- Rail Section Style drop-down list
-
Chooses the type of rail:
- Type 0: Flanged Vertical Section A "[" profile rail with a flange
- Type 1: Simple Vertical Section A simple vertical rail section
- Type 2: Railway Section An "n" profile rail section (suitable for use in railway modelling)
- Type 3: W Section A "W" profile rail profile
- Type 4: W Section (Smooth) A "W" profile rail profile with smoothing applied.
- Type 5: Vertical Fence Panel Fence panel profile
- Basic Rail Depth
- Sets the depth of rail geometry.
- Flange Depth / Flange Offset
- Set the dimensions of the flange (if the active style has one).
- Rail Material Channel
- Choose the material channel from the CivilViewRails material to apply to the rail geometry.
- UV Mat[erial] Repeat
- Sets the number of times the sub-material is repeated along each rail segment.