The Placed Object Manager panel controls the position parameters of multiple placed objects.
The panel provides a full overview of all objects placed into the current scene from the Civil View Object Placement Style Editor. This panel allows you to:
- Collectively update position parameters for any combination of objects.
For example, you can change the horizontal offset of all lamp columns in a single operation.
- Sort the list in ascending or descending order based on the contents of any column by clicking any column header.
- Filter the contents of the object list based on an individual parent shape, parent surface, object category, or object name mask.
- Limit the total number of objects listed for complex scenes.
The default is 1000 objects. The status bar on this panel shows the total number of objects in the scene and the number of objects listed.
- Clone any selection of placed objects from one parent shape to another.
- Access Quick Animation Tools to apply, remove, scale, or reverse animation to any selection of placed objects.
- Randomize the horizontal offset of any selection of animated vehicles.
You can set minimum and maximum values to prevent vehicles from always driving exactly in the center of each driving lane.
- Bake the animation currently applied to any selection of placed objects.
Procedures
To apply a filter to the object list in this panel:
- Select the basic criteria on which you wish to apply a filter.
- Click
 to initialize the filter criterion.
 - Edit the filter string; for example, to use wildcards with an object name.
- Click Apply Filter.
To remove a filter:
- Click Remove Filter.
Interface

[menu bar]
- File menu
-
- Export to OPS Style Opens a file dialog that lets you save the selected object styles in an Object Placement Style (OPS) file.
- Export to TXT File Opens a file dialog that lets you save the selected object styles in an ASCII text file.
- Edit menu
-
- Delete Deletes the selected objects.
- Select All Selects all objects in the list.
- Select None Deselects all objects in the list.
- Select Invert Inverts the current selection.
- Properties Opens the 3ds Max Object Properties dialog to show the properties of the selected objects.
- View menu
-
- Refresh Refreshes the contents of the list.
- Unsorted (Scene Order) Displays objects in the list in scene order. (Clicking a column heading lists contents in ascending or descending alphabetical order. By default the order is ascending alphabetical.)
- Help menu
-
- Help Opens the help to this page.
List Filtering Options
Filters the object list so you can focus on the objects that you wish to edit.
- Display Filter By drop-down list
- Chooses the criterion used to sort the list:
-
Object Name
Lists only the placed objects that match the object name mask.
-
Civil View Object Category
Lists only objects in the Vehicles, Furniture, Trees, Signs, Cameras, or Primitives object categories.
-
Parent Shape
Lists only objects that are dependent on a specific parent shape.
-
Parent Surface
Lists only objects that are dependent on a specific parent surface.
-
Object Name
-
[initialize mask string]
- Opens a small dialog that lets you choose an object name to use as the initial mask string.
Typically, you will edit the initial string to include wildcard characters so it filters a group of related objects.
- [mask string field]
- Enter the string used to filter objects in the list. Typically this string includes wildcard characters. Default="*" (everything).
- Apply String
- Click to filter the list using the mask string.
- Remove Filter
- Click to remove the filter and display all objects in the list.
Clicking this button does not reset the mask string.
Edit Selected Objects group
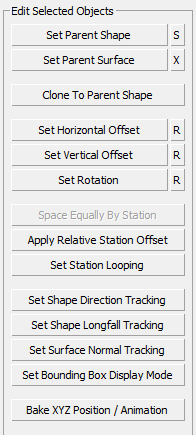
Controls in this group edit the settings of objects selected in the main object list.
- Set Parent Shape
- The position of an object is specified by the path of its parent shape. Click Set Parent Shape to change the parent shape, then select the new shape in a viewport. The objects move to a new position based on the new parent.
-
"S" button Click to change the spline index of the placed object, relative to the parent shape.

-
"S" button Click to change the spline index of the placed object, relative to the parent shape.
- Set Parent Surface
- Click this button to assign a parent surface to the selected objects, then select the surface in a viewport.
As well as following the path of a shape, objects can also track surface terrain. This effectively overrides the basic Z value (or object height) derived from the parent shape. This ensures that objects always sit perfectly on a ground surface, but use this feature sparingly: It can have a severe effect on the performance of 3ds Max, particularly with animated objects.
- "X" button Click to remove the parent surface assignment.
- Clone To Parent Shape
- Click to clone a selection of objects to another parent shape, then select the new parent shape in a viewport.
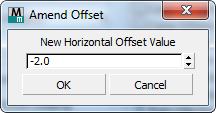
- Set Horizontal Offset / Set Vertical Offset / Set Rotation
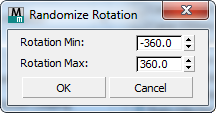
- Use these buttons to assign a new constant horizontal or vertical offset or rotation value to the selected objects.
-
"R" button Click to apply random offset or rotation values.
Civil View prompts you to enter minimum and maximum values so the randomization occurs within limits.
-
"R" button Click to apply random offset or rotation values.
- Space Equally By Station
- Click to space the selected objects equally along their parent shape.
The selected objects become equally spaced between the objects in the selection that are currently nearest to the start and end of the parent shape.
This button is disabled if two objects or fewer are selected.
- Apply Relative Station Offset
- Click to offset the position of the selected objects, relative to their parent shape, by a constant value.
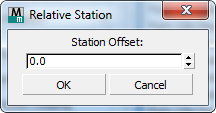
For example, to move a series of lamp columns 5 meters closer to the beginning of the parent shape, enter a value of –5.0.
- Set Station Looping
- Click to enable or disable station looping for the selected objects.
 Station looping forces animated objects to return to the start of their parent shape when they reach the end of an animation sequence.Tip: The default station looping setting is on the Civil View Preferences panel.
 - Set Shape Direction Tracking
- Click to enable or disable shape direction tracking for the selected objects.
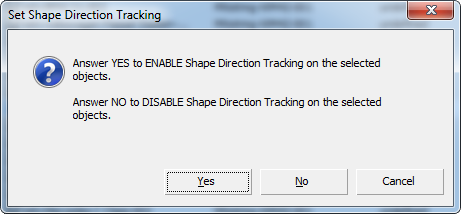
When shape direction tracking is on, an object rotates about its insertion point to follow the tangent of the parent shape.
- Set Shape Longfall Tracking
- Click to enable or disable shape longfall tracking for the selected objects.
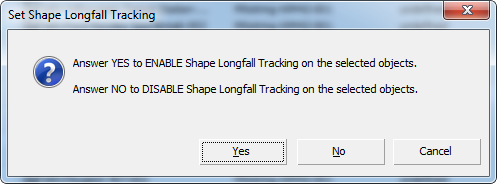
When shape longfall tracking is on, an object tilts about its insertion point to take account of the vertical slope of the parent shape. When longfall tracking is off, the object always remains horizontal.
This parameter is ignored if Surface Normal Tracking is on (see below).
- Set Surface Normal Tracking
- Click to enable or disable surface normal tracking for the selected objects.

When surface normal tracking is on, an object tilts about its insertion point to match the overall slope of the underlying surface.
This parameter is ignored if the object has no parent surface specified.
- Set Bounding Box Display Mode
- Click to enable or disable bounding box display for the selected objects.

Bounding box display can improve viewport performance.
- Bake XYZ Position / Animation
-
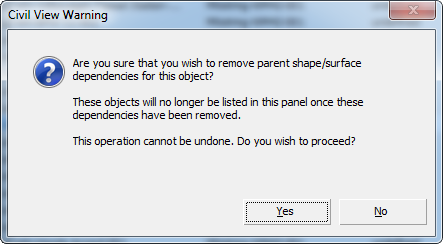
Click to remove the standard Civil View position controller from the selected objects. Objects are baked into their XYZ location; or if they are animated, the animation becomes keyframed.
Baking animation can dramatically improve the performance of playing back animation in the 3ds Max viewports; on the other hand, you lose all parent shape/surface dependencies, so subsequenly changing the shape or surface does not update the position or animation of the baked objects. In addition, this operation cannot be undone. When you click this button, Civil View displays a warning to this effect:
[object list]
Lists objects in the scene. You can filter the list to show only certain objects.
Click an object in the list to select it. To select multiple objects, use Ctrl+click; use Shift+click to select contiguous entries.
Clicking a column heading lists contents in ascending or descending alphabetical order. By default the order is ascending alphabetical.
Animated parameters are shown in red.