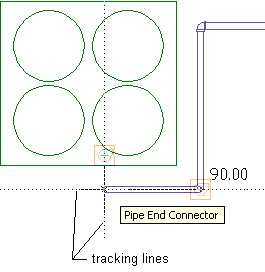
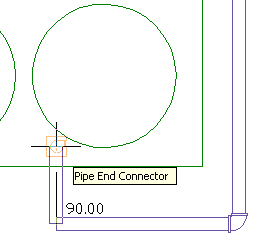
You can connect a pipe run to an MvPart. If so, check the connection type and size on the MvPart so that you can specify your routing preference and pipe size accordingly. You can also manually specify a part to connect a run to an MvPart.
To connect a pipe run to an MvPart
- Add pipe, as explained in Creating a Piping System.
- Begin laying out the pipe run.
- As your pipe run approaches the MvPart that you want to connect to, click
 (Object Snap Tracking) on the application status bar to line up your pipe run with the desired connection on the MvPart.
Using tracking to align a pipe run with a pipe connection on a chiller
- Move the cursor over the MvPart connection to display the pipe end connector.

- Click the pipe end connector to connect the pipe run to the MvPart. Tip: You might be prompted to accept or undo the connection.
If the pipe segment centerline is not aligned with the MvPart connector centerline, the software automatically presents routing solutions you can preview and use.
- If the size or connection type of the pipe segment does not match the size or connection type of the MvPart, specify the fittings to use to make the connection:
If… then… the pipe size differs from the MvPart connection size a transition fitting is automatically inserted. Accept the connection. If a transition is not specified in the routing preference, the Choose a Part dialog box prompts you to specify the transition. the pipe connection type differs from the MvPart connection type the Choose a Part dialog box prompts you to specify the fittings for this connection. you want to use a fitting in the part catalog that is not configured in the routing preference specify the fitting on the Properties palette, and insert it at the end of the pipe run. For more information, see Overriding a Default Part. Once the fitting is inserted, you might need to move the fitting to connect the pipe run with the MvPart.