Geometry Import Settings
Depending on the type of import, some of the options differ. See below for specific FBX and Alembic import settings.
- Import Type box
- Select the 3D model type to import.
- File Extension field
- Displays the default extension for the file type selected in the Import Type box.
- Smooth button
- Enable to build normals for the 3D model. Enable if you are importing polygons that do not have normals.
- Auto Fit In Scene button
- Enable to scale the imported model to fit into the current frame. When disabled, the imported model maintains the same size in which it was created.
- SVG DPI field
- Displays the desired dots per inch for coordinates in the imported SVG file. Used if the SVG file uses real-world units (for example inch, cm, or mm); has no effect if the SVG is in pixel units. Editable.
- Separate Nodes button
- Enable to create individual nodes for all 3D models contained in a file. When disabled, the 3D model is added to the scene with its own axis.
- Rotate Axis button
- Enable to rotate the 3D model by 90 degrees on the X-axis so that it is compatible with the target's coordinate system.
- Create Media button
- Enable to load the textures of the geometry to the Media list. If a texture is used in multiple geometry maps, it is loaded only once in the Media list. Not available if Action is accessed as a Timeline FX.
FBX and Alembic Import Settings
- Import Type box
- Select an import type for the FBX or Alembic model. Select Read File to create an FBX or Alembic Scene node, similar to a soft-imported Group node. Select Action Objects to create local copies of the FBX or Alembic files (similar to a hard import).
- Auto Fit In Scene button
- Enable to scale the imported model to fit into the current frame. When disabled, the imported model maintains the same size in which it was created, or you can use the Scene Units to Pixels field to manually set a scaling factor.
- Scene Units to Pixels field
- Displays the scaling factor used on the imported FBX file to fit the scaling used in the application. One unit in the FBX file (default is cm) is converted to the number of pixels (default is 10) that you specify.
- Models button
- Enable to import the geometry from the file.
- Lights button
- Enable to import lights from the file.
- Cameras button
- Enable to import cameras from the file. Free cameras are imported as target cameras (with a point of interest).
- Mesh Animations button
- Enable to import the scene animations and preserve complex geometry animations , such as nCloth animations.
- Normals button
- Enable to import the model's normal information.
FBX Specific Options
- Keep FBX Frame Rate button
- Enable to use the frame rate of the FBX file as the frame rate in Action. It might be useful to enable Keep FBX Frame Rate when importing an FBX file before starting to build your animation, otherwise the timing of your animation may be affected.
- Bake FBX Animation button
- Enable to add a keyframe at every frame of the imported FBX file. When disabled, Action translates the FBX keyframes to a comparable animation curve for comparable channels.
- Import As Action Object button
- Enable to import Action objects embedded in an FBX file, that had been previously exported from Action. For example, an exported FBX with extended bicubic data remembers this upon re-import, and creates the Extended Bicubic surface, in addition to the Geometry.
- Create Media button
- Enable to load the textures of the geometry to the Media list. If a texture is used in multiple geometry maps, it is loaded only once in the Media list. Not available if Action is accessed as a Timeline FX.
Alembic Specific Options
- Frame Rate box
- Select the frame rate of the imported Alembic file.
- Consolidate Geometry button
- Enable to create a single, consolidated, geometry. Any defined Alembic Face Sets is translated as an object group nodes, allowing you to define material properties. However, you lose access to the axis and individual geometry nodes. Significantly improves performances.
- Create Object Group button
- Enable to create one object group per geometry in the Alembic file. Enable this option if you need to change only the materials, and not the position of the geometries. If the Alembic file uses Face Sets, there is no need to also enable Create Object Group since there will be no additional performance gains.
Colour Management Settings
When importing 3D models in FBX or 3DStudio formats, and Photoshop PSD files, there are colour management settings that appear. See Colour Management in Action for more information.
Timing Settings
If the 3D model has animation, you can find settings in the Timing tab of the Geometry menu.
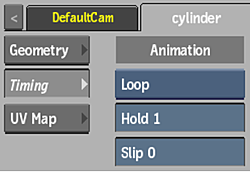
- Animation Mode box
- Select the animation mode to use for multiple 3D geometries imported into a single animated geometry node.
Select: To: Loop Play in a continuous loop. Once Play once. The 3D geometry is no longer displayed. Last Still Play once, and hold the last frame. Timing Animate according to the timing in the animation channel.
- Hold field
- Displays the number of continuous frames for Loop, Once, or Last Still Animation modes. Editable.
- Slip field
- Displays the offset to the start point for Loop, Once, or Last Still Animation modes. Editable.
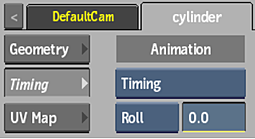
- Timing Range option box
- Select an option to determine how Frame Timing values outside the timing range of the animation are handled. Available when Timing is selected in the Animation Mode box.
Select: To: Roll Roll over the Frame Timing value. Cut (Geometry is not displayed.) Round Display the first or last geometry (with this option, you can select the first and the last geometry of your animation).
- Frame Timing field
- Displays the value for the frame in the timing curve. Available when Timing is selected in the Animation Mode box. Editable.
For Alembic models or FBX models with cache animation, these Timing settings are available:
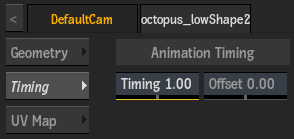
- Timing field
- Displays the scale of the geometry animation. Editable.
- Offset field
- Displays the offset applied to the animation curve. Editable.