If the initial camera track analysis does not give desired results, you can use some or all of the Fine Tuning options to update and refine your track analysis. These procedures are not necessarily required, but depending on your image and the initial tracking, may give better tracking results.
Defining Real World Measurements
You can use the Real World Measures settings to select two points in your analyzed scene, and enter a measurement that represents the distance between the two points. Establishing real world units is helpful when exporting the point cloud through the 3D camera for use in a 3D application.

To define real world units in your analyzed scene:
- In the Real World Measures section of the Fine Tuning tab, enable Define.
- Select a point in the image, then press Alt and select a second point.
A red line is drawn between the two points.
- Disable Define.
- In the Length field, enter a measurement of the length between the two points, in the unit of your choice (centimeters, inches, etc.). The Action scene scales to the distance you enter.
If you export the point cloud through the 3D camera, you'll be able to specify the unit of measurement in the Export Camera menu.
Setting the Orientation
Although it is not mandatory to define a ground plane in your image, it helps orient the reconstruction of the cameras.
To define the camera track ground plane:
- In the Plane section, enable Define.
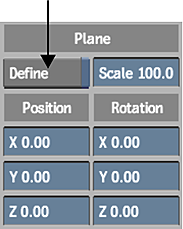 Note: If you selected Pan and Tilt as the camera type (or if the Auto Detect switched to Pan and Tilt) the Plane Define button is not available. The rest of the settings in this group are still available, but only for orientation purposes.
 - Select a minimum of three points in the image that represent the plane of the X/Z axes, such as the ground, a table, or any flat surface.
The selected points appear as red squares with white crosses.
Tip: You may want to disable the tracker temporarily and point display options (or raise the transparency level) to help you find and select the plane points. - Use the Position and Rotation controls to define the orientation of the ground plane.
- Use the Scale field to specify the scale of the scene.
- Disable Define.
Filtering Trackers to Fine Tune the Track Analysis
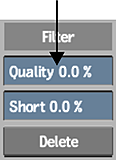
Use the Filter settings to delete lower quality trackers.
To fine-tune the track analysis:
- Use the Quality slider to adjust the number of good trackers kept. The higher the quality setting, more low quality trackers are selected, such as trackers that drift off their initial reference point. Click Delete to delete the selected trackers.
Trackers of lower quality may hinder the accuracy of the camera tracking.
Note: After you have made a change that requires the 3D tracking analysis to be refined or updated, notice that the LED next to the Refine and Update buttons turns yellow. This signifies that a Refine or Update is required, but you do not have to perform it until you have completed your tracker selections. - Adjust the Short slider to select short duration trackers, that is, trackers that only track a feature for a few frames. Click Delete to delete the selected trackers, leaving the longer duration trackers intact.
- You can manually select and delete trackers from the image that you feel are not tracking properly. Do one of the following:
- To select an individual tracker, click the tracker, and then click Delete.
- To select multiple trackers in the same area, Ctrl-drag a selection box over a series of trackers, and then click Delete.
- With Delete mode selected in the Tools box, select trackers in the image.
Refining or Updating the Track
Once you are satisfied with your fine tuning changes, you can refine or update your Analyzer.
To refine or update the 3D track:
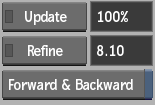
- Depending on the changes you have made, you can choose to refine or update the 3D track. Do one or both of the following:
- Click Update.
- Click Refine.
The track analysis uses the current results as a starting point, and refines from this point.
Note: The update operation deletes all previous 3D points and starts over based on the new information. Depending on your footage, and how many trackers you added, deleted, or linked, multiple updates may yield different results.
Click Refine again to stop the process once an acceptable pixel error value is reached. The pixel error value is a representation of the distance of the 2D tracks from the computed 3D points.