What's New: 2020
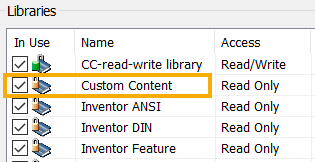
IMPORTANT: Before you begin To use the End Caps command, the Inventor Custom library must be installed and selected for use in the active project.
- Install the Inventor Custom library.
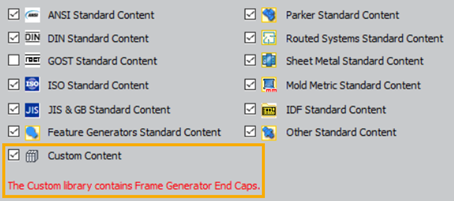
- After install, select for use in the active project in the Configure Libraries:
Project name dialog box.
- Finally, set the File Naming Defaults for End Cap, and then open an assembly file that contains frame members.
To Install and Add the Inventor Custom Library to the Active Project
See Support Article for more details
Create and Position End Caps
-
 On the ribbon, click
Design tab
On the ribbon, click
Design tab  Frame panel
Insert End Cap.
Frame panel
Insert End Cap.
- Optionally:
- Expand the Advanced Settings Menu in the upper right corner of the panel. Note the checked defaults and make any required changes to the settings.
- Select a saved Preset to configure the end caps.
- Select the faces of the members to receive end caps.
- After you select member faces, use the display controls to set the zoom and view orientation.
 Zooms and sets the view perpendicular to the frame manipulator.
 Zooms to the frame manipulator.
 Returns the display to the initial view.
- Set the Behavior options:

- Specify the Placement position.
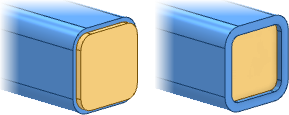
- Specify the Profile:
- Filleted Corners
- Chamfered Corners
- Sharp Corners
- Set the plate Thickness.
- Set the Offset type and distance or ratio.
- Optionally, set the following Part Properties:
- Material
- Appearance
- Specify the Placement position.
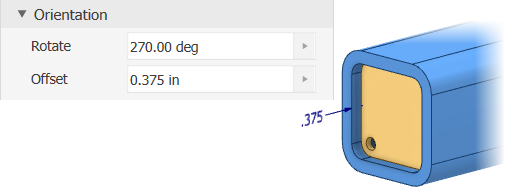
- Specify the Orientation.
- Set the Rotate value. For example, to locate an end cap feature such as a drain hole in the correct location.
- Set the Offset value. This specifies the distance between the selected face and the End Cap.
- Click Apply to insert End Caps using current settings or click OK to insert and finish.
- In the Frame Member Naming dialog, set the file Display Name, the File Name and location, and then click OK.
Note: See
Author Custom End Caps to learn how to add an end cap with features like a drain hole to the library.
Edit or Reuse End Caps
To edit an End Cap:
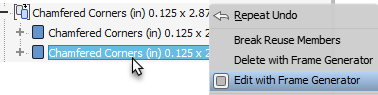
- Locate the feature in the browser and expand to view the instances.
- Right-click a member and select Edit with Frame Generator.
- Use the selections in the property panel to make the desired modifications.
- Click OK to accept your changes.
To reuse an End Cap:
- Locate the feature in the browser and expand to view the instances.
- Right-click a member and select Edit with Frame Generator.
- In the display, pick the frame member faces to receive new instances of the End Cap.
- Click OK to create the new instances.