Tracks are what you arrange along the Time View and are the background on which you add and sequence clips in the Time Editor. A track can host clips and Group clips.
Tip: You can customize the default color of clips and tracks in the
Color Settings
Preferences. See
Change user interface colors.
Common track operations
- Create tracks
-
- Select Tracks > Animation Track/Audio Track from the Time Editor menubar.
- Right-click in the Roster or the Time View and select Create Animation Track/Create Audio Track from the Time Editor Track contextual menu.
- (Audio tracks only) Drag an audio file into an empty area in the Time View or in-between existing tracks.
- Delete tracks
- To remove tracks from the Time Editor, select (or Shift-select multiple tracks) a track and select Delete Track from the Track contextual menu (or press Delete).
- Rename tracks
- You can rename a Time Editor track by selecting a track in the Roster and then selecting Rename Track in the Attribute Editor. See Time Editor in the Attribute Editor.
- Multi-select tracks
- To select more than one track Shift-select to select multiple tracks at once. You can key multiple tracks at once, as long as the tracks are selected in the Roster. SeeKeying animation in the Time Editor,
 Note: You can select tracks or clips but never both at the same time.
 - Rearrange tracks
- Select a track in the Roster, right-click it, and choose Move Selected Tracks Up/Down from the Track contextual menu.
-
- Show track keys
- You can display the keyframes set on clips on a track.
- Click the corresponding track's Show Keys
 icon in the
Time Editor Roster Controls.
icon in the
Time Editor Roster Controls.
-
- The keys appear as lines on the clip. See Keying animation in the Time Editor.
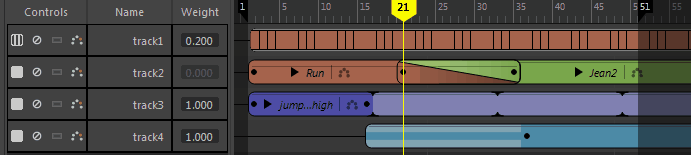
- Mute tracks
- Mute
 lets you disable a track temporarily to prevent it from playing back. When a track is muted, it is darker in the Time View and the Mute button turns red.
-
-
To mute a track:
- Click the corresponding track's Mute icon
in the Roster or right-click a track and choose
Mute.
- To mute multiple tracks, Shift-select them and click the Mute icon.
Note: To temporarily disable the Time Editor completely (not just a single track) so you can create new animation, see Mute the Time Editor. - Click the corresponding track's Mute icon
- Solo tracks
- Solo
 lets you single out a Time Editor track so that only it plays back. This mutes the other tracks and lets you focus on the animation in a the scene in isolation.
-

-
To solo a track
- Click the corresponding track's Solo icon
in the Roster. When a track is Soloed, the remaining tracks are dimmed in the Time View and the Mute buttons turn yellow.
- To solo multiple tracks, Shift-select them and click the Solo icon.
- Click the corresponding track's Solo icon
- Ghost tracks
- Ghosting a track lets you create a simplified representation of the animated objects on a track to preview the influence of each clip.

-
To ghost a track:
- Click the corresponding track's Ghost icon
 in the Roster.
- To ghost multiple tracks, Shift-select them and click the Ghost icon. For information on Ghosting, see Previewing animation with Time Editor Ghosts.
- Click the corresponding track's Ghost icon
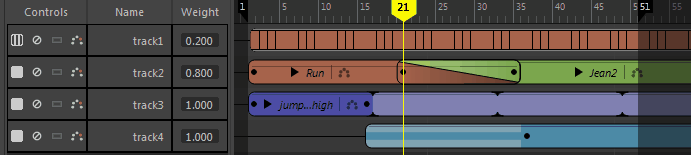
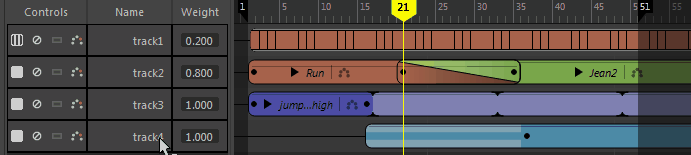
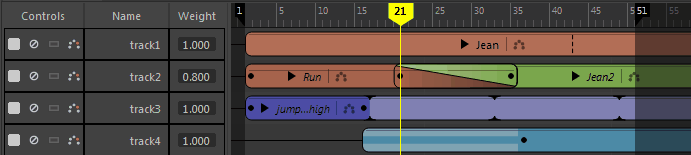
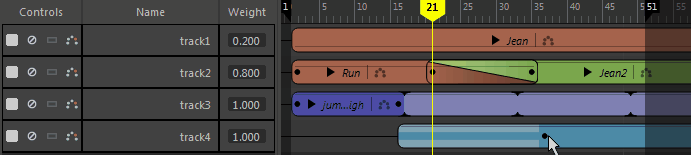
- Change track weight
- Changing track weights lets you determine how much of its animation plays in your scene. Enter a value in the Track Weight field.
- See Key Time Editor clip weights.
- Expand a clip's hierarchy
-
Note: While expanding clip hierarchies is done in the Track's Roster controls, it is considered a clip operation as it shows the associated keyframes.You can view a clip's hierarchy, exposing the keyframes in the animation.
-
-
To expand a clip's hierarchy
- Click the arrow next to the clip name. In the Roster controls, a new series of hierarchy arrows appear, colored the same as the selected clip.
- Expand each arrow to progress through the selected clip's animatable attributes.
- Rename a track
- You can change the names or numbering of Time Editor tracks by double-clicking on the track name in the Roster, and entering a new name.