

File
The File menu options let you import and export files into the Time Editor.
-
Add Animation from Scene Selection

- Adds a clip with contents selected in the Outliner or Viewport. Click
Add Animation from Scene Selection >
 to open the
Add animation to the Time Editor options. See also
Working with Time Editor clips.
Note: You can also drag a file from the File or Content Browser into the Time Editor or use the Time Editor Quick Start icons to add selected content to the scene.
to open the
Add animation to the Time Editor options. See also
Working with Time Editor clips.
Note: You can also drag a file from the File or Content Browser into the Time Editor or use the Time Editor Quick Start icons to add selected content to the scene. -
Add Pose from Scene Selection

- Creates a 1-frame long clip with the values of the currently selected object. The selection values are based on the values set in Channel box. See Match poses with the Time Editor.
- Import
-
- Import Animation Clip...
- Opens a file browser so you can bring animation files into the Time Editor at the
Current Time Marker position.
Note: There must first be an object or rig to which you want to add animation already in the scene when adding animation to the Time Editor. If you want to import an Animation Source, use the Import Animation Source Only... instead.
- See Import animation into the Time Editor for steps on how to import animation into the Time Editor.
- Import Audio Clip...
- Opens a file browser so you can locate an audio clip to add to new Audio track in the Time Editor. See
Working with Time Editor clips. The Time Editor supports
.wav
and
.aiff
audio file formats. Maya does not support the
.mp3 audio format.
Note: You can also drag an audio file from the File or Content Browser into the Time Editor Time View and a track is created automatically.
- Import Animation Source Only...
- Opens a file browser so you can select an animation source to bring into the Time Editor. Time Editor Animation Sources are the animation files that drive your objects/characters in the Time Editor. You can Ctrl-select multiple animation sources at a time for import to create a library of animation sources that you can use in a Time Editor composition.
- Animation Sources reside in the Time Editor Source menu and Outliner, under the Time Editor node.
- To add an Animation Source to a Time Editor Track, middle-mouse drag the Animation Source onto a clip that has the same hierarchy to remap the animation to it. SeeRemapping animation with the Time Editor.
Note: There must first be an object to which you want to add animation already in the scene when dragging animation files onto a Time Editor track.
- Export
-
- Export Selected...
- Opens the Export Selected Clip file browser, which lets you save the clip as a mayaAscii (.ma) or mayaBinary (.mb) file.
- Click
to open the
Time Editor Export Selection options
- All Clips to FBX...
- Saves the selected clips/all clips as .fbx files.
- Open Game Exporter

- Opens the Game Exporter, which lets you send animation clips to your game engine. See Export Time Editor clips to the Game Exporter.
- Open Content Browser

- Opens the Content Browser, where you can load sample files into the Time Editor.
-
Mute/Unmute Time Editor

- Temporarily disables the Time Editor so you can make adjustments to your animation. The Mute/Unmute Time Editor option disconnects all attributes to author new animation (including Constraints, Set Driven Keys, and so on) so you can switch back to Maya's non-Time-Editor driven mode. See Mute the Time Editor.
- The hotkey for this action is Q.
- Time Editor Preferences...
- Opens the Animation (Settings) Preferences window where you can scroll to the Time Editor section, and adjust the Granularity, Snap Tolerance and Minimum Clip Width settings as well as activate or disable In-View Messages and allowing clip creation to override constraints .
- Real Time Refresh
-
Temporarily suspends default scene redrawing so you can reposition or edit clips on a track. This is useful when working with large scenes and making adjustments that normally trigger a refresh, creating inconvenient time lags which made precision editing work difficult.
- Time Editor Hotkeys...
- Opens the Hotkey Editor so you can create your own hotkeys for Time Editor operations, like track creation and muting and soloing.
View
The View menu options let you modify the appearance of frames in the Time Editor. These options also appear as icons below the menu bar.
- Frame All
- Fills the time view with all the animation objects in a scene. The hotkey for this is A.
-

- Frame Selection
- Fills the time view with only the selected animation objects. The hotkey for this is F.
-

- Frame Playback Range
- Displays clips from the start frame to end frame. The hotkey for this is G.
-

- Center Current Time
- Frames the Current Time Marker at the center of the Time Editor. The hotkey for this is T.
-

- Group
-
- Open in Local Time Tab
- Opens a Local Time Tab to view the data inside of the Group clip with its original timing. See Create Tabs for Group clips for information on creating Local Time Tabs and Global and Local Timing in the Time Editor for an explanation of Global and Local timing.
Edit
The File menu options let you perform basic editing operations on Time Editor clips.
- Undo/Redo
- Reverse the effects of the last operation/restores the effects of the last operation.
- Delete
- Removes the selection from the Time Editor.
- Cut
- Removes the selection from the Time Editor and copies it to the clipboard to be pasted.
- Copy/Paste
- Duplicates/Pastes the selected object.
Note: The Copy/Paste options in this menu are specific to actions performed in the Time Editor. If you undo a Copy/Paste operation while the active window is not the Time Editor (for example, the Viewport), it will have no effect in Time Editor and vice versa.
- Split Clip at Current Frame

- Cuts the selected clip in two at the Current Time Marker position.

- The hotkey for this action is W.
- Trim Before

- Cuts the selected clip in two at the Current Time Marker position and deletes the earlier portion.
- The hotkey for this action is G.
- Trim After

- Cuts the selected clip in two at the Current Time Marker position and deletes the later portion.

- The hotkey for this action is H.
- Scale Start/End to Current Frame
- Stretches the start or end of the selected clip to the Current Time Marker position.

- Reset Timing
- Moves the selected clip back to the first frame.

- Clip Edge Edit Mode
-
Activate the following nodes to perform the following actions interactively.
-
-
Trim

- Lets you set the in and out points of a clip so that only part of the original source contributes to the clip. Select
Trim from the
Edit Mode menu, and place your cursor at the left or right edge of a clip. Notice the change in cursor look. Drag the cursor to trim.

A negative number on top of the clip indicates the number of frames trimmed.
A white dot on a child clip indicates that it is trimmed because of the parent clip. The white dot does not appear if a child clip is too small to display.

A black dot on the trimmed clip indicates that there is animation outside the clip.
See Time Editor Clip symbols for more.
-
Tip: Trim mode is the default Edit mode for the Time Editor. You can also press E with a clip selected to activate Trim mode.
-
Scale

- Lets you speed up or slow down the clip's animation. Select
Scale from the
Edit Mode menu, and place your cursor to the left or right edge of a clip. Notice the change in cursor look. Drag the cursor to scale.

The scale percentage appears at the top of the clip.
Tip: You can also press R with a clip selected to activate Scale mode.Note: Special symbols appear at the trimmed or expanded edge of a clip to show the state of the animation contained inside. See Time Editor clip symbols for more -
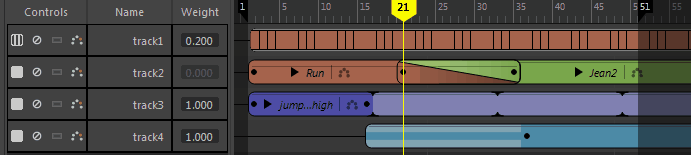
Loop

- Lets you repeat a clip's animation multiple times sequentially. Select
Loop from the
Edit Mode menu, place your cursor at the left or right edge of a clip, and drag to loop.

To adjust the looping, click and drag the edges of the looped area of the clip. A Loop After value (0.3 in the above figure) appears to indicate the number of loops the clip contains. If you loop the left side of the clip, then it is the Loop Before value. When you scale, trim, or loop a clip, the virtual border of a clip becomes the real border to perform all edit operations.
Tip: You can also press T with a clip selected to activate Loop mode. - You can set looping at clip start and end separately, with the Clip Loop Before Mode/Clip Loop After Mode in the Attribute Editor. There you can find two types of Looping modes, Cyclical, which makes the animation repeat itself, and Progressive, which repeats animation with an offset so you can use it to create a walk cycle. For a description of these two looping methods, see Types of Loops in the Time Editor.
-
Note: You cannot split a clip once a Hold or Looping has been applied to it. Make it into a Group clip and split it instead.
-
Note: To use Animation layers with a looped clip, create a Group clip from it, and then add layers to the Group.
- See also:
-
Hold

- Lets you extend the last pose frame of a clip for a specified period of time. Select Hold from the Edit Mode menu, and place your cursor to the left or right edge of a clip. Notice the change in cursor look. Drag the cursor to the desired Hold length.
-
 Tip: You can also press Y with a clip selected to activate Hold mode.
 -
Note: You cannot split a clip once a Hold or Looping has been applied to it. Make it into a Group clip and split it instead.
-
Trim
Tracks
The Tracks menu options let you create Time Editor tracks, where Time Editor clips reside. The Time Editor has three track types: Animation, Audio, and Shape. While most work in the Time Editor is done with Animation Tracks, you cannot add Audio or Blend shape clips to an Animation track, nor can you add different clip types on the same track, for example, you cannot put an Audio clip and an Animation clip together on one track.
See working with Time Editor tracks.
- Animation Track
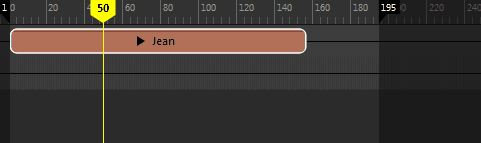
- Adds an animation track to the Time Editor. If a track is selected when you choose this menu option, the new track is added at the position of the selected track. If no track is selected when you choose this menu option, the new track appears at the end of the active composition. See Working with Time Editor tracks for common Track operations.
- To remove tracks, right-click the track and choose Delete Tracks from the Time Editor Clip contextual menu.
- Audio Track
- Adds an audio track to the Time Editor. If a track is selected when you choose this menu option, the new track is added at the position of the selected track. If no track is selected when you choose this menu option, the new track appears at the end of the active composition.
- To remove tracks, right-click the track and choose Delete Tracks from the Time Editor Clip contextual menu.
- Delete Tracks
- Removes selected tracks from the Track view.
-
Mute
/Solo

- Lets you isolate a Time Editor track so that only it plays back. See Working with Time Editor tracks.
-
- Mute tracks
- Mute
 lets you disable a track temporarily to prevent it from playing back. When a track is muted, it is darker in the Time View and the Mute button turns red.
-
-
To mute a track:
- Click the corresponding track's Mute icon
in the Roster or right-click a track and choose
Mute.
- To mute multiple tracks, Shift-select them and click the Mute icon.
Note: To temporarily disable the Time Editor completely (not just a single track) so you can create new animation, see Mute the Time Editor. - Click the corresponding track's Mute icon
- Unmute Tracks/Unmute All Tracks
- Reactivates the selected/all tracks.
- Solo tracks
- Solo
lets you single out a Time Editor track so that only it plays back. This mutes the other tracks and lets you focus on the animation in a the scene in isolation.
-

-
To solo a track
- Click the corresponding track's Solo icon
in the Roster. When a track is Soloed, the remaining tracks are dimmed in the Time View and the Mute buttons turn yellow.
- To solo multiple tracks, Shift-select them and click the Solo icon.
- Click the corresponding track's Solo icon
- Add to Soloed Tracks
-
- Adds any selected tracks to tracks that are already set to solo.
Note: Shift-select multiple tracks in the Roster area of the Time Editor.
- Undo Soloing
- Sets all tracks to active.
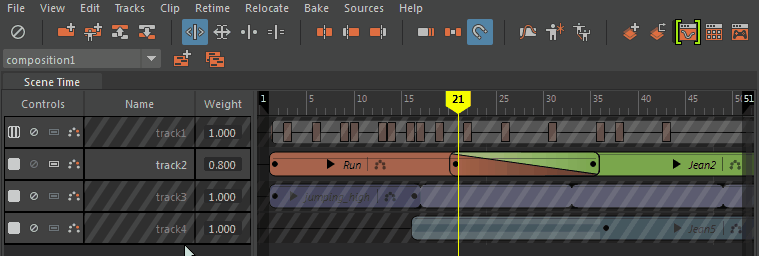
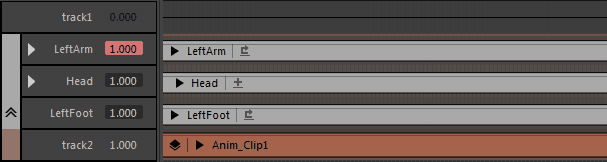
Clip
The Clip menu options let you manage clips that you select in the Time Editor.
-
Group

- Groups together selected clips into a Group clip. See
Combine clips into Group clips.
- The hotkey for this action is Ctrl+G.
-
Ungroup

- Ungroups the selected Group clip and returns all clips inside the Group to their local time.
Note: If the track that contains the Group clip has no other clips, the track is deleted as well.Note: This option is only active when you select a Group clip.
- The hotkey for this action is Ctrl+Shift+G.
- Layers
-
- Create Override
- Adds an Override Layer of the selected object(s) to the Time Editor. See Add Clip Layers to the Time Editor.
- Create Additive
- Adds an Additive Layer of the selected object(s) to the Time Editor. See Add Clip Layers to the Time Editor
- Create Transition
- Creates a bridging transition between the selected clips. See Create transitions between Time Editor clips for information on how to create transitions.
- Remove Transition
- Undoes any transitions created between the selected clips. See Create transitions between Time Editor clips for information on how to create transitions.
-
Graph Weight Curve

-
Note: This option is not available for Audio clips.
- Opens the animation clip in the Graph Editor to adjust the weighting. When two or more clips overlap in time and drive the same elements, you can mix them by setting weights that control their relative influence. See Modify Time Editor clips in the Graph Editor for information on using the Graph Editor to change clip animation.
- By adjusting the weight of a clip, you can control how much of an influence it has compared to the other clips in the resulting animation. The higher the mix weight, the more strongly a clip contributes to the animation. Mixing Group clips is an easy way to blend animation at an even higher level. See Key Time Editor clip weights for further information about clip weighting.
- Remapping
-
- Remap
- Opens the Roster Mapper so you can apply the clip's animation to another object in the Time Editor. See Remapping animation with the Time Editor.
- Remap and Create Clip from Namespace
- Expand to list all mappable Namespaces in the scene. See Remap animation by Namespace for more information.
- Ghost
- Lets you visualize the influence of each clip. See Previewing animation with Time Editor Ghosts.
- Rename Clip...
- Lets you enter a new name for the selected clip.
- Select Driven Objects
-
Note: This option is not available for Audio clips.
- Selects all elements that are grouped within the particular Clip/Group clip that are affected by the animation.
- This is useful when working with HumanIK rigs to make sure that all the affected animation controllers are selected, regardless of what HIK keying mode (such as Full Body and Body Part) is applied to the rig.
- For more information on working with Human IK character rigs, see Animate HumanIK charcters in the Time Editor.
- Make Animation Source Unique
-
Note: This option is only available when you use Time Editor Animation Sources for more than one clip.
- Sets the Animation Source for the selected clip as standalone, so you can edit the Animation for the selected clip without affecting any other clips that share the same Animation Source.
- For example, if you copy-paste a clip, the Animation Source is shared between them and duplicating animation curves would be performance inhibiting. Instead, this setting lets the Time Editor only duplicate the required data.
- One exception to using Make Animation Source Unique to create an independent clip is when you have multiple motion capture data performances (such as different Karate moves) stored in a single animation file. In this case, do not cut the Animation Source into multiple pieces. Instead, create a unique Animation Source that contains only the relevant segment by using in the Time Editor menu bar; this creates a separate iteration of the Animation Source.
Retime
The Retime menu options let you adjust the timing of key movements in animation clips in the Time Editor.
- Create and Edit Time Warp
- Creates a Time Warp curve for the selected clip. See Create and edit Time Warps with the Time Editor for more information.
- Create and Edit Speed Curve
- Creates a Speed Curve for the selected clip. See Alter clip speed with Speed Curve for more information.
- Enabled
- Shows whether the clip has a Time Warp /Speed Curve active on it.
- Edit
- Opens the curve in the Graph Editor.
- Reset
- Undoes any changes to the Time Warp/Speed Curve, and restores it to its default state.
- Delete
- Deletes the Time Warp/Speed Curve.
- Convert to Time Warp
- Changes a Speed Curve to a Time Warp curve. See Change Clip Timings in the Time Editor for an explanation of the difference.
Relocate
A Time Editor Relocator is a marker that lets you reposition and offset animation placement. The Relocate options let you create, select, and manage Relocators.
- Create Relocator

- Creates a Relocator for the selected animation, which is a marker that you can use to move your animated character to another position. Clips with Relocators are marked with the following icon
 next to the clip name.
Note:
next to the clip name.
Note:- You can find the Relocator at the average position and rotation of the clip root. To see the Relocator, choose Select Relocator from the Relocate menu in the Time Editor menu bar topic.
- If your animation clip is driven by multiple roots, select instead
Relocate > Create Relocator > to open the
Relocator Options, where you can create a relocator from a list all the root objects in the scene.
- See Reorient a character's position with Relocate.
- Edit Relocator
- Opens the Relocator Options window, where you can set or change the custom relocator for an already-created relocator.
- Select Relocator
- Selects the Relocator for the selected track.
- Reset Relocator
- Restores the character to its initial position in the scene, but retains the Relocator marker so you can continue to relocate your character.
- Remove Relocator
- Deletes the Relocator from the scene.
- Match Relocators...
- Opens the Matching Options window. For information on how to match animation clips see Match poses with the Time Editor Relocators.
Bake
The Bake menu options let you merge multiple Time Editor animation clips into a single clip.
- Bake to New Clip/Bake to New Clip and Delete
-
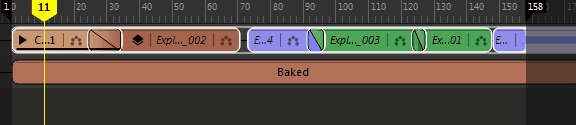
- Merges the selected clip to a single clip, creating only the minimum number of keyframes necessary in the merged clip. Deletes the original animation, if specified.
- Once you have baked your clips, you can perform editing operations on it as if it were a single clip. See
Edit animation in the Time Editor.
Note: You can use Bake to new Clip with Group clips or multiple selected clips.
- For more information about Baking clips, see Bake Time Editor clips.
- Bake to Scene/Bake to Scene and Delete
- Merges the selected clip(s) to the scene. Deletes the original animation, if specified.
- Flatten Layers
-
- Merges all Animation Layers of the selected clip into a single layer. See
Key on Layer clips.
Note: You must have more than one layer to flatten layers.
Sources
- Create Clip
- Adds the selected animation source, either in the Scene or the Outliner, as an clip to the selected animation track.
- Remap to Namespace and create Clip from Namespace
- Remaps the selected Animation Source to the selected object and creates a Clip.
- Apply to Scene
- Adds the Animation Source to the scene.
- Export...
- Opens the Export Anim Source window, where you can save the selected Animation Source as a Maya ASCII (.ma) or binary (.mb) file.