The following best practices can help to produce a successful unfold operation:
Unfold Setup
|
Remember to map UV texture coordinates |
You can create UVs using any UV mapping technique. The initial shape of the UVs should be free of distortion to avoid long computations when unfolding and to facilitate UV edge selection for cuts. See Mapping UVs. |
|
Plan your cuts |
Plan your cuts to obtain the best unfolded result. The better the cuts, the better the correlation between the original mesh and its corresponding UV shell. Anticipate that cuts will result in texture mismatches along edges, and locate edges on the model where they are least visible. For example, make cuts under the arms or on the back of the legs of a character. 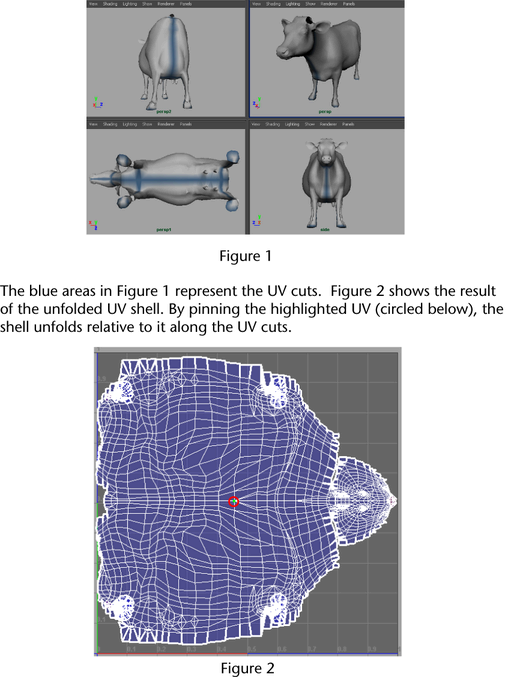 |
|
Consider the UVs you want to pin |
Pinned UVs provide an anchor around which other UVs can be unfolded. If you don't pin at least one UV when unfolding a UV shell, the shell may unfold into a very tiny mesh or an undesirable shape. For symmetrical meshes, pinning UVs along the line of symmetry maintains the shape of the shell.
Note: Pinning options are only available when you use the
Legacy unfold
Method (See
Unfold UVs options). The
Unfold Tool and the
Unfold3D unfold
Method automatically pin unselected UVs. See
Unfold a UV mesh.
|
Unfold Process
|
Unfold multiple meshes |
For complex meshes, you can cut the mesh into smaller sections and unfold each section as a separate UV shell. You can even enable Layout UVs during the Unfold process to automatically arrange the shells in the grid (note that this will reuse your current Layout UV options). While this method gives you more control, you need to plan ahead and determine where you can safely cut the mesh and re-sew UVs, if necessary. |
|
Create Quick Select sets |
Create Quick Select sets (Create > Sets > Quick Select Set) when you need to repeatedly select UVs for pinning. |
|
Highlight texture borders |
It is critical to view and select border edges in both the scene and the UV Editor. Turn on the display of texture borders by selecting . This displays the UV borders on the polygon mesh as thicker lines so you can see your progress as you cut the UV edges. |
|
Constrain the unfold direction |
By default, UVs unfold in all directions in an unrestricted manner. You can constrain the unfold process so the UVs are constrained to unfold in either the vertical or horizontal direction as they appear in the 2D view of the UV Editor. This can be useful when the appearance of the UVs is fine in one direction, but needs refinement in another.
Note: When using the
Unfold Tool, you can constrain the direction of the unfold operation by holding the Shift button while dragging the mouse.
|
|
Align UVs |
Use the UV Toolkit's Align & Snap options to snap UVs to match any vertical or horizontal lines that would naturally occur on the texture. See Align UVs options.
Tip: You can align UV edges that run down the axis of symmetry. For example, the line of UVs that run down the spine of a symmetrical four-legged animal, can be selected, aligned. and then pinned so they act as a benchmark for further unfold operations.
|
|
Use the UV Lattice Tool |
The UV Lattice Tool can be used to modify a region of a UV shell before performing further Unfold operations. |