
Troubleshoot I am not seeing the objects I added to my layer
Try the following possible solutions.
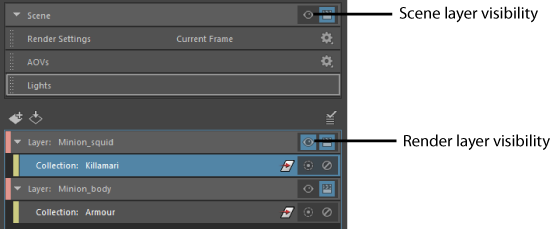
Check if you are in the correct render layer
Only one render layer can be visible at a time, whether it is a render layer you created, or the scene render layer.
You can add objects to the collections in your layer without being in that layer. Therefore, you may have added objects to a layer that you are not currently in.
To identify the layer that you are in, look for the layer with the highlighted
 icon. If you are in the scene layer, the
in the
Scene settings area at the top of the
Render Setup editor is highlighted.
icon. If you are in the scene layer, the
in the
Scene settings area at the top of the
Render Setup editor is highlighted.
To switch to a different render layer, or to the scene layer, click
 on the layer.
Check if any of your objects are in a collection that is disabled
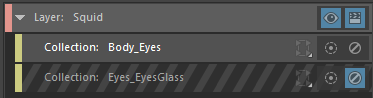
Collections are interpreted top-down. Therefore, if the same object appears in two collections, and one collection is disabled, then it is the state of the collection further down in the list that determines the final state. See Control visibility of collections.
In this example, the eyes geometry belong to both the top and the bottom collections. However, because collections are interpreted top-down, and the collection further down in the list is disabled, it takes precedence over the collection that is enabled, and the eyes do not appear in the render layer.
Overrides are also interpreted top-down. See Order of application of overrides.
Check the collection membership by clicking View All
Select a collection, then click View All to display a list of the collection members.
Check if any filters are set for the collection
The Collection Filters functionality in the collection Property Editor can be used to include only specific node types in a collection. If your objects are not appearing in your layer, they may have been excluded by your filter settings. See Identify missing members in a collection and Add collection members by node type.
Check if the capitalization is correct in your expression
Expressions are case sensitive; therefore *apple* is not the same as *Apple*. If you populated your collection with an expression, check the expression against your node names to see if you used the correct case to include your nodes.
Check if there are any missing members in your collection
A node may be missing from your collection if it was added to your collection, but was deleted from the scene later on. The
Render Setup editor marks the layer and collection with a
 icon to alert you of the missing members. If you have a long list of layers, you may need to scroll down the list of layers to locate the one with the error.
Check if you added a node to the child collection instead of the parent collection
A parent collection determines membership, and a child collection should only contain a subset of the parent collection's members. If you add pSphere1 to the parent collection and pSphere2 to your child collection, then pSphere2 will not be visible in your layer. See Create subcollections.
Troubleshoot the members I added via expression are not included in the collection
If you click View All to display the list of the collection members and notice that certain nodes are not listed, it is possible that you did not include : or :: to denote namespaces.
For example, the expression *foo* only matches node names that contain the letters foo. It does not match namespaces that contain the letters foo. Therefore, nodes such as food:food1, food:bread, and food:fruit:apple are not included with the expression. To include only the first two, you can use the expression foo:*. To include all three, you can use the expression foo::*
The only exception is the expression *, which encompasses all nodes in all namespaces.
Troubleshoot viewport is blank or I do not see what I expect to see when I switch layers
Refresh your layer. Check if a red border appears around the layer visibility icon
 and click the icon to update your layer accordingly.
Troubleshoot overrides do not have any effect in my scene
Check if the node that you want to create an override for is part of the collection. To do this, click View All in the Property Editor of the collection. If the node that you want to create an override for is not listed in the View Collection Objects window, then that is the reason why your override is not taking effect.
Reasons for this may include a spelling error in the node name so that it does not match the expression, or selecting an incorrect Collection Filter in the Property Editor so that the node you want is filtered out accidentally.
Troubleshoot I can create a shader override but I do not see the expected result in the viewport
One possible cause is that shader overrides are not supported for objects that do not have an initial shading group. This includes Arnold stand-ins.
Create a material override instead, or assign a shader to your object before creating the shader override.
Troubleshoot overrides on time, frame range, distance or angle produce inaccurate result when created via scripting
Overrides are calculated in Maya using internal units - units different from those you see in the Maya user interface. Therefore, if you use scripting to create overrides on attributes that are any of time/frame range, distance, or angle, you should make sure to set these values using internal units.
Maya internal units for time are time ticks, which are one six-thousandth (1/6000) of a second, while the default user interface unit for time is film, which is 24 frames per second.
See the MTime, MDistance, MAngle API documentation in the Maya Developer Help > C++ API Reference for more information about internal units, and the getAttrValue and setAttrValue function documentation in the ..\Python\Lib\site-packages\maya\app\renderSetup\model\override.py file in the Maya installation folder for information on how to convert between units.
Conversion is performed automatically by Maya for overrides created via the user interface.
Troubleshoot exported json file indicates incorrect values for overrides on time/frame range, distance, or angle
The values appear 'incorrect' because these overrides are calculated in Maya using internal units, which are different from those you see in the Maya user interface. For example, an override value of 20 frames would translate to 20 frames /24 frames per second * 6000 time ticks per second = 5000 time ticks.
See Troubleshoot overrides on time, frame range, distance or angle produce inaccurate result when created via scripting above for more information.
Troubleshoot I cannot middle-mouse drag and drop an attribute to create an override
Add the following flag to the attribute control command in the AE<NodeType>Template.mel file of the node that the attribute belongs to:
-dragCallback "AEdragCallback"
See AElambertCommon.mel for an example.
The Bump Mapping attribute of the Lambert node can be middle-mouse drag and dropped because the attrNavigationControlGrp section of the procedure that creates the bump mapping attribute in the UI has the line -dragCallback "AEdragCallback" added to it:
global proc AEshaderBumpNew (string $attrName)
{
    setUITemplate -pst attributeEditorTemplate;

    attrNavigationControlGrp
        -label (uiRes("m_AElambertCommon.kBumpMapping"))
        -at $attrName
        -dragCallback "AEdragCallback"
        bumpControl;

    setUITemplate -ppt;
}
Troubleshoot I cannot add my node to the collection
If you select a node and click Add in the Property Editor, and it appears greyed out and italicized in the node list, check the Collection Filter drop-down list to see if you have selected the correct node type for your collection. If you try to add a transform node, but your Collection Filter is set to Shaders, then your node will not be added to the collection.
Troubleshoot importing and exporting a .json file
Troubleshoot I cannot import my .json file
-
When you select File > Import All, you can only import files that were exported using File > Export All; that is, files that are a complete render setup. Files that were exported using File > Export Selected; that is, files that contain a subset of your render setup, such as a layer and a collection, or two overrides, can only be imported by clicking the
 button, or via the right-click menu of a layer or collection.
Troubleshoot I cannot export my .json file
You can export multiple items via Export Selected; however, the items must be of the same type. For example, you cannot export only a layer and an override. Otherwise, an error occurs, or the Export Selected contextual menu does not appear.
Troubleshoot AOVs when importing a .ma or .mb file

AOVs are not imported with the scene file if you File > Import a .ma or .mb while using the Render Setup system.
AOVs are imported with your scene, however, If you do the same while using the legacy render layers system.
Troubleshoot user templates do not appear when clicking
or right-clicking a layer or collection
Previously, in Maya 2016 Extension 2, the default user templates location was <Documents>\maya\Templates. In Maya 2017, the default user templates location changed to <Documents>\maya\RSTemplates . This is also the current behavior. If you saved your templates to the default location in Maya 2016 Extension 2, they are not recognized automatically in later versions of Maya. To workaround this issue, copy your templates from the Templates folder to the new RSTemplates location.
Troubleshoot a subcollection is not created when I override an attribute on the place3dTexture node
The place3dTexture node is a transform node. Therefore, if you add your objects to a collection, then drag and drop an attribute on the place3dTexture node to override one of its attributes, for example, to translate the texture, a place3dTexture subcollection is not created as a result.
Workaround: Select the place3dTexture nodes and add them to your collection manually. You can add them to your collection of objects or create a separate collection for these nodes. If the latter, leave the Collection Filters drop-down list at its default value (Transforms).
Troubleshoot there is no option to create an absolute or relative override when I right-click an attribute
In general, if the overriding of an attribute is not supported, then the corresponding right-click menu to create the override will also not be available.
Troubleshoot clicking
or right-clicking a layer or collection stops Maya interaction
Setting your global template path to a remote server that is slow to access may cause a slowdown when loading the import template menus (both via
or via the layer/collection right-click menus ).
It is advisable to store your global templates to a local server instead.
Similarly, if either your local or global template path is a folder that consists of a lot of files or subfolders, a slowdown may occur when accessing the right-click menu. If this occurs, you may want to select a different folder as your template path.
Troubleshoot no action occurs but I am not seeing errors in the Help Line
Errors may be printed to the Script Editor. Check the Script Editor for possible messages.