Overrides can be created for collections to apply non-destructive changes to your scene. You can easily revert your attributes back to their original state by disabling an override so that it does not apply. Experiment with different overrides by enabling and disabling them.
You can create one or more collections in a render layer, then override attributes for the objects in each collection.
You can create absolute or relative overrides: absolute overrides allow you to set the exact value of an attribute; for example, to translate your objects to X=10, Y=10, Z=10 exactly. Relative overrides allow you to modify your attribute relative to its current value.
For example, if you have 100 objects with different transparency levels, and all of them need to be 50% more transparent, then you would set a relative override for the Transparency attribute of their shaders, and set the Multiply value to 1.5.
To create an override, middle-mouse drag and drop an attribute from the Attribute Editor to the Property Editor.
You can also disable an override so that it does not apply. Overrides are automatically disabled when the collection that they apply to is disabled.
For information regarding shader, material and connection overrides, see Override the material applied to the objects in a collection.
For information regarding light overrides, see Create light overrides in your render layer.
Overrides can be re-ordered in the Render Setup editor by middle-mouse dragging and dropping. Overrides are interpreted top-down. See Order of interpretation of overrides.
See Create a render layer and Create a collection for your render layer.
You can also create overrides for an object in your visible render layer by right-clicking the attribute in the Attribute Editor. See Additional method to create overrides: create overrides in the visible render layer.
For advanced users, you can also Create overrides by typing the name of the attribute in the Property Editor.
Create an absolute override
- Select the collection for which you want to create an override.
The Property Editor updates to display the attributes of the collection.
- In the collection
Property Editor, select
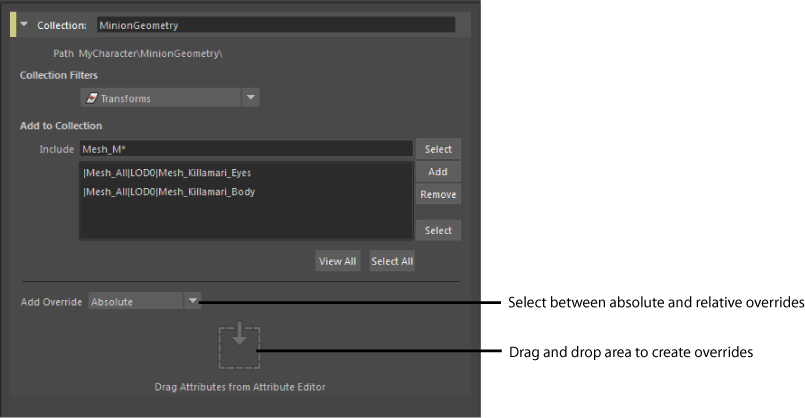
Absolute from the
Add Override drop-down list.
Tip: Select None from the drop-down list so that the drag and drop area does not appear in the Property Editor, leaving you with more space in the Property Editor to view your render setup node attributes.
-
Middle-mouse drag and drop the attribute that you want to override from the Attribute Editor to the Property Editor.
For example, to override the Translate attribute, middle-mouse drag and drop the Translate attribute from the transform node to the Property Editor.
An override is created and appears below the collection in the Render Setup editor.
Note:When you middle-mouse drag an attribute from the Attribute Editor to the Property Editor, you are dragging the name of the attribute and not the attribute that is specific to the node that you are dragging from.
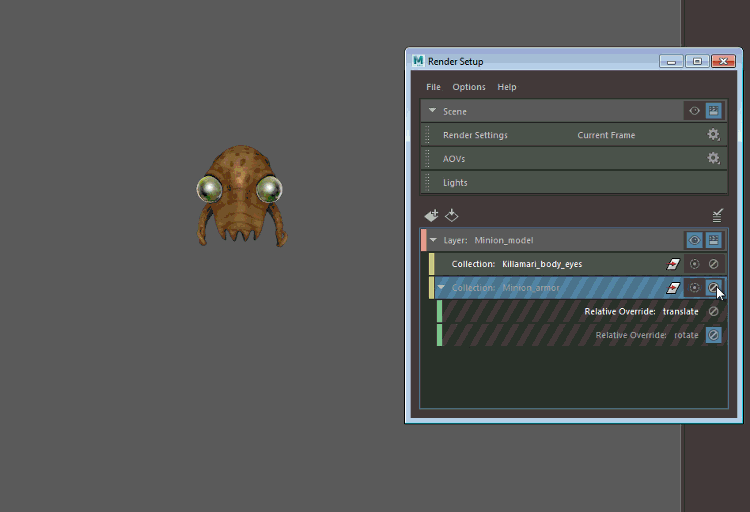
For example, in this case you are dragging the Translate attribute and not specifically the Translate attribute of the Mesh_Killamari_Body transform node to the override. The override is therefore applied to all objects in the collection that have a Translate attribute, and not just Mesh_Killamari_Body.
- Select the override in the
Render Setup editor and adjust its values in the
Property Editor.

Create a relative override
Create a relative override by scaling or offsetting the attribute relative to its current value; for example, multiply it with a factor of 5 and/or add an offset value. For example, if Translate X has an original value of 10, you can multiply it by 5 and add an offset of 2 so that the new value becomes 52.
You can create a relative override similar to how you create an absolute override. In the collection Property Editor, select Relative from the Add Override drop-down list, then middle-mouse drag and drop the attribute from the Attribute Editor to the Property Editor. Select the override and set new values for your attribute by specifying a multiplication factor and/or adding an offset value.
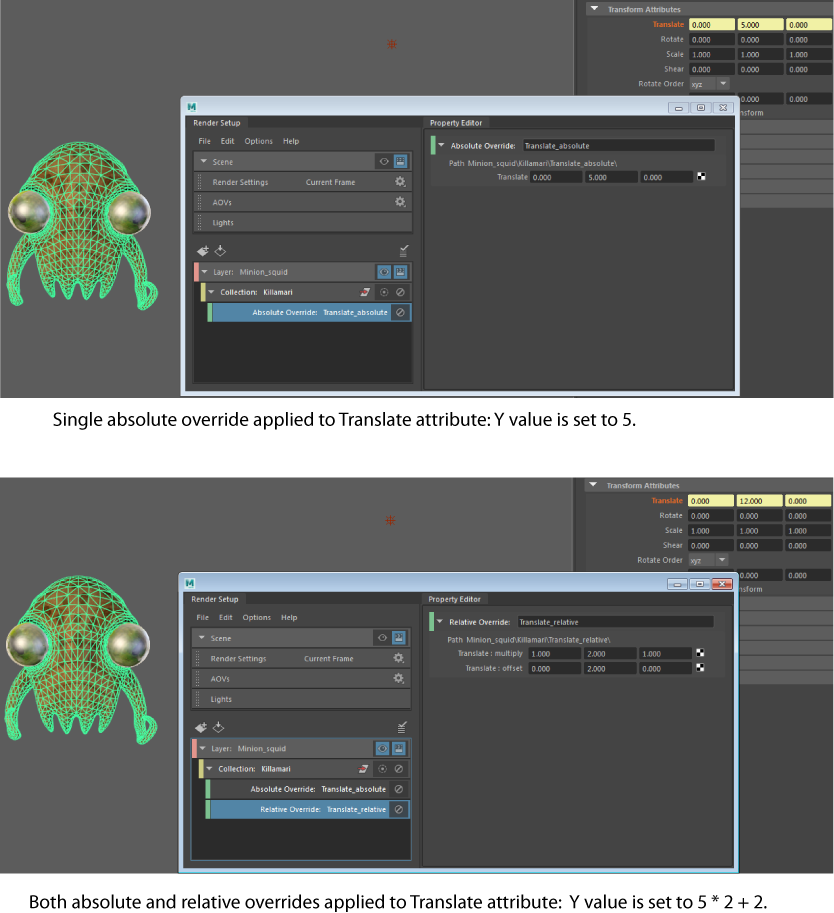
You can also combine both your absolute and relative overrides. In this example, an absolute override is applied to the Translate attribute where its Y value is set to 5. A relative override is then applied to the Translate attribute where the Y value is multiplied by 2 and offset by 2. As a result, the Y value of Translate is set to 5*2 + 2 = 12.
In addition to entering offset values in the Property Editor, you can also set your offset values by selecting your collection members and transforming them in the viewport. See Set transform override values by manipulating objects in the viewport.
Create an absolute or relative override using the right-click menu
-
Right-click a collection and select Create Absolute Override or Create Relative Override.
-
Select the override in the Render Setup editor. The Property Editor updates to show the properties of the selected override. Middle-mouse drag and drop the attribute that you want to override from the Attribute Editor to the Property Editor.
For example, to override the Translate attribute, middle-mouse drag and drop the Translate attribute from the transform node to the Property Editor.
Note:You can only add one attribute to each override.
Create an absolute or relative override for an attribute that is not a transform node
The examples above illustrate how to create an override for the Translate attribute, which is on the transform node.
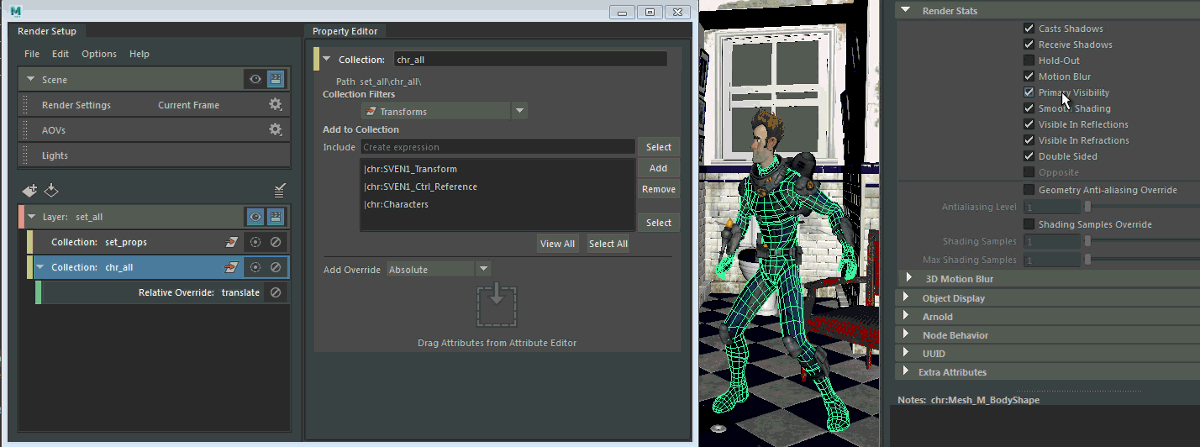
Follow the same workflow to create overrides on other nodes such as the shape node, or a shader node, and so forth. Note, however, that, by default, when you add nodes to a collection, only transform nodes are included. Therefore, if an override is created on an attribute that is not part of the transform node, Maya first creates a subcollection for the node type, then creates a corresponding override.
In this example, the character's transform nodes are included in the collection, and thus the character is visible in the layer. When the translate override is created, it is created below the chr_all collection. However, when an override is created for the Primary Visibility attribute, which is an attribute on the shape node, a sub-collection containing the shape nodes for chr_all is created, as well as a corresponding override.
Disable an override
Disable an override so that it does not apply to your render but remains in the
Property Editor. To do this, click
 on the override. Repeat this action to enable it again.
When you disable a collection, its corresponding overrides are also disabled. Overrides that were already disabled (before disabling a collection) retain their disabled state when the collection is re-enabled. In addition, they appear more dim in the
Render Setup editor compared to overrides that were originally enabled, and are denoted by a blue disabled
 state.

In addition, you can enable or disable your overrides even when your collection is disabled. This state is retained when you re-enable your collection.
Order of application of overrides
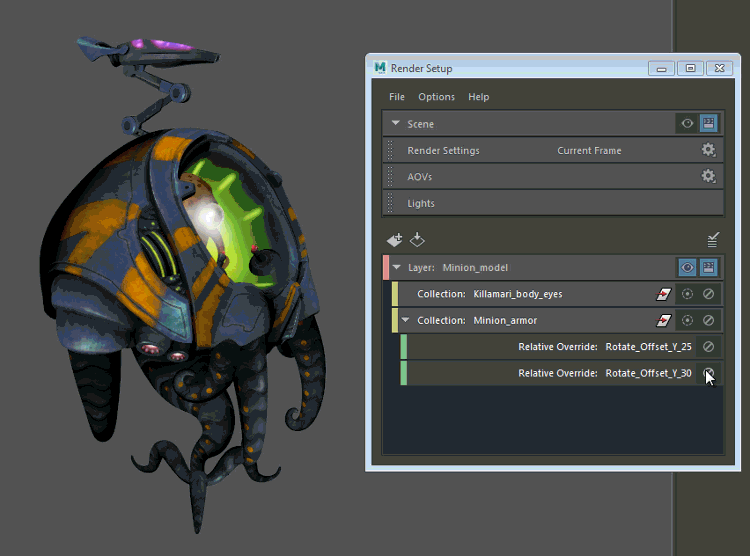
Overrides are applied top-down. Therefore, if the same object appears in two collections, and both collections have an override for the same attribute, then it is the override further down in the list that determines the final value; likewise for two overrides in the same collection.
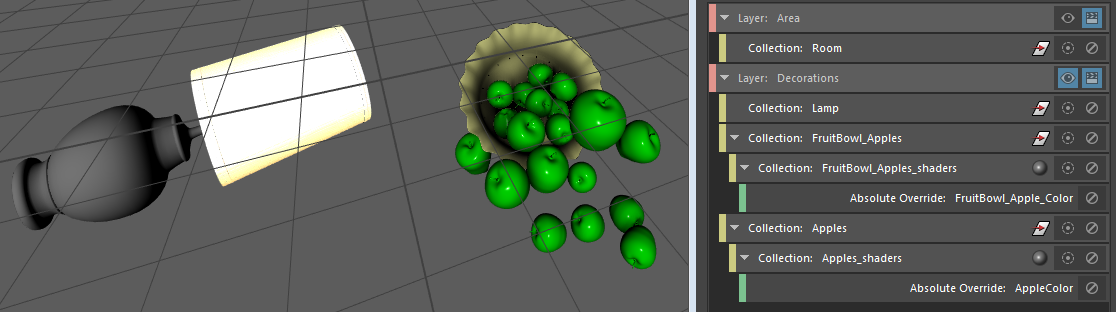
In this example, FruitBowl_Apples has a color override applied to set the color of both the fruit bowl and apples to yellow. Apples has a color override applied to set the color of the apples to green. The apples appear in both collections and a color override is applied in both cases. The override further down in the list (AppleColor) takes precedence and thus the apples appear green in the layer.
In the case of relative overrides for the same attribute, overrides are also applied top-down, but the results would be cumulative. In this example, a relative override has been applied to rotate the character by 25 degrees in the Y axis. Another relative override is created beneath the first that rotates the character by 30 degrees in the Y axis. The final result is that the character is rotated by 55 degrees in total.