The Autodesk® Advanced Toolpath Utility for Netfabb® comes with two demonstration buildstyles. One for CLI and one for XML machine exports. Both buildstyles are made for a fictional electron beam melting 3D printing machine. Let’s have a closer look at them.
The Advanced Toolpath Utility project files can be found here: demonstration/cliExport and demonstration/ xmlExport.
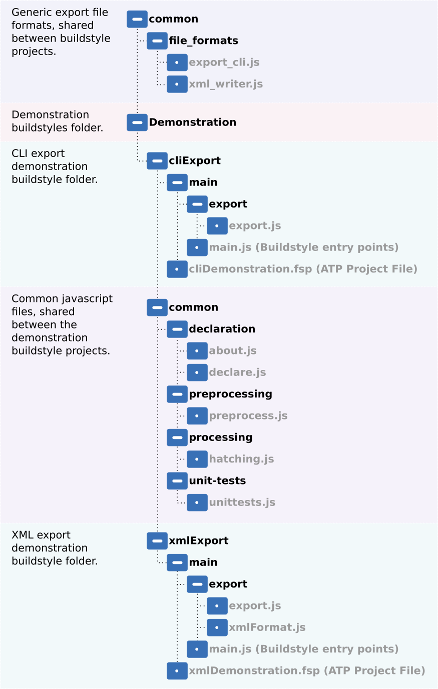
The export JavaScript code is generic and shared across multiple buildstyle projects. Most of the processing code is shared between the two buildstyles. You’ll find two common source folders called common in the main directory and in the demonstration directory of the tutorial source code folder, located at: (Your documents folder)\ATU-Examples\buildstyles
Buildstyle Processing
Buildstyle processing is done in three steps:
Configuration
Configuring the buildstyle includes:
- Buildstyle description: What information is passed to host applications about this buildstyle?
- Machine specification: Which machine is this buildstyle for?
- Material specification: What materials are supported within this buildstyle.
- Parameter declaration: Which parameters are available from outside of this buildstyle?
- Attribute declaration: Which attributes are used within this buildstyle?
- Export filter declaration: Which export filter is used for the data export?
Processing
The processing step includes preprocessing and processing.
Preprocessing
At the preprocessing step, the buildstyle can change the model data, that was passed by the host application. For example, corrections of the geometry data can be done during preprocessing.
Processing
At this step, each slice of the input geometry will be processed. The processing may include:
- Generation of hatching data (generation of the toolpath)
- Calculating layer specific flags that may be used later by the exporter
Export
The export step uses the geometry and the buildstyle data to create a machine readable export. This can either be one file or a directory containing several files.
Generic Buildstyle Concepts
Configuration
The configuration process contains machine, material, export, parameter and attribute declaration. It also defines buildstyle information, which can be requested by the host application.
Buildstyle Information
The buildstyle information structure is filled at declaration/about.js. This information can be queried by the host application.
exports.about = function(Info, runTests, doLogging)
{
  var buildStyleName = 'Autodesk Demonstration Buildstyle';
  var companyName = 'Autodesk';
  var copyright = 'Copyright (c) 2016';
  var legalNotice = 'All rights reserved.';
  Info.addCommentLine(buildStyleName);
  Info.addCommentLine(companyName);
  Info.addCommentLine(copyright);
  Info.addCommentLine(legalNotice);
}
Machine Definition
Sets the target machine name (declare/declare.js):
exports.declareMachine = function(Machine, runTests, doLogging)
{
  var buildStyleName = 'Autodesk Demonstration Buildstyle';
  var machineName = 'Generic Open Machine';
  Machine.setBuildstyleName(buildStyleName);
  Machine.setMachineName(machineName);
}
Material Definition
Define names for compatible materials (declare/declare.js):
exports.declareMachine = function(Machine, runTests, doLogging)
{
  var buildStyleName = 'Autodesk Demonstration Buildstyle';
  var machineName = 'Generic Open Machine';
  Machine.setBuildstyleName(buildStyleName);
  Machine.setMachineName(machineName);
  var materialName = 'Demonstration Material';
  Machine.addMaterialName(materialName);
  Machine.addLayerThicknessToMaterial(materialName, 10);
  Machine.addLayerThicknessToMaterial(materialName, 15);
  Machine.addLayerThicknessToMaterial(materialName, 20);
  Machine.addLayerThicknessToMaterial(materialName, 25);
  Machine.addLayerThicknessToMaterial(materialName, 30);
  Machine.addLayerThicknessToMaterial(materialName, 35);
  Machine.addLayerThicknessToMaterial(materialName, 40);
  Machine.addLayerThicknessToMaterial(materialName, 45);
  Machine.addLayerThicknessToMaterial(materialName, 50);
  Machine.addLayerThicknessToMaterial(materialName, 55);
  Machine.addLayerThicknessToMaterial(materialName, 60);
  Machine.addLayerThicknessToMaterial(materialName, 65);
  Machine.addLayerThicknessToMaterial(materialName, 70);
  Machine.addLayerThicknessToMaterial(materialName, 75);
  Machine.addLayerThicknessToMaterial(materialName, 80);
  Machine.addLayerThicknessToMaterial(materialName, 85);
  Machine.addLayerThicknessToMaterial(materialName, 90);
  Machine.addLayerThicknessToMaterial(materialName, 95);
  Machine.addLayerThicknessToMaterial(materialName, 100);
}
Export Definition
Depending on buildstyle parameters, one buildstyle may have different export filters (that is, the two demonstration buildstyles could be merged to one buildstyle with two different export filters for XML and CLI files) (main.js).
exports.declareExportFilter = function(exportFilter)
{
  exportFilter.declareFilter('CLI',
                             'Cli Export',
                             'cli',
                             CLI.version.major,
                             CLI.version.minor,
                             EXPORT_FILTER.nExportFilterMultifile);
};
Parameter and Attribute Declaration
The demonstration buildstyle declares buildstyle parameters for the host application, but no internal attributes.
exports.declareParameters = function(buildParamDecl, runTests, doLogging)
{
  buildParamDecl.declareParameterGroup('hatch_attributes', 'Hatch Attributes');
  buildParamDecl.declareParameterReal('hatch_attributes', 'Beam Compensation',
  ˓→'Beam Compensation', 0.001, 2.0, 0.001);
  buildParamDecl.declareParameterReal('hatch_attributes', 'Hatch Desity', 'Hatch
  ˓→Density', 0.001, 2.0, 0.02);
  buildParamDecl.declareParameterReal('hatch_attributes', 'Hatch Border Distance',
  ˓→'Hatch Border Distance', 0.001, 2.0, 0.02);
  buildParamDecl.declareParameterInt('hatch_attributes', 'Hatch Offset Border Count
  ˓→', 'Border Offset Hatch Count', 0, 10, 2);
  buildParamDecl.declareParameterReal('hatch_attributes', 'Hatch Offset Border
  ˓→Distance', 'Border Offset Hatch Distance', 0.001, 2.0, 0.02);
  buildParamDecl.declareParameterReal('hatch_attributes', 'Chess Board Size',
  ˓→'Size of a chess board cell', 0.001, 50.0, 1.0);
  buildParamDecl.declareParameterGroup('machine_attributes', 'Machine Attributes');
  buildParamDecl.declareParameterReal('machine_attributes', 'Recoating Time',
  ˓→'Recoating Time in ms', 0.1, 50000.0, 100.0);
}
/**
 * Build attribute declaration.
 * While calculating the exposure data these attributes can be set in
 * the exposure data. On export these attributes are available for export.
 *
 * @param Attrib bsBuildAttribute instance.
 * @param runTests Unit test flags.
 * @param doLogging Logging flag.
 */
exports.declareBuildAttributes = function(buildAttrib, runTests, doLogging)
{
}
Processing
Buildstyle processing is divided into single-threaded preprocessing and multi-threaded processing of model data.
Preprocessing
There’s no preprocessing being done for models at the demonstration buildstyle. The preprocessLayerStack function at preprocessing/preprocess.js just copies the source models without modification to the target models. This is OK for demonstration. The better and faster way would be to comment out the preprocessLayerStack function.
exports.preprocessLayerStack = function(sourceModelData,
                                        targetModelData,
                                        progress,
                                        runTests,
                                        doLogging)
{
  var sourceModelCount = sourceModelData.getModelCount();
  for( var smIdx=0; smIdx < sourceModelCount; smIdx++){
    var curModel = sourceModelData.getModel(smIdx);
				/**
				 * At this place, model data (i.e. islands of model layers) can
     * be changed.
     */
    targetModelData.addModelCopy(curModel);
  }
}
There's also no preprocessing done before hatch creation:
exports.prepareModelExposure = function(model,
                                        attrDefaultPrinterSettings,
                                        runTests,
                                        doLogging)
{
}
Processing
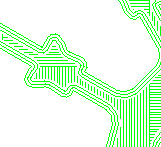
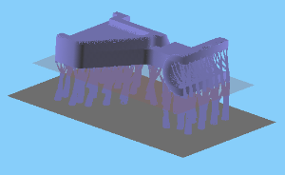
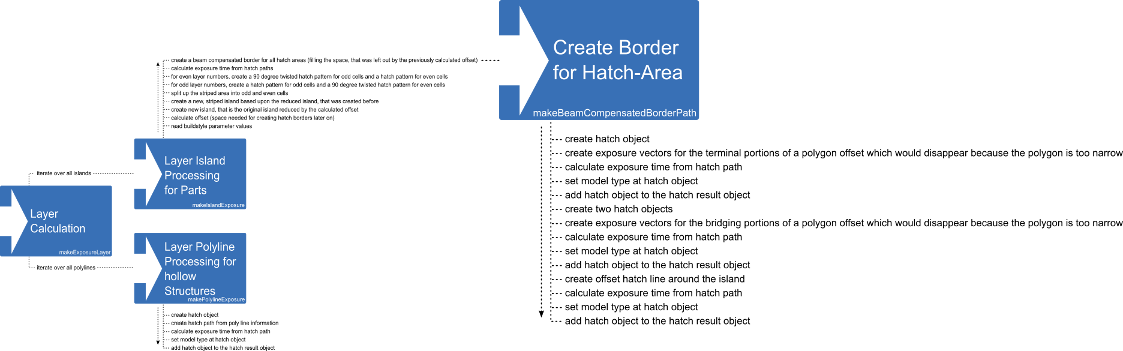
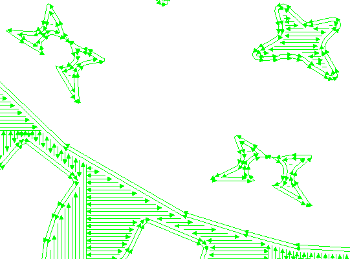
This is the most interesting and complex part of the demonstration buildstyle. The 2D shape data of every layer is used here to create hatch patterns. The density of these hatch patterns is so high, that the final result is a solid area, completely filled with building material.
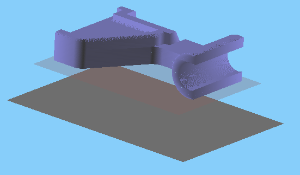
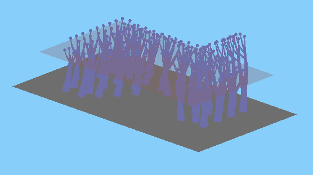
Here's how the processing steps with the following part and fitting support structures will look:
Calculation Start
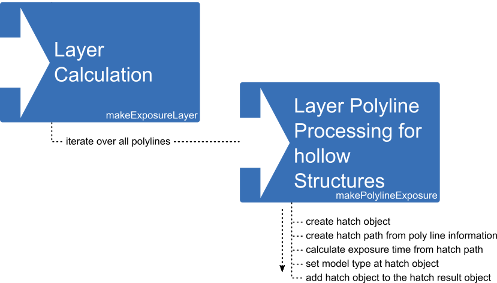
It starts at processing/hatching.js with makeExposureLayer:

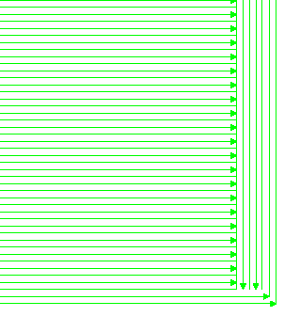
For all layers the makeExposureLayer function iterates over all islands (closed 2D areas) and all polylines (not necessarily closed polygon lines). The polyline hatching is rather simple:
| Processing | Result |
|---|---|
|
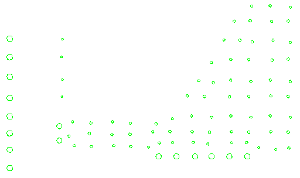
|
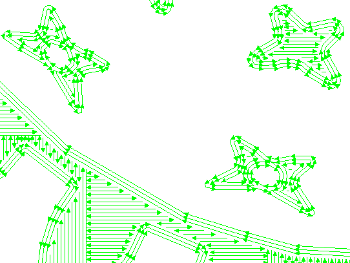
Calculation Start
It starts at processing/hatching.js with makeExposureLayer:
For all layers the makeExposureLayer function iterates over all islands (closed 2D areas) and all polylines (not necessarily closed polygon lines). The polyline hatching is rather simple:
| Processing | Result |
|---|---|
|
|
|
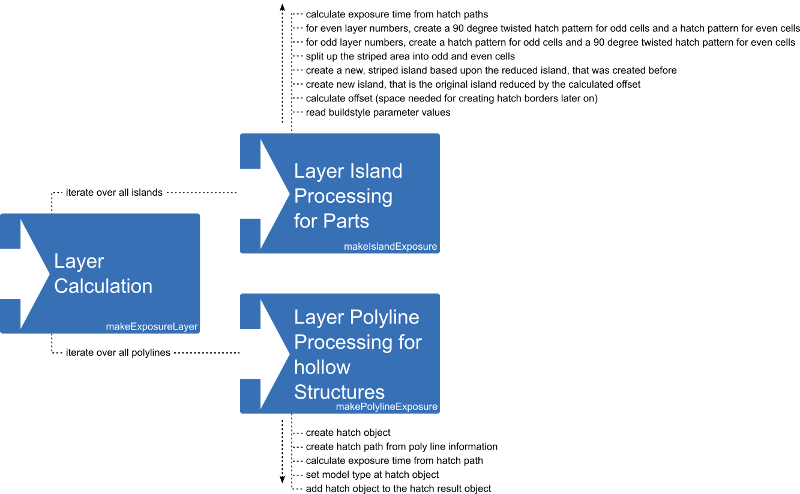
Island Processing
The island processing without creating a beam compensated border:
| Processing | Result |
|---|---|
|
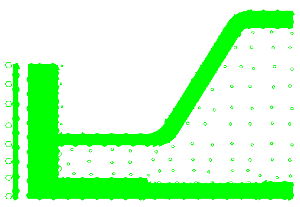
|
Full Processing
| Processing |
|---|
|
| Result |
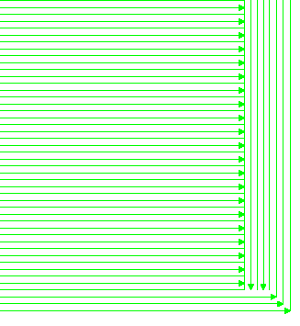
|
| Before/After results on another part |
|
Export
It doesn’t take much code to create standard exports, such as a CLI file. There’s already a generic JavaScript file for CLI or XML exports. The demonstration buildstyle creates a build time estimation and exports two CLI files (one CLI file for parts and another CLI file for support structures) into a directory.
Build-Time Estimation
exports.exportToDirectory = function(directory,
                                     filter,
                                     modelData,
                                     progress,
                                     attrDefaultPrinterSettings,
                                     attrPrinterSettings,
                                     runTests,
                                     doLogging)
{
  var modelCount = modelData.getModelCount();
  var overallHatchingTime = 0.0;
  for( var mIdx=0; mIdx < modelCount; mIdx++){
    var model = modelData.getModel(mIdx);
    var hatchTime = parseFloat(model.getAttrib(BS_EXPOSURE_TIME));
    overallHatchingTime += hatchTime;
    break;
  }
  // adding recoating time * layer count
  var recoatingTime = PARAM.getParamReal('machine_attributes', 'Recoating Time');
  var layerCount = modelData.getLayerCount();
  overallHatchingTime += ((recoatingTime/1000.0) * layerCount);
}
CLI Export
exports.exportToDirectory = function(directory,
                                     filter,
                                     modelData,
                                     progress,
                                     attrDefaultPrinterSettings,
                                     attrPrinterSettings,
                                     runTests,
                                     doLogging)
{
  var partFileName = 'part.cli';
  var supportFileName = 'support.cli';
  var partFile = new FILE.bsFile();
  var supportFile = new FILE.bsFile();

  partFile.createFile(directory,partFileName);
  supportFile.createFile(directory,supportFileName);

  var cliOptions = CLI.options.ascii;
  // build part exposure data
  var exporter = new CLI.cliExport(1.0,
                                   cliOptions | CLI.options.exposure | CLI.options.
˓→buildPart);
  exporter.exportCli(partFile, modelData, progress);

  // support exposure data
  var exporter = new CLI.cliExport(1.0,
                                   cliOptions | CLI.options.exposure | CLI.options.
˓→support);
  exporter.exportCli(supportFile, modelData, progress);
}