Use the Monte Carlo Packer for packing jobs with a large number of parts, or when you are concerned about interlocking. The Monte Carlo Packer prevents interlocking.
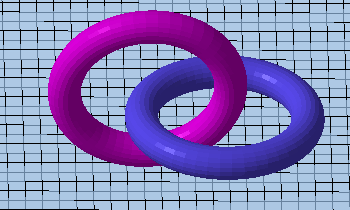
An example of two interlocking tori that can’t be separated.
Jump to:
To Pack Using the Monte Carlo Packer
- From the menu, choose
Arrange >
 3D Packing - MonteCarlo.
- In the appearing dialog, adjust the available options as needed.
- Click
Start Packing to pack the parts.
Note: Due to the random nature of testing for possible packing arrangements, the packer has no progress bar; however, it will stop packing eventually when there hasn't been a significant increase in packing density for a while. You may choose to watch the density percentage and stop packing yourself by clicking Stop Packing.
- When the packer stops, optionally click Resume Packing to see whether the parts can be packed more tightly.
- Click Close Packer to finish.
To Create No-Build Zones
No-build zones are simply defined by placing regular parts and switching them to constitute no-build zones. They may be contiguous, even intersecting. Collisions are only detected between regular parts, or regular parts and no-build zones. The process is reversible, parts which are currently set to be no-build zones can be switched back to be regular parts again.
- In the project tree, drag and drop parts into the No-build zones section of the respective platform.
- To turn a no-build zone back into a part, drag it out of the
No-build zones section.
Note: No-build zones that belong to a machine workspace by default cannot be turned into parts.
Working with the Part List
The part list is the second tab of the Monte Carlo packer's dialog. It lists parts with a number of properties:
| Name | |
| OK? |
Does the part have errors and needs repair? |
| Volume |
The true volume of the part. |
| No-Build Zone |
Parts set to be no-build zones may intersect with each other, but not with other parts. |
| Priority |
Parts with higher priority start lower in the initial part placement at the beginning of packing. |
| Rotation |
Sets whether parts may be rotated at the beginning of packing, and around which axes. If changed here, it will override the global setting on the first tab of the packer. Set to Default to adopt the global setting. |
The last two items can be changed from here. Changing them here is the same as changing them through the context menus of the parts in the 3D display.
- Select the part or parts whose properties you want to modify. You can select multiple parts by holding Ctrl or Shift while clicking.
- Right-click the column of the property you wish to change, and select the new value from the appearing context menu.