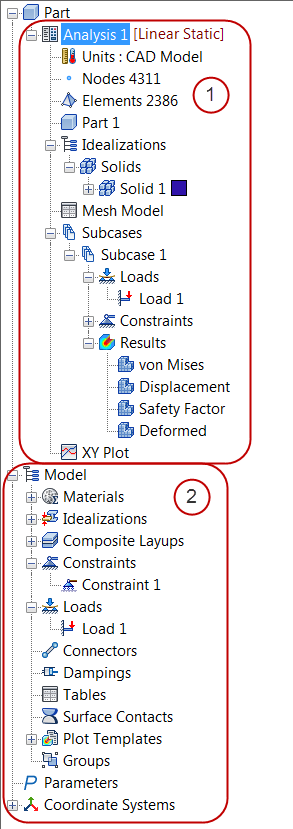
Autodesk Inventor Nastran exists as an environment in Autodesk Inventor. Its user interface is relatively simple, with a Model Tree consisting of two parts and a single ribbon tab divided into multiple panels.
Model Tree
The Model Tree lists the major settings in your Inventor Nastran analysis. It is divided into two sub-trees, the Analysis tree (1) and the Model tree (2).

1: Analysis tree
The Analysis tree contains the active analysis objects. It is the primary location for defining the analysis type. To modify, create, or duplicate settings, right-click on the analysis entity. You can also manage Subcases from the Analysis tree. Specific notes include:
- Right-click the top level Analysis branch to change and edit analysis settings.
- Mesh Model: Define mesh settings and controls.
- Surface Contacts: Add or edit contact relations between surfaces.
- Idealizations: Add or edit property settings.
- Subcases: Manage separate analyses that are run sequentially. You can add and edit settings from this branch. Note that in a nonlinear analysis, the results of one subcase are the initial conditions for the subsequent subcase.
2: Model tree
All FEA entities are stored in the Model tree for later use, but not all entities in the Model tree have to be used in a given analysis. You can drag settings from the Model tree into subcases as needed. If an entity is removed from a subcase, it is still available in the Model tree unless you delete it from here as well.
- Concentrated Masses: Lump mass elements that can represent more complex 3D bodies.
- Connectors: Specialized elements for connecting parts.
- Tables: Many tables can be created where needed on the fly, but this section stores them and can be used to create tables in advance of use.
- Surface Contacts: Contact must be initiated here.
- Plot Templates: Results views can be created and stored here.
- Groups: Node/Element groups are used in Contact definition and XY Plotting.
- Parameters: Autodesk Nastran solver Parameters provide high level control. See the Autodesk Nastran Reference Manual.
- Coordinate Systems: New analysis-specific CSs must be created here.
Output View
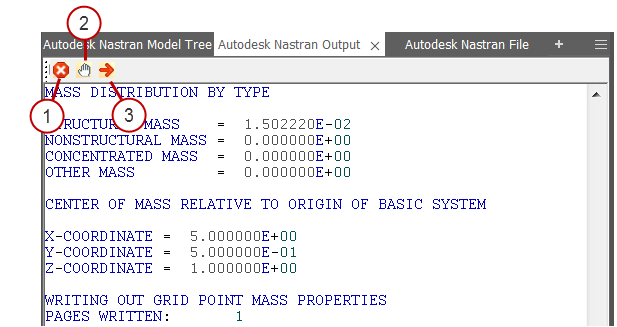
When the analysis is running, the Tree displays the Output View to show Autodesk Nastran Solver Log messages. Fatal errors appear in red.

- To stop the analysis, click the Kill button.
- To pause the analysis, click the Pause button.
- To resume a paused analysis, click the Resume button.
Ribbon Commands
The commands in the ribbon allow easy access to commonly used functionality. They streamline the Inventor Nastran workflow.

The following summarizes the Autodesk Inventor Nastran ribbon panels:
System
- Default Settings: Used to define initial settings for new analyses. The Default Settings dialog contains controls for General product settings, Display, Post-Processing, Report Generation, and for the Tree.
Analysis
- New: Create a new analysis and define the analysis settings. Note that this is the same as right-clicking on the Analysis branch of the Analysis tree.
- Edit: Open the analysis settings of the currently active analysis.
- Import from Stress Analysis: Import results of a stress analysis for use in another analysis.
Prepare
- Materials: Create a new material from scratch or using a library.
- Idealizations: Create new solids, shells, beams or concentrated masses, specifying their material and other properties.
- Offset Surfaces: Create a new surface offset from an existing one.
Setup
- Constraints: Define new constraints.
- Loads: Define new loads.
Contacts
- Automatic: Define contact conditions by locating all contact pairs. Note that you can modify the contact type by right-clicking on the contact condition in the Model Tree and selecting an alternative.
- Manual: Define contact conditions by selecting specific contact pairs.
- Solver: Specify attributes of surface contacts that are automatically generated when running the solver.
Mesh
- Mesh Settings: Modify the mesh settings affecting the entire model.
- Mesh Table: Activate the Mesh Table for additional control of the individual mesh on parts and bodies.
- Generate Mesh: Generate or regenerate the mesh after changing settings.
- Mesh Control: Specify different mesh settings for particular points, edges, or faces of the model.
Solve
- Run: Perform the calculations on the active analysis using the current settings.
Results
- Load: Open saved results and load them from an existing "FNO" file. This command maps the results to the current mesh. It is best used for comparing different subcases on the same model. If the mesh is different from the model that created the FNO file, the display may not make sense.
Display
- Object Visibility: Select which model elements to display or hide.
Nastran Support
- Help: Opens the homepage of the Autodesk Inventor Nastran Help.
- Tutorials: Opens the Tutorials topic within the Help.
- About: Opens a windows with information about the Autodesk Inventor Nastran version and License.
- ReadMe: Opens the online ReadMe webpage.
- Forum: Opens the online Forum webpage.
- Verification Manual: Launches the verification manual pdf file, which has all the benchmark and NAFEMS cases.
- Unload Results: Unloads all the results from your model.
Exit
- Finish Autodesk Nastran: When you are finished with your Autodesk Inventor Nastran session, click Exit to return to the general working environment of Autodesk® Inventor.
File Types
|
Relevance |
Type |
Autodesk Extensions |
Other Nastran Versions |
|---|---|---|---|
|
Primary |
Inventor Files |
*.iam, *.ipt |
-- |
|
Nastran Bulk Data File |
*.nas, *.bdf |
*.bdf, *.dat |
|
|
Binary Results File |
*.fno, *.op2 |
*.op2 |
|
|
Support Files |
Analysis Data |
*.log |
*.f04 |
|
ASCII Results File |
*.out |
*.f06 |
|
|
Model Initialization File |
*.ini |
-- |
|
|
Results Summary |
*.rsf |
-- |
|
|
Intermediate Files |
*.els, *.dis, *.gpf, *.gps, *.sta |
*.DBALL, *.MASTER, *.asm |
|
Previous Topic: Cantilevered Beam Exercise |
Next Topic: Cast Lever Exercise |