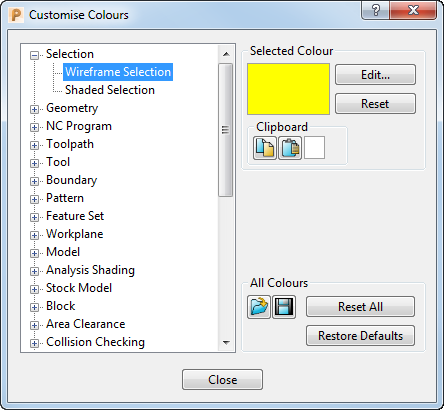
You can customise the colours of entities in PowerMill from the range of 32-bit colours via the standard Windows colour selector.
Click File tab > Options > Customise Colours to display the Customise Colours dialog.

The left side of the dialog displays the items that can have customised colours.
Selected Colour
Selecting an item in the tree enables the Selected Colour area of the dialog, which displays the current colour of your selected item. It contains the following:
Edit — Displays the standard Windows colour editing dialog. Select a colour and click OK to display this colour in the Selected Colour area of the Customise Colours dialog.
Reset — Reverts your colour selection to what it was when you started PowerMill.
 Copy — Copies the currently selected colour onto the clipboard.
 Paste — Pastes the colour on the clipboard into the selected colour.
 Clipboard Colour — Shows the colour currently on the clipboard.
All Colours

This is useful if you want to use different colour schemes for different types of work. This area contains the following:
 Import Colour Table — Loads a colour table from file. This displays the
Import Colour Table
dialog, which works in the same way as all Windows
Open dialogs
 .
.
 Export Colour Table — Saves the current colour table. This displays the
Export Colour Table
dialog, which works in the same way as all windows
Save
dialogs
 . All files are saved as
Colour Table files
*.pmlct. This can be useful if you need different colour schemes for different projects.
Reset All — Changes your colour selection to what it was when you started PowerMill.
Restore Defaults — Resets all the colours to their default values. The Query dialog is displayed. Click Yes to restore the defaults or No to cancel the request.
Feature or Pattern Colours
The active feature is drawn using its colour property (for example, the colour extracted from the CAD model). If an active feature does not have a colour property, then it is drawn in the active feature colour defined here. The same is true for Patterns.