Create a spiral stair run component by specifying the center point, start point, and endpoint for the run.

You can use the Center-Ends Spiral run tool to create a spiral run that is less than 360 degrees.
- While creating the run, move the cursor counter-clockwise or clockwise to specify the turn direction.
- A Flip tool is provided to change the turn direction in stair edit mode, if required.
To create a single spiral run
- Select the Center-Ends Spiral run component tool and specify initial options and properties. See Selecting the Run Component Tool and Specifying Options.
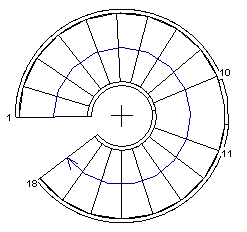
- In the drawing area, click to specify the center point for the run.
- Click to specify the start point.
- Move the cursor clockwise or counter-clockwise to set the turn direction, and click to specify the endpoint and the total number or risers.
- Optionally, on the Tools panel, click
 (Flip) to change the rotation of the stair from counter-clockwise to clockwise.
- On the Mode panel, click
 (Finish Edit Mode).

To create 2 spiral runs joined by a landing
- Select the Center-Ends Spiral run component tool and specify initial options. See Selecting the Run Component Tool and Specifying Options.
- On the Options Bar:
- For Location Line, select Run: Center.
- Verify that Automatic Landing is selected.
- Create a Center-ends Spiral run as in the previous procedure, but specify the end point for the landing when the desired number of risers has been reached (less than the total).
- Click to snap to the center point of the first spiral run.

- Move the cursor along the extension line, and click to specify the start point for the second run. Notice that the landing is created automatically. (The default landing depth is the same as the run width.)

- Click to specify the endpoint and create the remaining risers.
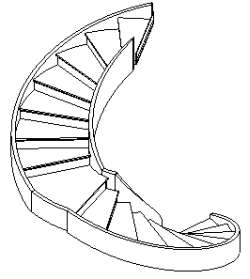
- Optionally, on the Quick Access Toolbar, click
 (Default 3D View).
- On the model panel, click
(Finish Edit Mode).