Use Trim/Extend, Quick Connect, or Route and Fill to fill gaps in a fabrication model for ductwork, pipework, or electrical containment.
- Use the
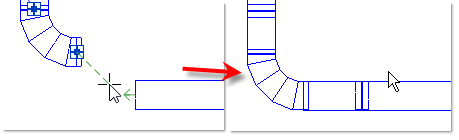
Trim/Extend tool to fill a gap between two straights, for example, when connecting a duct branch to a main or pipework to a header.
To fill a gap between two straights, use the Trim/Extend tool. See Trim and Extend Elements.Note: Trim/Extend always uses the first solution, which may not give you the desired result. By using Route and Fill, you can select from multiple solutions depending on the service's fittings. When connecting a branch to a main, use Route and Fill.
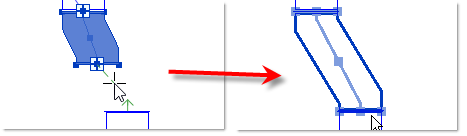
- Use the Quick Connect tool to fill a gap between a fitting and another straight where no additional fittings are needed, or between two straights. Drag a straight to make a connection to a connector, regardless of size when you select the connector snap on the other component.
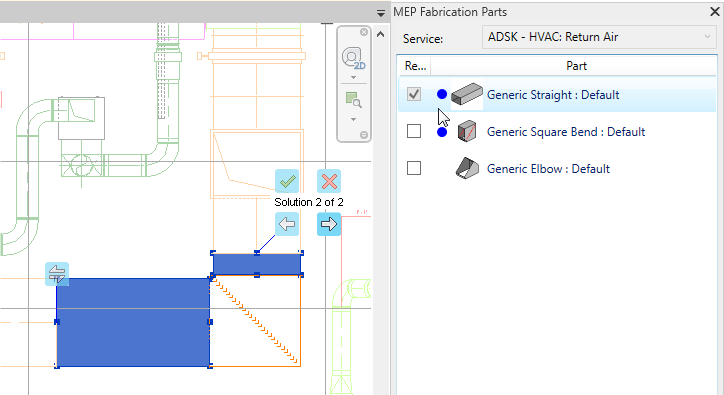
- Use the Route and Fill tool to add parts between two open connectors in a faster, more efficient way than placing parts one by one. The Route and Fill tool provides one or more solutions depending on the service. You can narrow the number of solutions by filtering the fittings used.
Note: A route must exist in a single plane. Solutions that require two planes or three bends are not supported.
Some of the factors that influence how MEP fabrication parts are chosen when using these auto fill tools are described below. Note that the behavior is slightly different, depending on the tool.
- Exclusions: Parts that are indicated as excluded in the MEP Fabrication Parts palette are never used for auto filling features. For example, if you have three different types of elbows displaying in the MEP Fabrication Parts palette, you should exclude the ones that you do not want, so that the preferred one is automatically placed, when using auto fill tools. For more information, see Exclude Parts from Auto Fill Tools.
- Fewest number of parts: Revit chooses the solution (part) that requires using the fewest number of parts in the run. For example, when adding to an existing run, a tap will be added, instead of a tee.
- Most compact solution: When multiple solutions with the same number of parts exist, the most compact solution is used.
 Video: Fill Gaps in a Fabrication Model
Quick Connect
To use the Quick Connect tool, follow these steps:
- Select a fabrication fitting with an open connector.
- Right-click and click Quick Connect or simply drag from the starting connector.
- Click an open connector on another fabrication part to establish the end of the route.
Quick connect is useful for stretching an offset or taper, or dragging a bend.
If more than one solution is available, Revit provides the option to open the Route and Fill editor.
Route and Fill
To use the Route and Fill tool, follow these steps:
- Select a fabrication part with an open connector. If the selected part has more than one open connector, you must select the connector you want to route from.
- Click Modify | Fabrication Parts tab
 Edit panel
 (Route and Fill).
As you move the mouse, Revit surveys the open connectors in the view that are on the same plane to determine if a connection is possible. An arrow displays on each available connector.Note:
(Route and Fill).
As you move the mouse, Revit surveys the open connectors in the view that are on the same plane to determine if a connection is possible. An arrow displays on each available connector.Note:- The connection angle cannot be greater than 90 degrees.
- Route and Fill will only provide solutions that have at most two bends/elbows. You can add an elbow to the end of a segment prior to using the tool to affect the offered solutions.
Tip: You can change the color of the arrow on the available connectors in the Fabrication Settings dialog.
- Click an open connector to establish the end of the route.
The start point must be a connector on a fabrication part. However, the end point may be on a generic Revit element such as a duct, pipe, or mechanical equipment.
In some cases, you may receive an error indicating: "Fabrication fitting could not be made to fit. A supported route could not be found." There may be a variety of reasons a solution cannot be found.- Check the exclusions to ensure there are suitable parts from which to create a solution. See Exclude Parts from Auto Fill Tools.
- Verify that the parts available have sizes defined consistent with the scenario. See Change the Size of Fabrication Parts.
- In some cases, there may not be sufficient room to fit a combination of fittings required for a solution. Solutions may be possible by moving elements further apart, or in the case of offsets, closer together.
- Click Previous and Next on the Solutions panel or
 and
and
 in the drawing area to view the possible solutions. Solutions requiring the fewest number of parts display first. As you click Next, the solutions displayed require more parts to complete the run.
Tip: You can also press the right and left arrows keys to view the next and previous solutions.
in the drawing area to view the possible solutions. Solutions requiring the fewest number of parts display first. As you click Next, the solutions displayed require more parts to complete the run.
Tip: You can also press the right and left arrows keys to view the next and previous solutions.The MEP Fabrication Parts palette displays all the parts used in the available solutions. A blue dot indicates that a part is used in the currently selected solution. As you position the cursor on a part in the list, the part is highlighted in the drawing area. In the MEP Fabrication Parts palette, select the check boxes to filter the list of available fittings and limit the number of solutions.
- (Optional) Changes in size, shape, and direction occur from the starting point of the route. To reverse the start and end points of the route, in the drawing area, click
 (Start Route from Opposite End).
- (Optional) To route to a tee or tap solution and select the centerline as the second point on a straight segment instead of an open connector, on the Solutions panel, click
 (Cut Into). Smart Snapping is automatically disabled when Cut Into is enabled.
- Click Finish on the Solutions panel or
 in the drawing area to accept a solution and complete the run.
Note: You can also press Enter to finish the command.
in the drawing area to accept a solution and complete the run.
Note: You can also press Enter to finish the command.