After using Dynamo for Revit to create a generative design study, integrate a selected outcome into the Revit model.
To integrate an outcome using Dynamo for Revit
- If needed, open
Revit,
Dynamo, and the Explore Outcomes dialog.
- If you closed the study type in
Dynamo and the model in
Revit, open them again and arrange the windows to display side by side.
For instructions, see steps 1, 2, and 4 in Create a Study Using Dynamo for Revit.
- If you closed the Explore Outcomes dialog for the study, in
Dynamo click Generative Design
 Explore Outcomes, and open the study.
- If you closed the study type in
Dynamo and the model in
Revit, open them again and arrange the windows to display side by side.
- In the
Explore Outcomes dialog, do the following:
- Select the outcome that you want to integrate into the
Revit model.
In the Variables section of the details pane, make a note of the outcome's values. You'll refer to this information in another step.
- Click Open in Dynamo.
- Select the outcome that you want to integrate into the
Revit model.
- Go to the
Dynamo window.
The following warning displays:
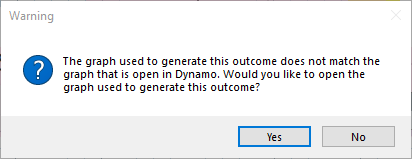
- Click Yes.
- If
another graph is currently open and it has unsaved changes, another warning displays asking if you want to save those changes. Answer it as needed.
Dynamo opens an edition of the study type that uses the inputs for the selected outcome.
- In the study type,
confirm that you selected the desired outcome.
When you integrate this outcome into the model, Dynamo adds to or modifies the model. Before doing this, confirm that you selected the desired outcome.
- In the study type, review the values shown for the variable input nodes, and compare them with values shown in the Explore Outcomes dialog.
If the values don't match, close the study type without saving changes, and start again.
- In the Run Settings bar at the bottom of the Dynamo window, click Run (or press F5).
- To see the 3D preview of the result (if it has one), press CTRL+B.
Confirm that the outcome is as expected. If any errors occur, resolve them before proceeding.
Note: Depending on the study type, the outcome may show abstract representations of the changes to be made, rather than actual Revit elements. When the outcome is integrated, the elements will display in the model. - To return to the graph view, press CTRL+B again.
- In the study type, review the values shown for the variable input nodes, and compare them with values shown in the Explore Outcomes dialog.
- Run the study type to make changes to the model.
- In the study type, locate the Data.Gate node.
The Data.Gate node is typically located towards the right side of the graph.
For a sample study type, it's located in a group box that's labeled something like "Create Revit elements" or "Gate node".
Note: Some study types don't contain a Data.Gate node. - For the Data.Gate node, change its value from Close to Open.
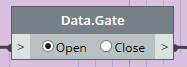
This change allows Dynamo to integrate the outcome into the model.
- Click Run to run the study type again.
You can ignore the issue about open gate nodes.
With the Data.Gate node open, Dynamo updates the model accordingly.
- In the study type, locate the Data.Gate node.
- In Revit, review the changes.