You can create a Generative Design study using Dynamo for Revit. This access does not require a subscription to the AEC Collection or other qualifiers. It only requires access to Revit.
Steps
- Open and prepare the model in Revit.
- Use Dynamo to open the study type.
- Create a copy in a different location.
- Arrange the Dynamo and Revit windows.
- Determine whether Revit elements are required.
- Select Revit elements.
- Run the study type to validate it.
- Create the study.
Open and prepare the model in Revit
- Open the
Revit model.
This is the Revit model that you want to use for the generative design study.
- Review information
about the study type so you understand what it does and what it needs to run successfully.
- For a sample study type, read its help topic.
- For a custom study type, consult the
Dynamo author or review information they have provided.
Note: If you don't have this information, you can learn it by examining the study type in Dynamo. Skip to Step 2: Use Dynamo to Open the Study Type. After completing Step 2 through Step 5: Determine whether Revit Elements Are Required, return to complete the rest of Step 1: Open and Prepare the Model in Revit.
- Prepare the model:
For a sample study type, go to its help topic and prepare the model as instructed in the section "Preparing the model".
For a custom study type, do the following:
- Open a view where you can see the part of the model and any objects involved in the study.
- Add instances of any Revit families required for the study.
- Optional: If you added any family instances to the model,
edit each family, and check the position of its origin. If needed,
move the origin to be at or near the midpoint of the family.
This change will result in better outcomes.
- To make it easier to select elements in the model when creating the study, turn on visibility for corresponding model categories, such as room reference lines and categories for family instances, such as furniture.
Use Dynamo to open the study type
- In
Revit, click Manage tab
 Visual Programming panelDynamo
 .
.
- In the Dynamo window, under Files, click Open.
- Navigate to the location where the study type resides, select its DYN file, and click Open.
To open a sample study type:
- Navigate to this location: %PROGRAMDATA%\Autodesk\AECGD\Revit\Samples <release>\
- In that location, open the folder for the desired
language and locale, such as en-US for English-United States or fr-FR for French-France.
For each study type, the folder contains a DYN file and its corresponding Dependencies folder.
- Select the desired DYN file, and click Open.
Create a copy of the study type in a different location
The sample study types are read-only. Before using one to create a study using Dynamo for Revit, create a copy of it in another folder.
- In
Dynamo, click FileSave As.
- Navigate to another folder, enter the file name, and click Save.
A message displays titled Warning: Dependencies folder required.
- Click OK in the message box.
You can ignore this warning for now. A Dependencies folder is created later in Step 8.
Arrange the Dynamo and Revit windows
You want to see both windows at the same time.
- Move and resize the windows on your monitor so you can see both Dynamo and Revit.
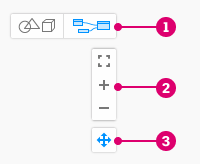
- To see the entire study type, zoom and pan using the middle mouse button or the Zoom
 and Pan
 controls.
- Colored boxes group the nodes into logical functions or steps. On the left, the gray box provides documentation. Sample groups describe how the different colors are used in the graph.
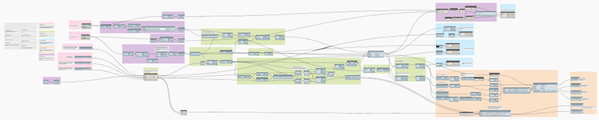
- Each group contains one or more nodes. Each node performs a specific operation.
- The graph may display warnings and errors. You'll look at these in a few moments.
 in the
Determine whether Revit elements are required
If the study type uses model elements when generating design alternatives, you need to manually select elements from the Revit model.
In Dynamo, check the study type for Revit selection nodes. The node names typically start with "Select", and they describe selecting something from the Revit model. They are usually on the left side of the graph.
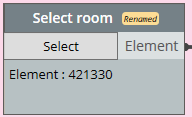
For sample study types, inputs are identified using pink group boxes. Zoom in on the part of the study type that displays pink group boxes. Check those nodes for Revit selection nodes similar to the following:
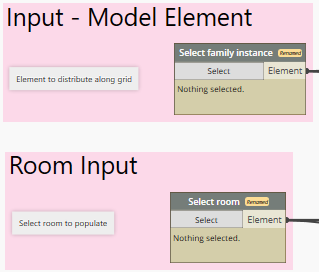
Select Revit elements
If the study type does not require Revit elements to be selected, skip to the next step.
Otherwise, for each Revit selection node, select elements for the study.
- In Revit, open a view where you can easily see and select the desired elements.
- In
Dynamo, do the following:
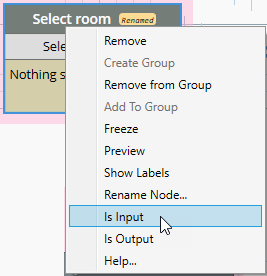
- Right-click the node's title bar and clear the check mark for Is Input.
This action removes the input field from the Define Study dialog.
Notice that the node states "Nothing selected."
- Click the Select tab of the node.

- Right-click the node's title bar and clear the check mark for Is Input.
- In
Revit, select the relevant element in the model.
In some cases, you need to select multiple elements at once. For example, when creating a Maximize Window Views study, you select multiple windows or curtain elements. (If you use a selection box, the selections are automatically filtered for the correct element type.) After selecting elements, click Finish on the Options Bar.
- In
Dynamo, confirm that the selection node displays the element ID (or IDs).
Repeat this process for each Revit selection node.
Run the study type to validate it
Running the study type is a validation step. When you click Run, Dynamo executes it once to make sure Dynamo has all needed information and can execute successfully using default settings.
- In
Dynamo, if the Generative Design Tools tab does not display in the right pane, on the menu bar click Generative DesignOpen Generative Design Tools.
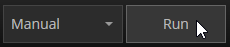
- In the Run Settings bar at the bottom of the
Dynamo window, click Run. (The keyboard shortcut is F5.) If the run settings are set to Automatic, the graph will run automatically.
- If any issues display in the Issues tab, review them. Click issue links to jump to those spots in the study type where adjustments are needed.
- After addressing issues, re-run the graph until all issues are resolved.
- Save the graph. The graph (DYN file) is updated with the changes. A Dependencies folder is also created in the same location as the DYN file.
When the study type runs successfully (or displays the message "Run completed with warnings"), an outcome may display behind the nodes. If desired, press CTRL+B to view the 3D preview so you can see the outcome more clearly. Use the middle mouse button to zoom in and out, if needed. Press CTRL+B again to return to the graph view.
Create the study
After running the study type to validate it and saving it in Dynamo, create the study to generate multiple outcomes.
- In the right pane of Dynamo, under Generative Design Tools, on the Study Type tab, make sure the Clear Cached Data option is turned off.
Note: You may want to leave the Include File Dependencies option off until you are ready to share the study with others. When selected, this option will copy any files referenced by an input node into the Dependencies folder for that study.
- At the bottom of the Generative Design Tools tab, click Create Study Type (or Update Study Type).
The graph is updated with the changes. A Dependencies folder is also created in the same location as the DYN file.
- On the menu bar, click Generative DesignCreate Study.
Wait a moment for the Create Study dialog to open. It may open in a different part of the screen.
- In the Create Study dialog, for Choose Folder, select the folder where the current study type resides. Then select the study type.
If the folder doesn't appear in the Choose Folder list, add it. Then select it from the Choose Folder drop-down list, and select the study type.
- In the Define Study dialog, complete the fields, resolve any issues, and click Generate.
The outcomes display in the Explore Outcomes dialog. Now you can do the following:
- Explore more outcomes of the study. Examine their details.
- Create a new study using different criteria. (Repeat Step 8.)
- Integrate a selected outcome into the Revit model.