3ds Max is an object-oriented program. This means that each object in the 3D scene carries instructions about 3ds Max what you can do with it. These instructions vary with the type of object. Because each object can respond to a different set of commands, you apply commands by first selecting the object and then choosing the command. This is known as a noun-verb interface, because you first select the object (the noun) and then invoke the command (the verb).
Identifying the Selection Interface
In the user interface, selection commands or functions appear in the following areas:
- Main toolbar
- Edit menu
- Quad menu (while objects are selected)
- Tools menu
- Track View
- Display panel
- Modify panel
- ribbon
- Schematic View
- Scene Explorer
The buttons on the main toolbar provide a direct means of selection. The Select From Scene dialog is easy to use, while the Edit menu provides more general selection commands, plus methods of selecting objects by property. Perhaps the most powerful selection tool is the Scene Explorer, which lets you select objects by various methods, and also edit object hierarchies and properties. Track View and Schematic View let you select objects from a hierarchical list.
Selection Buttons
The main toolbar has several selection-mode tools, listed following. When any of these tools is active, you can select objects by clicking them.
![]() Select Object
Select Object
![]() Select by Name
Select by Name
![]() Select And Move
Select And Move
![]() Select And Rotate
Select And Rotate
![]() Select And Scale
Select And Scale
![]() Select And Manipulate
Select And Manipulate
Of the selection buttons, you use Select Object when you want selection only. The remaining buttons let you both select and transform or manipulate your selection. Use transforms to move, rotate, and scale your selection. See Moving, Rotating, and Scaling Objects and Select and Manipulate.
Selecting with Quad Menu Commands
Rather than using the toolbar buttons, you might find it faster to choose selection-mode tools from the Transform quadrant of the quad (right-click) menu, where you can easily switch among Move, Rotate, Scale, and Select. Choose any of these and click the object to select in the viewport.
Selecting by Name
Another quick way to select an object is to use the keyboard shortcut for the Select By Name command. Press H on the keyboard to open the Select From Scene dialog and then select the object by name from the list. This is a foolproof way to ensure you select the correct object when the scene contains many overlapping objects.
Crossing Versus Window Selection
![]() One way to select multiple objects simultaneously is to drag a region, such as a rectangle, around them. The main toolbar
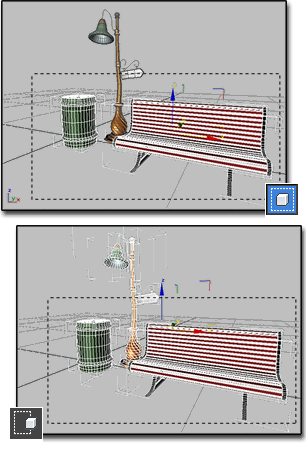
One way to select multiple objects simultaneously is to drag a region, such as a rectangle, around them. The main toolbar  Window/Crossing toggle switches between Window and Crossing modes when you select by region. In Window mode, you select only the objects entirely within the selection. In Crossing mode, you select all objects within the region, plus any objects crossing the boundaries of the region.

Above: Window selection selects the trash can and bench, but not the streetlight.
Below: Crossing selection selects all three: trash can, bench, and streetlight.
Edit Menu Commands
The Edit menu contains selection commands that operate globally on your objects.
Edit menu selection commands include:
Select By > Name (also a toolbar button)
Selection Region > Rectangular Region
Selection Region > Circular Region
Selection Region > Fence Region
Selection Region > Lasso Region
Selection Region > Paint Selection Region
Selection Region > Window (also a toolbar button)
Selection Region > Crossing (also a toolbar button)
Tools Menu Commands
The Tools menu provides the Scene Explorer commands as well as access to modeless selection dialogs or "floaters." You can place them anywhere on the screen, or minimize them by right-clicking the title bar and choosing Minimize:
- New Scene Explorer (and related commands) See Scene Explorer.
- Display Floater Provides options for hiding and freezing selections as well as some display options. See Display Floater.
- Layer Manager This modeless dialog lets you select objects individually and by layer, and change display properties such as Hide and Freeze. See Manage Layers Dialog.
Scene Explorer
The Scene Explorer gives you a modeless dialog for selecting and linking objects as well as changing object properties such as the name and display characteristics. You can manipulate hierarchical relationships via drag-and-drop techniques, and use various search methods including a powerful Boolean editor to fine-tune your selection. You can also edit properties for multiple objects at once simply by selecting them and then changing one of them.
Track/Schematic View Selection
Track View is primarily designed as an animation tool, but you can also use its Hierarchy List window as an alternative method of selecting objects by name and hierarchy. This works in both the Curve Editor and Dope Sheet modes of Track View.
Schematic View is specifically designed to let you navigate your scene efficiently, presenting a hierarchical view and letting you select objects and their properties by name.
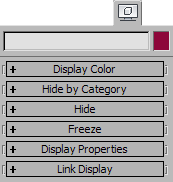
Display Panel Selection

The Display panel provides options for hiding and freezing objects. These techniques exclude objects from other selection methods, and are useful in simplifying complex scenes. Frozen objects are still visible, but hidden objects are not.