View designs automatically or manually, specify mode, display and save as an image, or disable ray tracing.
What's New: 2023
Changing the view orientation, or starting another command interrupts the ray tracing process. Where applicable, such as when using Orbit, the ray trace process reinitializes when the active command ceases to be used. For other commands, ray tracing disables automatically. To re-enable ray tracing use the ribbon access point.
When you enable ray tracing, the dialog unfolds in the lower right corner of the display, providing access to the three modes. The process begins using the default settings. When complete, the ray tracing dialog auto-hides after a couple of seconds. Moving the cursor into the dialog area causes the bar to redisplay.
Manually View Designs with Ray Tracing
- On the
View tab
 Appearance panel
Visual Style select either Realistic or Monochrome.
Appearance panel
Visual Style select either Realistic or Monochrome.
- Click
Ray Tracing. Click again to disable the feature.
- In the Ray Tracing bar in the lower right of the display area, select the appropriate ray tracing mode:
- Low
- Rough and semi-rough materials are approximated. Consequently, materials may look shinier than expected. Direct lighting is approximated and indirect lighting is treated as a constant ambient color. Shadows will lack in details. Useful for quick previews of outdoor/product renderings, but unsuitable for interior scenes.
- Draft
- Rough and semi-rough materials are approximated. Consequently, materials may look shinier than expected. Lighting is approximated so shadows will lack in details. Useful for quick previews.
- High
-
Soft shadows and soft reflections from semi-rough materials will be rendered with a high quality level. This is the standard setting for final high quality renderings.
- You can interrupt the rendering process at any time to save, pause, or disable the scene rendering, click the appropriate button. To resume rendering, click Continue.
- Save
- Saves the image at its current resolution state. Specify the name file type, and location in the Save As dialog.
- Pause
- Interrupts the ray tracing process. Click continue to resume. Scene changes such as orbit, zoom, and so on will cause the render to start over.
- Disable
- Halts the ray tracing process and returns to raster display mode. See below for more options.
Note: Ray tracing is enabled only for Realistic and Monochrome visual styles.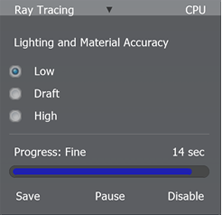
Lighting and Material Accuracy
Save, Pause, or Disable Scene Rendering in Process
- In the Ray Tracing bar in the lower right of the display area, select the appropriate ray tracing mode:
By default, Ray Tracing is not enabled to automatically render the scene.
Save Ray Tracing Result as an Image
- On the File menu, click Save As Save Copy As.
- Specify a name, file type, and location for the image.
- Click the Options button and specify the image size and whether it will render with a transparent background.
Note: If you specify a different image size than the screen, the scene renders with at that size during the save operation. The default image options save immediately.
- Click OK and click Save.
Disable Ray Tracing
- In the Ray Tracing dialog, click Disable.
- On the ribbon View tab, Appearance panel, click Ray Tracing.
- Change from the Realistic or Monochrome visual style to any other visual style.
- Activate a command that disables ray tracing.
- Modify the application option or document display settings to remove the automatic setting from the Realistic visual style.
Use one of the following methods:
Automatically View Designs with Ray Tracing
By default Ray Tracing is disabled. You can enable it for all models as an application option or on a per document basis using Document Appearance settings. Because ray tracing works only with two specific visual styles it automatically initializes only when one of those styles is active.
- In the
Tools tab
Options panel click
Application Options.
- On the
Display tab Appearance section
specify application settings.
- Click Settings, and in the dialog Realistic Visual Style section check Enable Ray Tracing. Ray tracing is automatically enabled when you open the file.
To use application settings:
- In the
Tools tab
Options panel click
Application Options.
- On the
Display tab Appearance section
specify document settings.
- Click Settings, and in the dialog Realistic Visual Style section check Enable Ray Tracing. Ray tracing is automatically enabled when you open the file.
To use document settings:
CPU Ray Tracing or GPU Ray Tracing

Perhaps you noticed in the Ray Tracing dialog, the upper right corner says CPU. Starting with Inventor 2023 GPU Ray Tracing is a Pre-release option. When the option is in use this area will show GPU.
To learn more about the option or make use of it, if your hardware supports GPU ray tracing, see GPU Ray Tracing (Pre-release) Details.