In this exercise, you export the object classes in your drawing to multiple feature classes in a single Autodesk SDF file.
Note: This exercise uses the map you created in
Exercise 1: Create objects using object classes.
To export to an Autodesk SDF file using object classes
- If the ObjectClass.dwg file you created previously is not still open, open it.
- Click

 . Find
- In the Export Location dialog box, do the following:
- Make sure that Files Of Type is set to Autodesk SDF (*.sdf).
- Navigate to the folder where you copied the tutorial data.
- For the file name, enter Roads_Parcels_Signals.sdf.
- Click OK.
- In the Export dialog box, under Filter Selection, click Select Object Classes.

- In the Select Object Classes dialog box, hold down the Ctrl or Shift key and click all three object classes. Click Select.
- In the Export dialog box, click the Feature Class tab and do the following:
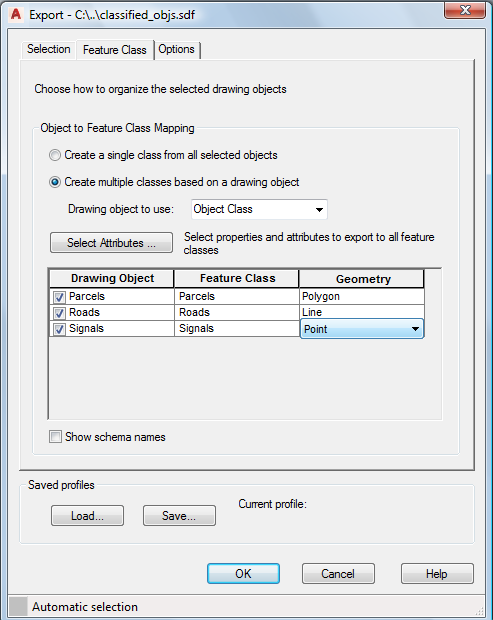
- Under Object To Feature Class Mapping, click Create Multiple Classes Based On Drawing Object.
- For Drawing Object To Use, select Object Class.
- Click Select Attributes.
- In the Select Attributes dialog box, expand the Object Classes item and select all three object classes. Click OK.
The new SDF file will contain one feature class for each object class you selected. The properties of each feature class match the attributes of its corresponding object class.
- On the Feature Class tab of the Export dialog box, under Object To Feature Class Mapping, specify the appropriate Geometry entry:
- For Roads, select Line.
- For Parcels, select Polygon.
- For Signals, select Point.

Use object classes to create feature classes, specifying the geometry type for each one.
- Click OK.
To continue this tutorial, go to Exercise 2: Connect to the resulting SDF file.