These steps explain how to create an LOD group if you already have the various versions of a mesh you want to display at different times. If you only have the high resolution version of the mesh and you want to automatically generate the lower resolution versions to display, see Generate LOD meshes.
- View the scene through the camera with which you want to associate the LOD group.
For example, view the scene through one main view panel, and select your main game camera from the Panels > Perspective or Panels > Orthographic menus.
- In order, select the geometry you want to put in the LOD group.
Select the highest resolution model first, and the lowest resolution model last. By default, objects are assigned to the LOD level stack in the order you select them, so you want the highest resolution model to be ordered first.
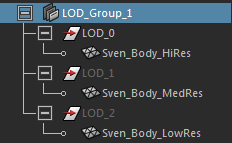
For example, selecting (1) Sven_Body_HiRes, (2) Sven_Body_MedRes, then (3) Sven_Body_LowRes creates the following LOD group:
- Do either of the following, depending on whether you want to edit LOD options before creating the group:
- On the
General shelf, click
Create LOD
 .
.
- From the main menu bar, select
Edit > LOD (Level of Detail) > Create Group >
 .
.
- On the
General shelf, click
Create LOD
- (Optional) If you opened the
Setup Lod Options, confirm the
Threshold Type is set the way you want, then click
Setup Lod.
By default, the Threshold Type is set to Screen Height Percentage so that levels display based on the percentage of screen height taken up by the overall LOD group in the current camera frame. Screen Height Percentage measures the overall height of all the meshes in the LOD group relative to the current camera frame, and establishes an initial default percentage for each level to display. You can edit these threshold values yourself later on. See Edit LOD threshold values.
Tip: To better visualize the percentage of screen height for your LOD group, you can turn on Film Gate and
Gate Mask
and
Gate Mask
 in the
panel toolbar. (Or select
View > Camera Settings > Film Gate and
View > Camera Settings > Gate Mask from the
panel menus.)
in the
panel toolbar. (Or select
View > Camera Settings > Film Gate and
View > Camera Settings > Gate Mask from the
panel menus.)
This creates the LOD group in your scene, and hides all but one level in the group, depending on your camera view.
- (Optional) Open the
Outliner to view your LOD group in the scene hierarchy.
Expand each LOD_n sub-group to see the associated mesh (or meshes).