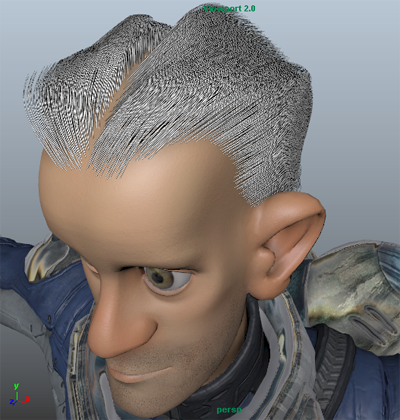
To create a part in your character's hair, you can create a Ptex-based region map. A region map provides a way to override how the guides interpolate the placement and behavior of the curves. To create a hair part along the center of the scalp, you paint each side of the scalp two different colors, which define the two regions of the map. The map prevents splines from crossing over the colored painted regions. This forces the splines to either side of the painted area creating a hair part.
- Clear the preview and turn off Update Preview Automatically.
- Click the Primitives tab.
- In the Region Control section, click this icon
 beside Region Map then select click Create Map from the menu that appears.
 - In the Create Map window, type a name, such as part_Region, for the map.
- Set the following:
- Map Resolution to 30.
This sets the number of texels per-face for the Ptex map.
Start Color to Red.
When you paint a region map, it is import to select two easily distinguishable colors, such as red and blue. The colors you select are not associated with any attribute value.
- Map Resolution to 30.
- In the Color section of the Tool Settings window, click the color swatch and select blue.
Maya automatically sets the other 3D Paint Tool settings for region map painting.
- Use the 3D Paint Tool to paint half of the scalp area blue. Note: It is important that one side of the scalp is red and the other side blue. Make sure there are no patches mistakenly painted blue in the red half of the scalp. Otherwise, the region map will not work properly.

- Click this
 icon to save the Ptex map.
 - In the Region Control section, set Region Mask to 1.0.
Setting the Region Mask attribute to 1.0 enables the Region Map on the mesh.
After creating the hair part, you may need to create a Region Mask to override the part along the back of the head. This way, the part starts at the front hairline and stops at the crown of the head.
- Preview the Description.

Create a region mask to override the hair part
- In the Region Control section, click this icon beside
 Region Mask then select Create Map from the menu that appears.
 - In the Create Map window, set the following:
- Map Resolution to 30.
Start Color to White.
This sets the map value to 1, which keeps the effect of the region map on the mesh. You can then paint black on the areas of the mesh where you want to override the region map.
- Map Resolution to 30.
- In the Tool Settings window, set Color to Black.
Use the brush settings you used for the other Ptex-based mask to paint the region mask. See Create a hairline using a Ptex map.
- Use the 3D Paint Tool to paint the area where you want the region map masked.
- Save the map and preview the Description.
