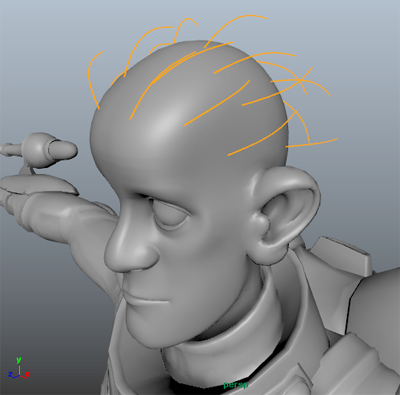
At this point in the workflow, you should have an idea about basic shape of the hairstyle. You can use XGen Utilities, such as Guides As Curves or Lattice, to generate the basic shape from the guides.
 beside
Preview
beside
Preview
 , and turning off
Update Preview Automatically. Clear the preview by clicking
, and turning off
Update Preview Automatically. Clear the preview by clicking
 . This lets you better see the guides as you work with them.
- In the
Outliner,
 -select all the guides.
- In the XGen window, click the Utilities tab.
- Under
Utilities, click
 to select the Guides As Curves utility.
This utility lets you shape the guides as NURBS curves.
- Under
Guides As Curves, click Modify As Curves.
A temporary NURBS curve is created for each guide.
- Select the curve CV then use the
Move Tool to create the basic shape of your hairstyle.
 Tip: If you select the mesh by mistake while manipulating the curve CVs, you can lose the component-mode selection on the curves.If you have problems getting the shape you want, add control vertices to the guides by increasing their CV count.
If this happens, click Accept to save the curves you have already modified. Select the guides you still want to shape, and then click Modify As Curves.
- (Optional) To increase a guide's CV count, in the Primitives Attributes section of the Primitives tab, click Rebuild and increase the CV Count value in the Rebuild Guides window.
-
After shaping the guides, locate and expand the xgCurveFromGuide group in the Outliner and select all the _tempCurves objects.
- Click
Accept.
Maya applies the curve shapes to the guides and deletes the temporary curves.
 Note: You can shape guides individually by
 -clicking a guide, and then selecting
Guide Control Points from the menu that appears.
-clicking a guide, and then selecting
Guide Control Points from the menu that appears.
- With the guides selected, click this icon
 to mirror their position and shape to the opposite side of the mesh.
Tip: If you want to create a hairstyle that is not symmetrical, you can reshape the guides after you have mirrored them.
to mirror their position and shape to the opposite side of the mesh.
Tip: If you want to create a hairstyle that is not symmetrical, you can reshape the guides after you have mirrored them. - Click the preview icon
to view the generated splines.
Tip: After you finish shaping the guides, you can hide them by clicking
 .
.
Notice that the splines cover the scalp region, but are spread too thin. Increase the Density attribute to add more splines per-face and preview the Description again.
- In the Generator Attributes section, set Density to a value between 25 and 30, and then preview the Description.
With the basic hair style completed, you can modify primitive attributes so the splines look more like hairs by setting the width and adding taper.
To set spline Width and Taper
- In the XGen window, click the Primitives tab.
- In the Primitive Attributes
section, set the following:
- Width to a value between 0.03 and 0.08.
- Taper to a value between 0.7 and 1.0.
- Taper Start to 0.3.