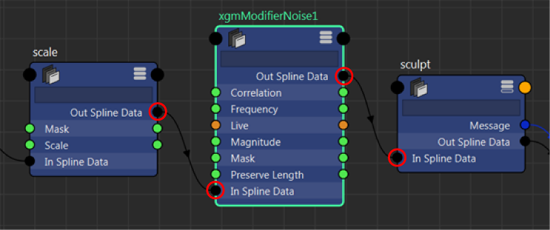
You can add interactive grooming modifiers to your groom using the Interactive Groom Editor or by creating the modifier nodes in the Node Editor. To modify the properties of a specific modifier, select it, and then edit its attributes in the Attribute Editor.
Create a mask for the modifier so you can better control how its effect is distributed across the hairs. You can set modifier attributes using texture files. See Work with masks.
Work with modifiers in the Interactive Groom Editor
| To... | Do this |
|---|---|
| Add a modifier | Select the description, click
Add Modifier, and select one from the list that appears.
The modifier gets added to the top of the modifier stack. Its input automatically connects to the output of the modifier below it. |
| Edit modifier settings | Select the modifier and edit the modifier settings in the Attribute Editor. |
| Reorder modifiers | Select one of the following methods:
|
| Duplicate a modifier | Select one of the following methods:
|
| Disable a modifier
Disabling a modifier temporarily removes it from the processing stack. The modifier settings are not deleted. |
Click this icon
 to the left of the modifier. to the left of the modifier.
Click this icon
|
| Delete a modifier
Deleting a modifier permanently removes it from the description node network and deletes all its settings. |
Select the modifier, then select one of the following methods:
|
Add a modifier using the Node Editor
After you add a modifier, you can edit, delete, or disable it in the Node Editor like other Maya nodes.
- In the Node Editor, create a modifier node by pressing Tab and typing its name and press Enter.
All interactive grooming modifier nodes start with xgmModifier followed by its name, for example, xgmModifierNoise for the Noise modifier. For a list of modifiers and their node names, see Interactive grooming modifiers.
The modifier node appears in the Interactive Groom Editor using its node name.
- Depending on where you want to position the modifier in the stack do one of the following:
- Position the modifier node between two other interactive grooming modifier nodes and connect its In Spline Data and
Out Spline Data
ports to the respective ports of the adjacent nodes.

- To position the node at the bottom of the modifier stack so it gets computed first, connect its In Spline Data port to the Out Spline Data port of the description_base node.
- To position the node at the top of the modifier stack so it gets computed last, connect its Out Spline Data port to the Input Spline Data port of the descriptionShape node.
- Position the modifier node between two other interactive grooming modifier nodes and connect its In Spline Data and
Out Spline Data
ports to the respective ports of the adjacent nodes.
 or
or
 to move the modifier up or down in the stack.
 to re-enable the modifier.
 icon.
icon.