
To view the File Type Specific options for FBX:
- Select and choose FBX Import or FBX_DAE Import from the File Type drop down.
Presets
- Autodesk Media and Entertainment
- The Autodesk Media and Entertainment preset contains the most options since it contains the optimal settings for most animation workflows. All available options are visible in the UI so you can access and customize them.
- Autodesk MotionBuilder
- Use the Autodesk MotionBuilder preset if you are using a Maya to MotionBuilder back to Maya workflow. This preset uses the Constraints and Skeleton Definitions options set for optimal Character animation using Maya and MotionBuilder.
- User Defined
- The User Defined preset label displays whenever you modify a setting that is different from the preset default.
- Editing presets
- If you change a preset, the preset field displays User defined, to show that the preset differs from its default state. You can find the user-defined states in a temporary file so that the settings are the default the next time you use the plug-in.
- You can also save your settings is a custom preset. See Creating a custom preset.
Statistics
The Statistics window lets you view relevant meta information about the incoming (FBX) file and system (application) settings. Information varies depending on what is in the file. For example, you can use the statistics section to identify when the file was created, what direction the Up-axis faces, the file units used, and frame rate.
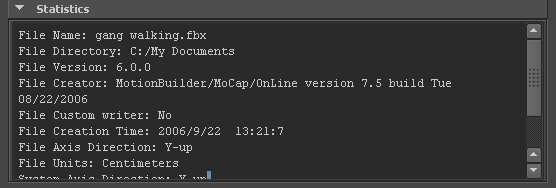
- Sometimes statistics are hidden below the window edge; use the scroll bar to view it.
- If the FPS (frame rate) is not a standard rate (24, 25, 30, 48, 50, 60, 100, 120 fps), it is not displayed. For example, an FBX file that uses a frame rate of 8 frames per second does not display in the Importer statistics. If the frame rate does not match between the FBX file and its host application, a warning appears next to the System Frame Rate value. If the frame rate is not a standard rate, the Importer displays the system frame rate but no warning.
Include
- File Content
- Use the File Content menu to select how to import the content of your file into the host application. Select from the following three options:
-
- Add
- This option adds the content of the FBX file to your scene. If elements exist in the host application they are duplicated, so use this option to add non-existing elements to your scene.
Tip: Use this option if you are importing multiple characters from 3ds Max into a game engine. Otherwise, naming conflicts occur that combine the character's root joints together. When you export to a game engine, you must remove any namespaces. See FBX plug-in renaming strategy for more information.
- Add and update animation
- This option adds new content and updates animation from your file to matching objects in your scene.
- For example, if there is animation on any object in the FBX file and the object name is identical to an object in the destination application, that animation is replaced. If the object with the same name does not have animation, the new animation is added.
- This is the default option for the Media & Entertainment and MotionBuilder presets.
Tip: If you plan to import multiple characters into a game engine, use the Add option above, or naming conflicts occur. See FBX plug-in renaming strategy for more information.
- Update animation
- This option adds the content of the FBX file to your scene but only updates existing animation; any objects in the file that are not already in the scene are ignored.
- Add and update animation
- This option adds new content and updates animation from your file to matching objects in your scene.
- For example, if there is animation on any object in the FBX file and the object name is identical to an object in the destination application, that animation is replaced. If the object with the same name does not have animation, the new animation is added.
- This is the default option for the Media & Entertainment and MotionBuilder presets.
- Update animation (keyed transforms)
- Use this option so that existing un-keyed transforms on existing scene elements are not overwritten, and instead are preserved in their current state. With the new option, only Keyed animation from the imported file updates the transforms on open elements in scene.
Warning: If you intend to exclusively-merge hierarchies containing animation data, the new animation is ignored on unkeyed import transforms are identically named. If identically-named transforms have keys, existing import behavior is maintained .
If this option is missing from the FBX Import > Include options, see Where is the "Update animation (keyed transforms)" option in the UI? or use the Script the import mode to merge keyed transforms script.
- Geometry
- Expand the Geometry rollout to access options related to importing geometry into your scene.
-
- Smoothing Groups
-
Activate this option to import Smoothing Groups with the file.

-
Note:
FBX polygon objects with smooth edge normals will reimport into Maya with incorrect normal information unless you activate the Smoothing Groups option in the Include > Geometry section on export, and this Smoothing Groups option on import.
- Unlock Normals
- Activate this option to unlock geometry normals and force Maya to re-compute the edge continuity.
Note:
- Normals are automatically unlocked for all deformed geometry imported into Maya.
- Locked normals can create shading issues for geometry if a deformer is applied after import. Unlocking geometry normals resolves this.
- Combine per-vertex Normals
- Activate this option to combine geometry vertex Normals.
- Common uses of this option include reverting the Split per-vertex Normals option of the FBX Export window. For more information regarding this workflow see Split per-vertex Normals in the FBX Export options.
- When you use the Combine per-vertex Normals option in the FBX Importer, the Maya FBX plug-in performs the inverse operation of the Split per-vertex Normals option in the FBX Export window. This can result in incorrect UV texture maps (see the note below).
- If you are not using a merge-back workflow (merging FBX into an existing scene) this option might result in incorrect UV mapping when you re-import the FBX file into Maya. Import your FBX file into to your original Maya scene to avoid geometry UV issues with split geometry.
Note: Using this option permanently alters any UV maps applied to geometry. The plug-in properly re-assigns the UVs to the newly split geometry. There is a limitation in regards to UVs, when importing this geometry into an empty Maya scene, using the Combine per-vertex Normals option in the FBX Importer, as it may result in incorrect UV assignments.
- Animation
- Expand this rollout and activate this option to import animation found in the scene.
-
- Extra Options
- Expand this section to view additional import options.
- Animation Take
- Displays the current animation take in the FBX file.
- If no animation take exists in the file, the field shows a No animation message.
- If several animation takes exist in the file, the currently selected take is displayed in the field.
You can change the selected take of animation by selecting another take from the menu. The Maya FBX plug-in lists all available takes of animation contained in the file.
Note: You can only select and import a single take of animation at a time. - Fill Timeline
- Activate this option when you want to update the application timeline by the animation range in the incoming FBX file. “Animation range” refers to the first and last keys of animation contained in the file.
- Bake Animation Layers
- When the Bake Animation Layers option is active, the plug-in collapses all layers into the base layer. If you disable the Bake Animation Layers option, all the layers in the FBX file will be imported.
- Optical Markers
- Activate this option to convert optical markers contained in the file into dummy objects on import.
- If you disable this option, the import process ignores this data.
- Optical markers normally come from motion capture data, as a cloud of animated points or markers. The Maya FBX plug-in does not import the animation as the data type is incompatible. However, the Maya FBX plug-in converts optical data into a cloud of static null objects in Maya.
Tip: If your optical data originates from MotionBuilder, you can set the state of all optical markers to Done in MotionBuilder which lets you import the animation data as curves in Maya.
- This option is useful if you need to import optical data that is stored within an FBX file. For example, if you wanted to send an FBX file containing optical data that someone needs to use in Maya but they do not use MotionBuilder, you can activate this option to use the FBX file format to store optical data.
- Quaternion Interpolation Mode
- Use this option to convert and resample quaternion interpolation into Euler curves to ensure interoperability.
Resample as Euler interpolation This is the default conversion setting for quaternion interpolations .
This option converts and resamples quaternion interpolations into Euler curves to ensure interoperability.
Retain Quaternion Interpolation This option retains quaternion interpolation types during the import process. Tip:Use this when you import animation that has quaternion interpolations. This is only compatible with applications supporting this interpolation type, such as Autodesk MotionBuilder. Also, the resulting animation is not identical since quaternion evaluations are different in Maya and MotionBuilder. Use the default (Resample as Euler interpolation) option in order to obtain visual results identical to your animation in MotionBuilder, or other applications.
Set as Euler Interpolation This option lets you change the interpolation type of quaternion keys to a Euler type, without resampling the animation curves themselves. Tip:Using this option results in the same number of keys, set as Euler types. The visual result will be different since it will now be evaluated as a Euler interpolation. Use the default (Resample as Euler interpolation) option to obtain visual results identical to your animation in MotionBuilder, or other applications.
- Protect Driven Keys
- Activate this option to prevent any incoming animation from overwriting channels with driven keys. Maya has special driven keys that link one attribute value to another object attribute. These keys are exclusive to Maya and are not supported by FBX. When this option is active, the Maya FBX plug-in prevents the disconnection or overwrite of attributes that use driven keys.
- If the option is active, the driven keys are protected and no incoming animation is applied to the driven channels.
- If the option is not active, the driven keys are discarded and the incoming animation is applied to the driven channels.
- Deforming Elements to Joints
- Activate this option to convert deforming elements into Maya joints. This option was originally provided because Maya did not support locator elements (that is, transform nodes that are not joints,) within a joint chain.
- If this option is not active, all elements other than joints being used to deform are converted to locators.
- Update Pivots from Nulls
- Activate this option only when you import older (pre-MotionBuilder 5.5) FBX files that contain an animated joint hierarchy, for example, an animated character.
- This option lets you assign the rotation transformation of the null (or joints) elements in the hierarchy that are used as pre- and post-rotation to the joint orient and the rotate axis of the original node.
- The pre-rotation and post-rotation nodes are then deleted. Older files created with the Export Pre/Post Rotation as Nulls option are merged back to the original Maya setup.
- Geometry Cache File(s)
-
Activate this option to import FBX-exported geometry cache data during the FBX import process.
The Maya FBX plug-in generates three files when you export Geometry cache files using FBX:
- an FBX file
- an XML file
- an MCX file
The plug-in stores XML and MCX files in a subfolder named after the FBX file and has the suffix FPC (_fpc).
For example, if you export a scene containing a cube named pCube1 to the FBX file myTest.fbx, you create the following files:
- myTest.fbx
- myTest_fpc
- pCubeShape1.xml
- pCubeShape1.mcx
- Animation
- Deformed Models
- Activate the Deformed Models option to import Skin and Blend Shape deformations.
- You can choose to import Skins and Blend Shapes specifically by expanding Deformed Models to access individual options. You also have the option to Pre-normalize weights. Pre-normalizing weights normalizes the weight assignment of skin deformations so that smooth skin weights add up to one.
-
- Skins
- Activate this option to import all skin deformation into your scene.
- Blend Shapes
- Activate this option to import all geometry Blend Shapes into your scene.
- Pre-Normalize Weights
- Activate this option to normalize weight assignment.
- During the import process, the Maya FBX plug-in can pre-Normalize weights to ensure that every vertex on a skinned mesh has a weight no less than a total of 1.0. You can have many joints that influence a single vertex, however, the percentage of each deforming joint always equals a sum total of 1.0.
- Use this function if you import older FBX files that result in abnormal mesh deformations.
- Constraints
- Activate this option to ensure that certain supported constraints contained in the FBX file are imported into
Maya. If this option is not active, no supported constraints are imported.
FBX supported constraints include:
- Point
- Aim
- Orient
- Parent
- IK handle (including Pole Vector)
-
- Skeleton Definitions
- Select the Skeleton definition to include (FBIK/HumanIK/None) in the file on export. This can be useful if you are transferring to MotionBuilder, which also supports characters.
- Cameras
- Activate this option to import all cameras contained in the file. The plug-in imports camera settings, but not render settings. This can change rendering results depending on the source application used in comparison. See Why are my cameras inconsistent? in FBX Troubleshooting for more about render settings limitations.
- The plug-in saves cameras as FBX types in the FBX file for interoperability. This means they must convert into Maya camera types on import.
- Lights
- Activate this option to import all lights contained in the file. The Maya FBX plug-in exports and converts light types to ensure FBX interoperability.
- FBX supports Standard Point, Spot, and Directional light types from Autodesk 3ds Max, Autodesk MotionBuilder, and other Autodesk applications.
- Audio
- Activate this option to import all audio contained with the file.
Advanced options
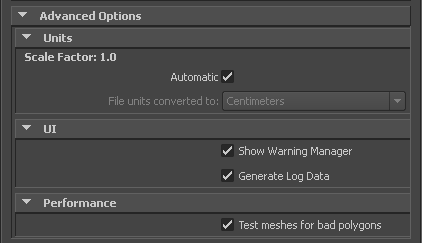
- Units
- The
Units option lets you view the conversion factor (scaling value) the plug-in uses as well as modify the conversion units.
This option automatically identifies, sets, and converts units of the incoming file to match units of the host application.
If this option is active, but the File Units match the system units, there is no need for scale conversion and the plug-in applies no conversion. The displayed Scale Factor is 1.0 in this case.Note: This conversion affects only incoming data. This conversion does not change the settings in Maya. - Scale Factor
- Displays the conversion value or Scale Factor that the plug-in applies to the entire incoming scene.
- The Maya FBX plug-in compares the units used in the host application with the units used in the file imported to determine the Scale Factor value. The plug-in then proposes a unit conversion that matches the system units in the host application. The displayed Scale Factor is the result of this calculation.
- For example, if you import a scene from software that used centimeters as the working units to software that uses feet as units, the Scale Factor will be 2.54. This option is always active, but if your File Units match the system units, the plug-in does not apply a scale conversion. No conversion is applied. The displayed
Scale Factor is 1.0 in this case.
Note: If you change the File Units Converted to: option, you can modify the Scale Factor value applied to incoming data.
- Automatic
- Activate the Automatic option if you want the Maya FBX plug-in to automatically identify, set, and convert units of the incoming file to match units of the host application.
- When you activate
Automatic, the
Scene units converted to option is disabled, although it shows the resolved unit and scale factor. If you disable the
Automatic option, the Scene units converted to option becomes available. When
Automatic is active but the file units match the system units, there is no need for scale conversion and the plug-in applies no conversion. The displayed
Scale Factor is 1.0 in this case.
Note: This conversion affects only incoming data. This does not change the settings in Maya.
- File Units converted to
- Use this menu to specify the units to which you want to convert the file. Modifying this setting directly affects the
Scale Factor value applied to the incoming data. The Maya FBX plug-in looks at the
Settings/Working Units in the
Preferences window of Maya.
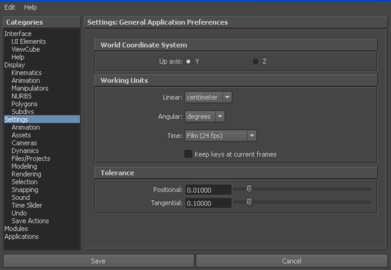
- The displayed
Scale Factor uses this unit setting for its calculation. This automatic behavior ensures that the plug-in respects units, and proper scaling is applied by default.
Note: Verify the System Units your Maya scene uses so that you can control whether the Maya FBX plug-in needs to scale your scene.
- If you import a file that is in the same unit setting as the
Working Units of your Maya scene, there is a match of units and the plug-in displays “1.0” as the
Scale Factor. No scale conversion is applied.
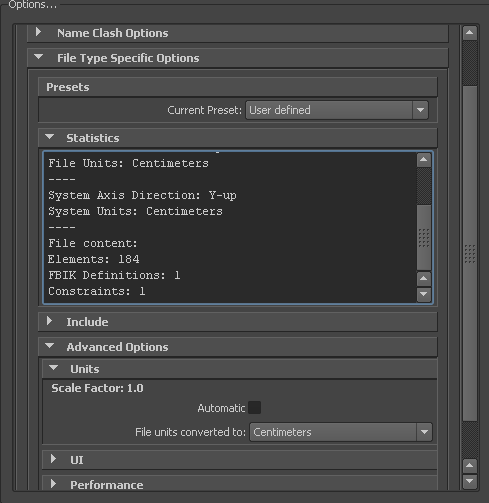
- If the units do not match and your Maya scene is empty and/or changing the System Units is not a concern, change the Maya System Units to match the File Units used in the incoming file before you start to import. This results in a match of units, Scale Factor of “1.0”, and no scale conversion is applied.
- For example, if you import a file that is in centimeters into a Maya scene set to inches, it results in a
Scale Factor
of 0.3937008. In this case, the incoming data is scaled down to match the scene's unit system.
Note: If the Scale Factor is 1.0, no scaling is applied. If the Scale Factor is greater than 1.0, the incoming data is scaled up. If the factor is smaller than 1.0, the incoming data is scaled down.
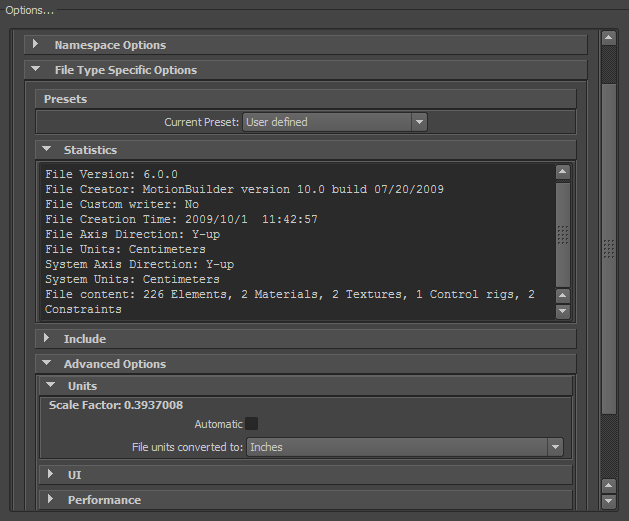
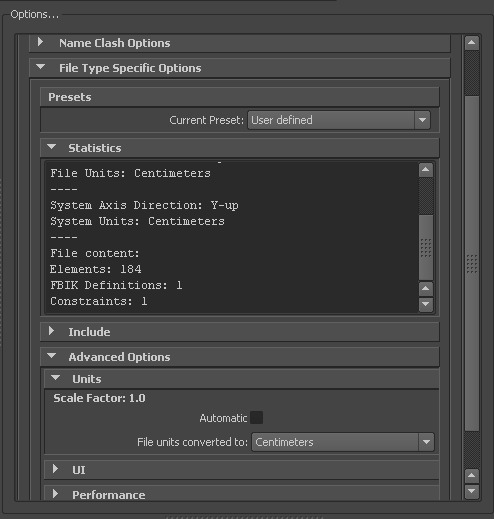
- If, with the previous example, you do not want to change the System Units of your Maya scene and do not want the plug-in to scale your incoming data, you have another option:
- Change the
File Units Converted To option to match the
File Units. This results in a
Scale Factor of “1.0”, and no scaling is applied, even though units do not match between the file and the
Maya System Units.
- UI
- These options let you set display options of the UI. This lets you show or hide the Warning Manager.
- You can customize these display options, save them as a new preset, and share this preset file. See the Editing presets section in FBX Import options topic for more information.
-
- Show/Hide Warning Manager
- This option lets you disable the Warnings and Errors dialog box that appears during the import process. The Show Warning Manager option is active by default.
- When something unexpected occurs during the conversion, the plug-in reports an error. This error occurs because the Maya FBX plug-in encounters an unknown behavior and the conversion is going to produce an unexpected result.
- The Maya FBX plug-in uses errors and warnings to alert you of conversions and potential problems during the import process.
- When the Maya FBX plug-in must apply a conversion to the source data for it to be in a format that the destination application can read, a warning is reported. This warning is not the indication of a problem, but instead exists to provide a report of conversions that have been applied to the incoming data.
- Generate log data
- Deactivate the Generate log data option if you do not want warning and error information written to the log. However, if you do deactivate this option, the file name and time stamp are still recorded in the log.
- Normally, it is recommended to leave the Generate log data option active, which is the default, as this helps you identify problems with file conversions. Occasionally, some batch import/export create very large warning/error files, and in this case you might want to disable this option.
- Performance
- The Performance options let you detect performance issues with your file.
-
- Test meshes and remove bad polygons
- Activate this option when you want to test your mesh objects for degenerate polygons, such as two-sided polygons, single vertex polygons, and so on. The Maya FBX Plug-in will evaluate the scene for any degenerate polygons and remove them from mesh.
Information
- Help on FBX
- Click Help on FBX in the Information rollout to access the Maya FBX plug-in documentation.
Axis conversion
The FBX Importer does not have an Axis Conversion option in the UI. Only the FBX Export window has this option exposed in the UI.
This is because the Maya FBX Plug-in calculates and applies the Axis Conversion automatically upon import.
