Use these options to set what happens when you select .
- Inherit Smooth Mesh Preview
-
Turn this setting on when you want to convert a mesh from Smooth Mesh Preview display mode to a Subdiv Proxy and retain the current Smooth Mesh Preview settings. For example, if you want to render or animate a smoothed version of the object.
- Subdivision method
- Exponential Smoothing Controls
-
For information on the Exponential Smoothing Controls, see Smooth Options.
- Linear Smoothing Controls
-
For information on the Linear Smoothing Controls, see Smooth Options.
Exponential Smoothing Controls
The following options are available when you set Subdivision Method to Exponential.
- Division Levels
-
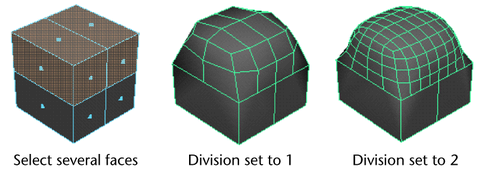
Use the slider or type a number in the Division levels box to increase or decrease the number of times Maya performs the smoothing operation. This also increases or decreases the object’s smoothness. The Division levels range is from 1 to 4. The higher the value, the smoother the object.
- Subdivision type
-
Lets you select the algorithm that is used to smooth your mesh in Subdiv Proxy mode. Different options display depending on the Subdivision type you select.
- Maya Catmull-Clark
-
Smooths the faces of a mesh using Maya's implementation of the Catmull-Clark algorithm.
For more information on the Maya Catmull-Clark options, see Maya Catmull-Clark Controls.
Note: In Maya 2014 and earlier versions, Maya Catmull-Clark was the default subdivision type. - OpenSubdiv Catmull-Clark
- (Default) Smooths the faces of a mesh using Maya's implementation of the OpenSubdiv libraries.
OpenSubdiv Catmull-Clark applies a uniform refinement scheme to the faces of a mesh. See
OpenSubdiv overview.
For more information on the OpenSubdiv Catmull-Clark options, see OpenSubdiv Controls.
OpenSubdiv Catmull-Clark
The following options are only available when OpenSubdiv Catmull-Clark is the selected Subdivision type.
- Vertex Boundary
- Controls how boundary edges and corner vertices are interpolated.
Important: When working with the OpenSubdiv Catmull-Clark subdivision type, a corner is an area of your mesh where two edges meet.
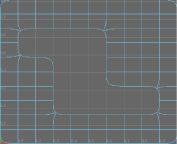
- Sharp edges and corners
- (Default) Edges and corners remain sharp after smoothing.
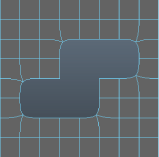
In the following example, edges and two-edge corners are sharp.
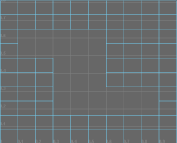
- Sharp edges
- Edges remain sharp after smoothing. Corners are smoothed.
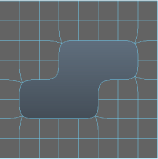
In the following example, edges are sharp, but two-edge corners are smoothed.
- UV Boundary
- Controls how smoothing is applied to boundary UVs.
Important: When working with the OpenSubdiv Catmull-Clark subdivision type, a corner is an area of your mesh where two edges meet.
- No Interpolation
- UVs are not smoothed.
- Smooth (sharp edges and corners)
- UVs are smoothed. Edges and corners remain sharp after smoothing.
In the following example, boundary edges and two-edge corners are sharp.
- Smooth (sharp edges)
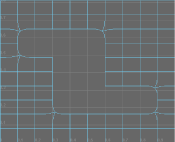
- UVs and corners are smoothed. Edges remain sharp after smoothing.
In the following example, boundary edges are sharp, but two-edge corners are smoothed.
- Smooth (all sharp)
- (Default) When on, smooths face-varying data (UVs and colors sets) near vertices that are not on a discontinuous boundary. Vertices on a discontinuous boundary are subdivided with a sharp rule (interpolated through).
 Note: Smooth (all sharp) produces the same results as the Smooth Internal option in the Maya Catmull-Clark controls.
- Propagate UV Corners
- When on, face-varying data (UVs and color sets) from the original mesh is applied to the UV corners of the smooth mesh. The default setting is off.
- Smooth Triangles
- When on (default), applies a subdivision rule to your mesh that makes triangles subdivide more smoothly.
- Crease Method
- Controls how boundary edges and vertices are interpolated.
- Normal
- (Default) No crease sharpness smoothing is applied.
- Chaikin
- When on, interpolates the sharpness of incident edges. After subdividing a crease edge, the sharpness of the resulting edges is determined using Chaikin's curve subdivision algorithm, which produces semi-sharp creases. This method improves the appearance of multi-edge creases with different edge weights.
Maya Catmull-Clark
The following options are only available when Maya Catmull-Clark is the selected Subdivision type.
- Boundary rules
- Lets you set how you want creasing applied to boundary edges and vertices as you smooth the mesh.
- Legacy
- Applies no creasing to boundary edges and vertices.
- Crease all
- (Default) Applies full creasing to all boundary edges and all vertices that have only two incident edges before being converted to a smooth mesh.
- Crease edges
- Applies full creasing to edges only.
- Continuity
-
The value you enter here determines the degree of smoothness.
- Smooth UVs
-
Applies the same smoothing operation to the UVs as to the vertices. Smooth UVs is on by default, providing better results for UVs.
Turn off Smooth UVs if you want to maintain compatibility with scenes created in older versions of Maya, or if the UVs do not need to be smoothed and you want to improve performance.
- Propagate Edge Hardness
-
Copies the edge hardness values from any hardened edges on the original mesh to the associated new edges on the Smooth Mesh preview. The default setting is off.
- Map borders
-
Controls how borders are smoothed when Smooth UVs is on.
- Smooth all
-
All UV borders are smoothed.
- Smooth internal
-
Internal borders are smoothed. This is the default setting.
- Do not smooth
-
Borders are not smoothed.
- Preserve
-
Specifies what components will remain unaffected during the Smooth.
- Geometry borders
-
When turned on (the default), this option preserves the properties of the border edges of the mesh.
- Hard edges
-
Preserves the properties of any existing manually hardened or softened edges. If you have changed the hardness or softness of edges ( or ), turn this option on to maintain those settings.
Setup
- Mirror Behavior
-
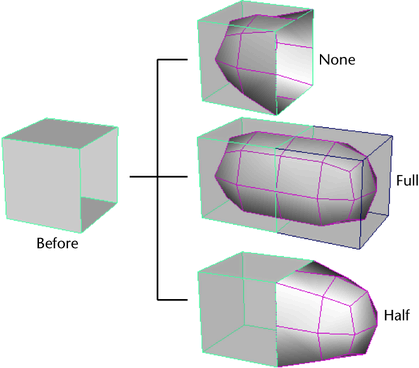
Controls how the smooth mesh and proxy mesh are mirrored and/or located relative to each other.
- None
-
The smooth mesh is created within the proxy mesh.
- Full
-
The smooth mesh is created within the proxy mesh, and both the proxy mesh and the smooth mesh are mirrored about the Mirror Direction.
Adjustments that you make to one half of the proxy mesh are automatically mirrored onto the other half, making symmetrical modeling much easier.
- Half
-
The smooth mesh is created adjacent to the proxy mesh (based on the Mirror Direction). This allows you to modify the proxy mesh and clearly see the result on the smooth mesh.
 Note: You would usually use mirroring for modeling an object, not animating it. Otherwise, the object’s animation would be symmetrical.
After you have finished modeling an object with mirroring, use to remove the smooth mesh. Then create a new subdiv proxy (with Mirror Behavior set to None) for animating the object.
Note: If you modify the mirrored half of the subdiv proxy in object space mode, dragging a manipulator in one direction will modify the proxy in the opposite direction.If you modify the mirrored half of the subdiv proxy in world space mode, dragging a manipulator in one direction will modify the proxy in the same direction.
If you modify the original half of the subdiv proxy, in object space or world space mode, dragging a manipulator in one direction will modify the proxy in the same direction.
Note: Mirroring only works across the world axes. Mirroring an object that has been arbitrarily rotated may produce unexpected results; some geometry may be overlapping.
- Mirror Direction
-
The direction that the selected mesh will be mirrored. That is, positive or negative X, Y, or Z.
Subdiv Proxy will mirror the proxy mesh at the extent of its bounding box in the Mirror Direction.
- Merge Vertex Tolerance
-
When a vertex on the original mesh and its corresponding mirrored vertex are closer than the Merge Vertex Tolerance, then they will be merged into a single vertex.
- Share Transform Node
-
Controls whether the smooth mesh is transformed when you transform the proxy mesh.
For example, you may prefer to move the proxy mesh away from the smooth mesh in order to adjust the proxy mesh and clearly see the effect on the smooth mesh. In this case, turn off Share Transform Node.
Or you may prefer to keep the proxy mesh and smooth mesh together. In this case, turn on Share Transform Node.
- On
-
If you transform the proxy mesh, the smooth mesh will also be transformed.
- Off
-
If you transform the proxy mesh, the smooth mesh will not be transformed.
Tip: When working with Subdiv Proxy, you can save the low resolution mesh and use it for fast interactive playback provided you have not performed additional modifications to the node that would affect its history.Use with Share Transform Node turned off. Bind the proxy mesh to a skeleton, and hide the smooth mesh using the hotkey ` (left open quote beside the 1 key). The low resolution mesh will provide fast interactive playback.
To display the smooth mesh (for example, for rendering), press the ` hotkey again. (Or turn off the Subdiv Proxy Renderable option so the proxy mesh is not rendered.)
Note:If you create a subdiv proxy with Share Transform Node turned on, and then delete history on the proxy mesh, the proxy mesh and smooth mesh will appear to become a single object. This is because they share a transform node. To select either the proxy mesh or the smooth mesh (for example, in order to delete one of them), press the Down Arrow key and then press either the Left or Right Arrow key.
Display Settings
- Subdiv Proxy Shader
-
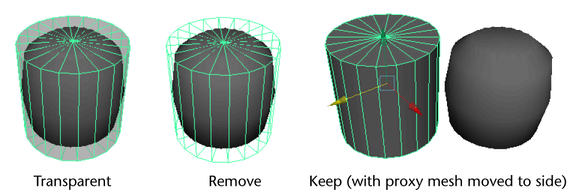
Controls the appearance of the proxy mesh’s material to best suit the way you like to work.
- Remove
- Eliminates the connection between the proxy mesh and its material.
- Keep
- Maintains the original connection between the proxy mesh and its material. If you choose Keep, you’ll need to move the proxy and smooth mesh side-by-side.
- Transparent
- Assigns a new Lambert material with partial transparency to the proxy mesh. This lets you view the smooth mesh beneath the proxy.
- Subdiv Proxy Transparency
-
Sets the Transparency attribute of the proxy mesh material. This material is created by the Subdiv Proxy operation.
- Subdiv Proxy Renderable
-
Controls whether the proxy mesh is rendered (on) or not (off).
- Subdiv Proxy In Layer
-
When on, Maya adds the proxy mesh to a new layer so you can control the visibility of the proxy mesh. When off, no layer is created. For example, if the object is already in another layer, you might want to turn off this option so that the proxy mesh only belongs to one layer and not two.
- Smooth Mesh In Layer
-
Turns on the ability to add the smooth mesh to a layer in the Layer Editor.
- Smooth Layer Display
- Sets the default state for the smooth mesh layer. These options are only available when the Smooth Mesh in Layer option is turned on
- Normal
-
The smooth mesh is fully visible and selectable in this display state.
- Template
-
The smooth mesh is visible as a template only and is not selectable as an object.
- Reference
-
The Reference display state restricts you from editing the smooth mesh directly. This is the default setting.
Note: and output the polygon vertex order differently. If you need to perform operations that require identical topologies, for example, using Blend Shape, you may wish to use the same smoothing tool for smoothing the polygon meshes to avoid unexpected results.