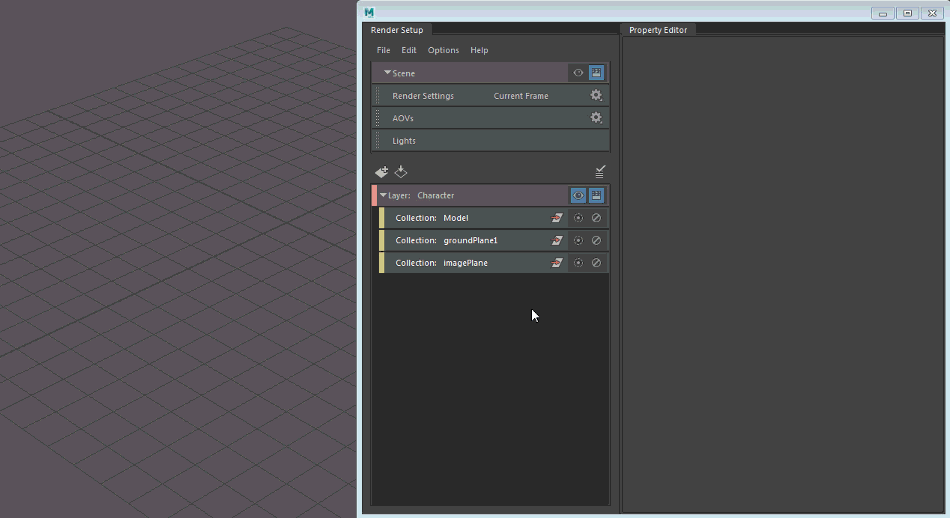
Click the
Scene
 icon at the top of the
Render Setup editor to switch to the scene layer, then double-click the
Render Settings tab to open the
Render Settings window. This opens the
Render Settings for your scene.
icon at the top of the
Render Setup editor to switch to the scene layer, then double-click the
Render Settings tab to open the
Render Settings window. This opens the
Render Settings for your scene.
The range of frames being rendered is also displayed. It may indicate Current Frame, or Frame 1-10, for example, if you have set a Start frame and an End frame.
Create Render Settings overrides for a render layer
-
Double-click the Render Settings tab on the scene layer (or on any of the render layers) to open the Render Settings window.
- Click
on the layer for which you want to create an override, to switch to the layer.
The Render Settings window now updates to display the Render Settings for your visible layer.
-
Right-click the attribute that you want to override in the Render Settings window and select Create Absolute Override for Visible Layer or Create Relative Override for Visible Layer.
In the Render Setup editor, A Render Settings collection is created for your visible layer, as well as a corresponding override.
- Select the override and adjust its value in the
Property Editor.

After you create the override, a red border may appear around the layer visibility icon
 ; click this to refresh your layer before you render in order for the overrides to be reflected in your render.
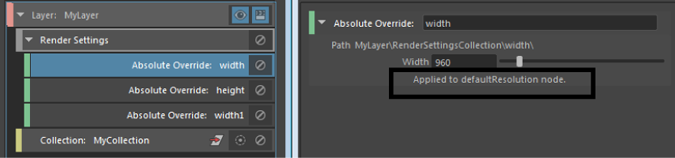
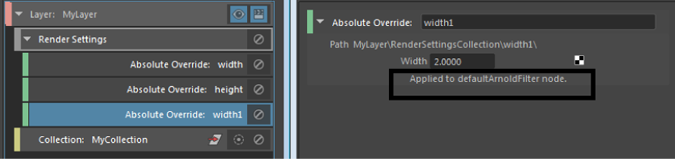
Select any Render Settings override, and the Property Editor indicates the node to which it is applied; for example: Applied to defaultResolution node.This indicator appears on all Render Settings overrides created since Maya 2017 Update 3.
This indicator may be helpful in cases when you create overrides on two or more attributes with the same name on different nodes.
For example, in this case, there are two overrides named width. The Property Editor indicates Applied to defaultResolution node for the former:
and Applied to defaultArnoldFilter node for the latter for easy identification.
Display the Render Settings for each render layer
To open the
Render Settings for any layer, including the scene layer, click
on the layer, then double-click its
Render Settings collection.
If a Render Settings collection does not yet exist for the layer, you can middle-mouse drag and drop the Render Settings tab from the top of the Render Setup editor to your render layer.
When viewing the Render Settings for a specific layer (including the scene layer), the Render Settings collection for the corresponding layer appears with a grey border.
You can only display the
Render Settings window for a layer that is visible. If you switch to another layer (by clicking
on the layer) while the
Render Settings window is open, the
Render Settings window automatically updates to reflect the settings for the visible layer.
The converse is also true. If you use the Render Layer drop-down list in the Render Settings window to display the Render Settings for a different layer, that layer is automatically set as visible.
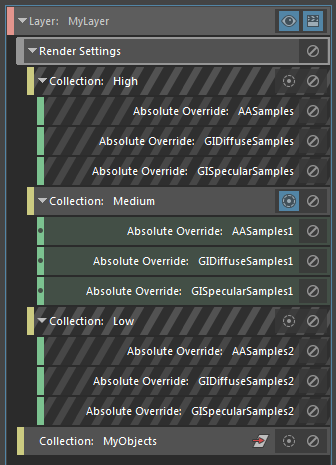
Create Render Settings subcollections
Create Render Settings subcollections to sort your overrides and create multiple Render Settings combinations.
Right-click the Render Settings collection for your layer and select Create Render Settings Collection. You can then drag and drop, or copy and paste your Render Settings overrides to this subcollection.
If a Render Settings collection does not yet exist for the layer, you can middle-mouse drag and drop the Render Settings tab from the top of the Render Setup editor to your render layer.
In addition, you can create a Render Settings override directly within a subcollection by doing the following:
- Click
on the render layer for which you want to create an override.
- Select the Render Settings subcollection to which you want to add the override.
- Right-click the attribute in the Render Settings window and select Create Absolute Override for Visible Layer or Create Relative Override for Visible Layer.
An example application of this feature is to create High, Medium and Low Render Settings, and convert one set of these settings (Medium, for example) to local render overrides. This way, lower sampling values are used for interactive test renders and higher sampling values (global Render Settings) are used for batch rendering.