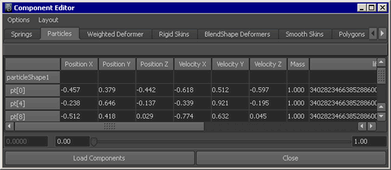
Use the Component Editor to assign per-particle attribute values to selected particles in your nParticle object.
If necessary, add the per-particle attribute you want to edit (see Add dynamic attributes to nParticles for information on adding attributes).
To set per-particle attributes with the Component Editor
- Select the nParticle object.
- In the Per Particle (Array) Attributes section of the Attribute Editor, right-click the attribute data box and choose Component Editor.
- Click
 (the Select by Component Type icon).
 - In the workspace, select the specific particles you want to edit, and click Load Components.
You can drag a selection box to select adjacent particles, or you can Shift-select non-adjacent particles. The particles turn yellow when selected. If the particles don’t become selected, make sure the selection mask is set correctly for particle selection. See Basics for details.
After you select the particles, the Component Editor displays the selected particles and per-particle attributes you can set. The current attribute values are shown for each particle.

The particles are abbreviated pt[0], pt[1], pt[2], and so on. The number in brackets is not the particleId. It’s an array index used internally by Maya. If you want to be certain you’re setting the value of the correct particle, select only that particle in the workspace. The Component Editor displays only the selected particle.
- Click the entry box you want to edit and enter a value for the desired attribute.
You can drag through multiple boxes in rows or columns to enter the same value for all. You can also click an attribute name to select and enter a value for all particles listed in the table.
The value you enter becomes the initial state value—the value of the attribute at the first frame. Unless dynamic effects alter the value of the attribute, this value is used for the entire animation.
Many per-particle attributes have vector values. A vector is a related group of three components. For example, velocity is made of velocity X, velocity Y, and velocity Z components. As another example, rgbPP has a vector value made of R, G, and B components. These are labeled rgbPP[0], rgbPP[1], and rgpPP[2] in the Component Editor.
If you’re unfamiliar with how to use vector components to set position, velocity, or acceleration, experiment with the various component values until you develop an intuitive sense of their effect on motion.