Share links to vaulted data, download files, view file contents, and more.
Print a Page from the Thin Client
For information on viewing files, view the topic Thin Client - Print.
Display a File in the Viewer
For information on viewing files, view the topic Thin Client - The Viewer.
Download a File
When downloading multiple files at once, the Thin Client limits the download to 500mb. Downloading files individually doesn't have a maximum limit.
To download a local copy of a file from the vault:
- Select the Files workspace in the navigation pane.
- Navigate the folder tree to find your file. Select folders in the navigation pane or in the data table to view their contents. Alternatively, you can search the vault to find the file using the search bar.
- Select the file name to view its details or select the checkbox to the left of the file name.
- Select the Download icon
 to display a drop-down menu with the following options:
- Select Download File to download a local copy of the file.
- Select Download Visualization File to download a local DWF of the file.
Share a Link
To generate a link that you or others can open in the Vault Client or Thin Client:
- Select a workspace in the navigation pane.
- Navigate the data table to find the object to share. Alternatively, you can search the vault using the search bar.
- Select the object name to view its details or select the checkbox to the left of the object name.
- Select the Share icon
 .
.
- Select the Desktop Client tab or the Web Client tab in the Share window.
Note: Links for the Vault Client and the Thin Client are not interchangeable. The type of link that you select can only be viewed in the specified client.
- To share the link, use either of the following methods:
- Enter an email address in the open field and select Send. An email is automatically generated by your computer's default email client.
- Select Copy Link to copy the link to your clipboard.
Update File Visualization
- Select the Files workspace in the navigation pane.
- Hover over a row and select the Ellipsis icon
 of the file to update.
- Select Update Visualization to send the job to the job processor.
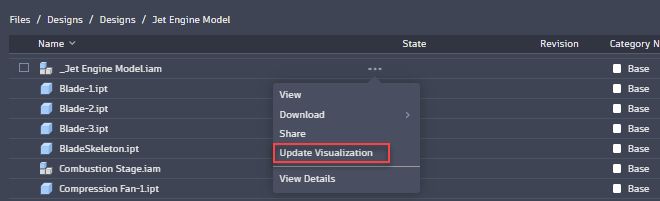
Alternatively, select the "Update Visualization" command available in the file's details page.

Sort Data Tables
Select a header in a data table to sort the table. Number-based fields sort numerically in ascending or descending order. Text-based fields sort alphabetically from A-Z or Z-A. Date-based fields sort from older to newer or newer to older.
View Historical Versions and Revisions
In object details, select the Latest / Latest Released dropdown menu to browse and select historical versions or revisions. You can also select past versions in the History tab.
Version and revision apply when you share a link to the Thin Client. Links redirect to the version and revision selected in the dropdown menu/History tab.
Filter Data in the History Tab
When you’re viewing file or item details, the History tab can be filtered. Select the Filter icon to the far right of the table header to display filter options. Filter options include Show Latest Versions Only and Show All Versions.
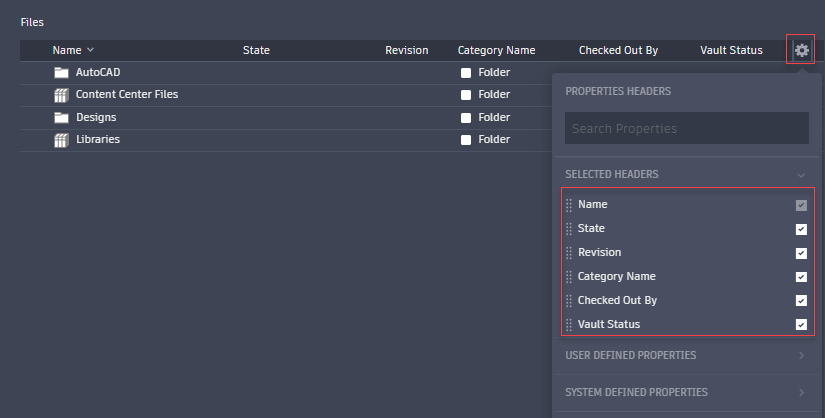
Modify Data Table Headers
You can modify or rearrange the display order of headers and also add system-generated or user-generated properties to the header.
 is not visible, it means that the default columns are enforced by the administrator.
- Select the Configure Columns icon
in the far-right of the table header.
- Select the properties that you want to display.
- Click, or tap and hold on touchscreen devices, to drag a header and rearrange the display order. Press Ctrl or Shift to select multiple properties.
- To hide a header, unselect the checkbox.
- Click Restore default order to set the last default order set by the administrator.
For administrators:
If you are an administrator, you can configure the required columns and enforce the same for all users. Once this is enforced, non-admin users cannot change the default columns.
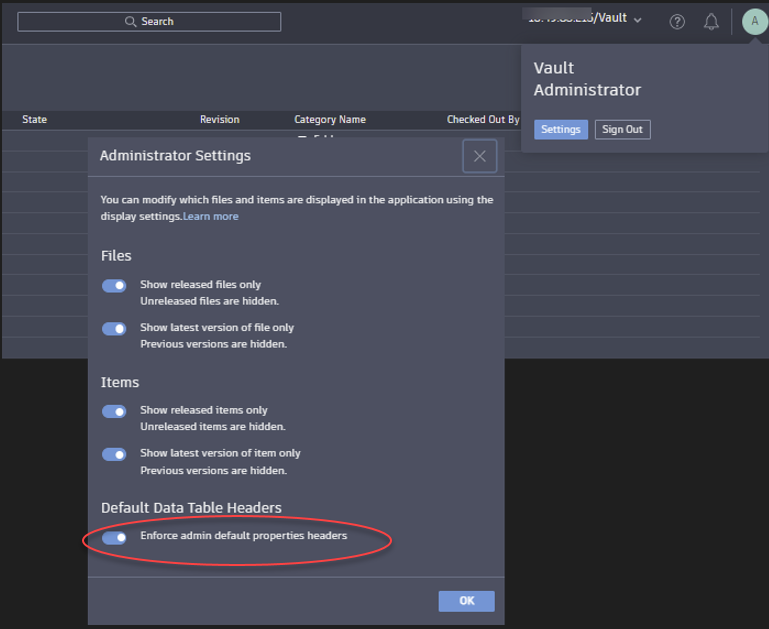
- Select the Configure Columns icon
in the far-right of the table header.
- Select the properties that you want to display.
- Click, or tap and hold on touchscreen devices, to drag a header and rearrange the display order. Press Ctrl or Shift to select multiple properties.
- To hide a header, unselect the checkbox.
- Click Set default.
- Click Restore > Default order to set the last default order set by the administrator.
- Click Restore > System default order to set the system default properties header.