- Open a drawing with a rehab corridor or create a rehab corridor.
-
Click Home tab
 ModifyCorridorEdit Rehab Corridor
 .
Existing rehab corridor regions will be highlighted blue and three custom viewports will be displayed for the selected chainage within the rehab corridor region: the cross section view, profile view and plan view. See About Rehab Corridor Sections for more information.Note: Only corridor regions with rehab subassemblies are available for selection. You can review rehab subassemblies here: Rehab and Crossfall Optimisation Subassemblies.
.
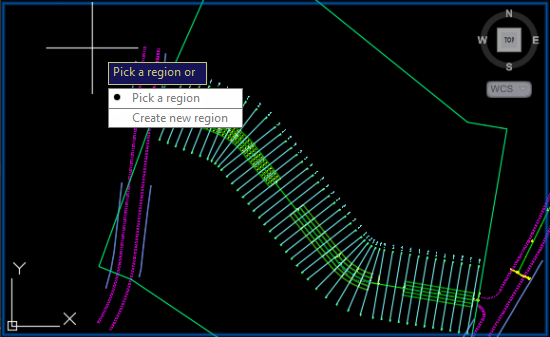
Existing rehab corridor regions will be highlighted blue and three custom viewports will be displayed for the selected chainage within the rehab corridor region: the cross section view, profile view and plan view. See About Rehab Corridor Sections for more information.Note: Only corridor regions with rehab subassemblies are available for selection. You can review rehab subassemblies here: Rehab and Crossfall Optimisation Subassemblies. - Click the plan view viewport. The Select a corridor region options will be displayed.
- Select an existing rehab region in the corridor or add a new rehab region to the corridor.
To select an existing rehab region in the corridor:
- Click Pick a Region.
- Hover over an existing rehab corridor region.
- The rehab corridor region will be highlighted yellow.
- Click to select it.
To add a new rehab region to the corridor:- Click Create New Region
- Click the rehab corridor to select it.
- Hover your cursor over areas of the rehab corridor baseline that don't have a region and click to specify a start chainage.
Note: You can also click Fill in the command prompt. When you click Fill, available region locations are highlighted red on the baseline. You can click an individual region location to select it for the new rehab corridor region. This will automatically assign start and end chainages to the new region.
- Move your cursor to another chainage and click again to specify the end chainage.
Note: If you clicked Fill in the command prompt, you don't need to specify start and end chainages.
Note: The Rehab Corridor Editor ribbon tab for your selected rehab corridor region displays and the Rehab Parameters palette will auto-dock to the right side of the user interface. You can click Add a Region in the Rehab Corridor Editor ribbon tab to begin the Create new region workflow again for a new rehab corridor region. - Modify rehab parameters in the Rehab Parameters palette.
You can assign lane inputs and properties and edit rehab input parameters in the properties table.
Click Rehab Parameters
 to launch the Rehab Parameters palette if it's not displayed.
- When you have finished modifying rehab parameters, click Apply.
- Use the Rehab Corridor Editor ribbon tab to navigate between chainages and review attributes for each chainage. You can also specify the chainage at which you want to change a parameter.
For each selected chainage, you can modify parameters in the Rehab Parameters palette. Changes that you make in the Rehab Parameters palette will update the selected rehab corridor region and the cross section view once you click Apply.
- When ready, click Rehab Manager
 in the Rehab Corridor Editor ribbon tab.
The currently selected rehab corridor region is automatically assigned to the Rehab Manager.
By default, the Crossfall Correction Report tab is selected in the Rehab Manager. You can also select the Milling and Levelling Report tab. See To Generate Rehab Reports for more information.
- Use the Chainage Selection panel in the Rehab Corridor Editor ribbon tab to navigate between chainages in your selected rehab corridor region and display them in the Rehab Manager. You can also select chainages in the Rehab Manager.
- Use the Rehab Manager to make any necessary modifications to the accepted slope for each chainage. Your modifications will automatically be applied to the selected rehab corridor region.
- Optionally, you can export rehab reports. See To Generate Rehab Reports for more information.
- Click Close in the Rehab Corridor Editor ribbon tab when done.