In plan or profile views, you can label a series of consecutively connected pipes with a single pipe label.
A spanning label helps minimize the number of labels displayed in a pipe network.
When you place the cursor over the spanning pipe label, the pipes that are in the span are highlighted. You can also use the AutoCAD list command to list the connected pipes. After adding a spanning label, you can highlight the connected pipes that comprise the span by selecting the label.
To label a span of pipes in a plan view
- Click

 .
. -
At the command line, you are prompted to select the first pipe network part (pipe or structure).
- In the drawing, click a pipe or structure in the pipe network to define the starting point for the connected pipe span.
-
At the command line, you are prompted to select the next pipe network part (pipe or structure).
- Click a part (pipe or structure) to define the ending point for the span.
- Press Enter.
The following prompt is displayed:
Specify label location on pipe:
- Specify the location for the label by clicking one of the pipes in the span. You must click a pipe, not a structure.
If you select a pipe that is not included in the span, a prompt is displayed indicating that the label location must be on a spanned pipe.
Note that the label can be slid along the span with the slider grip
 .
.
To label a span of pipes in a profile view
-
Click .
-
At the command line, you are prompted to select the first pipe network part (pipe or structure).
- In the drawing, click a pipe or structure in the pipe network to define the starting point for the connected pipe span.
-
At the command line, you are prompted to select the next pipe network part (pipe or structure).
- Click a part (pipe or structure) to define the ending point for the span.
- Press Enter.
The following prompt is displayed:
Specify label location on pipe:
- Specify the location for the label by clicking one of the pipes in the span. You must click a pipe, not a structure.
If you select a pipe that is not included in the span, a prompt is displayed indicating that the label location must be on a spanned pipe.
Note that the label can be slid along the span with the slider grip
.
To highlight a connected pipe span
- Hover the cursor over the spanning label. This highlights all of the parts that are in the span.
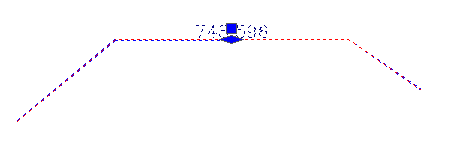
- Right-click the pipe span label and select Show Spanning Pipes. A dotted line will appear from the starting point to the end point of the connected pipe span, as shown in the following illustration. The diamond-shaped slider grip can be used to slide the label along the span. To remove the highlight, deselect Show Spanning Pipes from the right-click menu.
Do one of the following:
To move a spanning pipe label
Spanning labels are not anchored to any particular pipe or structure. You can move them freely to any connected pipe or structure in the span.
- Click the label to be moved and select the slider grip .
Move the label to the desired location.
To reset the anchor position of a label that spans multiple pipe network parts
- At the command line, enter ResetAnchorPipe.
- In the drawing, select a label that spans multiple pipe parts (spanning pipe label).
- Select the new anchor point by clicking on a pipe in the same network. You must select a pipe, not a structure.
The new anchor position is set, and the spanning label will display at the midpoint of the selected pipe.