The Morpher material works hand-in-hand with the Morpher modifier. You can use it to make the cheeks of a character blush, or to wrinkle a character's forehead when the eyebrows are raised. With the Morpher modifier's channel spinners, you can blend materials the same way you morph the geometry.
The Morpher material has 100 material channels that map directly to the 100 channels in the Morpher modifier. After you apply the Morpher material to an object and bind it to the Morpher modifier, you use the channel spinners in the Morpher modifier to morph materials and geometry. Empty channels in the Morpher modifier, with no geometry morph data, can be used to morph materials only.
Applying the Morpher Material
An object must have at least one Morpher modifier in its modifier stack. You can assign the material to an object and bind it to the object's Morpher modifier in either of two ways.
- After the Morpher modifier is applied to an object, use the Assign New Material command in the Global Parameter rollout of the Morpher modifier. This is the simplest way, and applies the Morpher Material to the object and binds the material to the Morpher modifier at the same time.
- Open the Material Editor, select the Morpher material, and click Choose Morph Object in the Parameters rollout, then click the object in the viewports. After clicking the object, a dialog displays in the viewports, select the Morpher modifier from the dialog (an object may have multiple Morpher modifiers). This binds the Morpher material to the Morpher modifier.
Procedures
Example: To apply and use the Morpher material:
- Create a sphere in the Perspective viewport.
- On the
 Modify panel, right-click the sphere's entry in the modifier stack display, and choose Convert To: Editable Mesh.
- From the Modifier List, choose Morpher.
This applies the Morpher modifier to the sphere.
- On the Morpher modifier's Global Parameters rollout, click Assign New Material.
The Morpher material is now applied to the object and bound to the Morpher modifier.
- Open the

 Material Editor, and click
 (Pick Material From Object) (the eyedropper), then click the sphere in the viewports.
The Material Editor displays the Morpher material parameters.
- On the Morpher Basic Parameters rollout, in the Modifier Connection group, click Choose Morph Object, then click the sphere in the viewport.
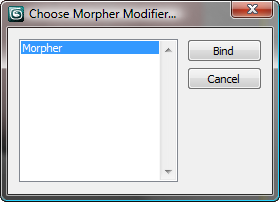
This opens a small dialog titled Choose Morpher Modifier, which lists Morpher modifiers in the scene.
- In the Choose Morpher Modifier dialog list, click Morpher to highlight that modifier, and then click Bind.
- On the Morpher Material Parameters rollout, click the Mat 1 slot.
- On the Material/Map Browser choose Standard.
- On the Basic Parameters rollout, click the Diffuse color swatch.
- On the Color Selector, choose a bright yellow, and close the color selector. Leave the Material Editor open.
- Turn on
 , then move the time slider to frame
50.
, then move the time slider to frame
50.
 Select the sphere, and then go to the
Modify panel.
Select the sphere, and then go to the
Modify panel.
- On the Morpher modifier's Channel List rollout, set the channel 1 spinner to
100.
In the Material Editor, the color of the sample sphere changes to yellow.
- Turn off
 .
.
- On the main toolbar, click
 (Render Production).
The sphere is yellow. If you render an animation the sphere changes from a grey color to yellow.
Interface
The Morpher material interface is on a Parameters rollout in the Material Editor.

Modifier Connection group
- Choose Morph Object
- Click this option, then select an object in the viewports that has a Morpher modifier applied to it. Clicking an object in the viewports displays the Choose Morpher modifier dialog. Choose a Morpher modifier, and click Bind.
- [name field]
-
Displays the name of object to which the Morpher material is applied. If no object has been specified, the field displays "No Target".
- Refresh
- Updates the channel data.
- [marker drop-down list]
-
This list is identical to the marker list in the Morpher modifier. Markers you save in the Morpher modifier appear here.
Base Material group
- Base material button
- Click to apply a base material to the object. The base material represents what the model looks like before any channel blending takes place.
Channel Material Setup group
- Map #
- 100 material channels are available. The scroll bar allows you to scroll through all the channels. Double-click a channel to jump to the material parameters for that channel.
There is a one-to-one correspondence between the channels in the Morpher material and the Morpher modifier. A material in channel 1 of the Morpher material is controlled by the channel 1 spinner in the Morpher modifier.
- Material on/off toggle
- Turns a channel on and off. Channels that are off do not affect the morph result.
Mixing Calculation Options group
3ds Max can slow down if many active materials are being blended. Options in this group allow you to control when the morph result will be computed.
- Constantly Choose to compute the material morph result all the time.
- When Rendering Choose to compute the material morph result at render time.
- Never Calculate Choose to bypass material blending.