AOVs
| Further Reading |
|---|
| See Render Settings in the Arnold User Guide |
AOVs (Arbitrary Output Variables) provide a way to render any arbitrary shading network component into different images. For example, an artist might find it convenient to separate direct and indirect lighting contributions and later recombine them during compositing. Arnold provides built-in AOVs for outputting depth, position, and motion vectors.
- Using closures as AOVs is not currently supported.
- Multichannel EXRs are possible using Merge AOVs.
- MtoA supports Cryptomatte AOV shaders.
- Light path expressions can be used to output light into specific AOVs.
- An introduction to AOVs for compositing tutorial can be found here.
To the right of the Arnold Renderer tab in the Render Settings dialog, you should see the AOVs tab. The available AOVs for each group are shown in the left list. When you select one, it will move across to the 'Active AOVs' list, which is the set of AOVs you want to use for your render.

Legacy
Maya Render View
This allows you to enable AOVs, disable them, or specify that AOVs are only to be used in batch renders.
Render View AOV
This allows you to select an AOV channel to preview in the render view. Remember to switch back to 'beauty' afterward.
AOV Shaders
A list of shaders can be defined that will be evaluated after the regular surface shader. With this, it's possible to add shaders to set specific AOVs without modifying the original shader tree. Shaders intended for this purpose should add a booleanmetadata named aov_shader on the node itself, as a user-interface hint. If options.atmosphere or options.background are set, these global AOV shaders will also be run for atmosphere and background contexts.
Only shaders with AOV-writing capabilities should be added to 'AOV Shaders' in AOVs.
Denoiser
Output Denoising AOVs
Automatically outputs the optional AOVs (diffuse_albedo, Z, N). This should be used for denoising using the Arnold Denoiser, multilayer EXR, or Kick.
A current limitation means that you must render in EXR and Merge AOVs need to be enabled.
This should also be enabled when using batch rendering with the Arnold Denoiser.
AOV Browser
The AOV Browser allows you to select the AOVs you want to be active for your render. You can also choose to add a custom AOV.

Either double-click or select and use the arrow buttons to move AOVs from 'Available' to 'Active'.
A tutorial about compositing AOVs can be found here.
AOVs
Beneath the AOV browser, the active AOVs that you have selected for output are listed in more detail:

Each AOV is actually represented by three nodes - the AOV node itself, plus an associated driver node and filter node. This dialog shows you the type, driver, and filter of the chosen AOVs in drop-down menus, and the checkbox to the left allows you to control which are active. If you click on the triangle at the far right, a context menu is displayed which in addition to providing another way to remove or make an AOV active/inactive, also allows you to add an alternative output driver for each AOV (and to select the driver and filter).
Because the driver and filter nodes are separate to the AOV node, you can add multiple outputs for each AOV by adding extra driver nodes to that AOV node, for example allowing both EXR and JPG to be written out by the same AOV. This extra flexibility in AOV output can be really useful in some situations (maybe you want to output your beauty pass in multiple formats or using different filters – or you might have a custom output driver that you want to output to at the same time as the normal render view).
Note that the driver drop-downs will show the driver which is currently the selected file output type in the Common tab of Render Settings in brackets, e.g.,
Each AOV has a node associated with it. You can use the attribute editor to examine these nodes in more detail.
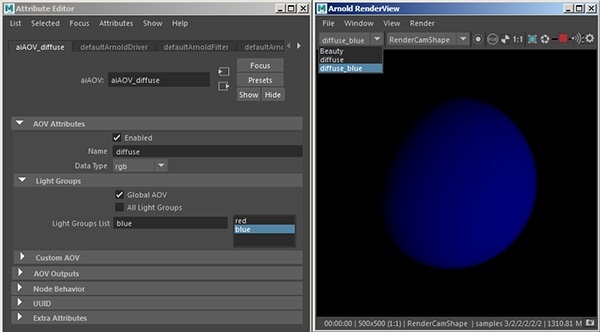
Per-Light AOVs
Each light object has an ' AOV Light Group ' attribute which can be used to write out the light contribution to a separate AOV with a corresponding name. To create a per-light AOV, you must do the following:
- Enter a name for the per-light AOV in the 'AOV Light Group' of the light. In this case, we have a red and a blue light in the scene and so the light groups have been named red and blue.

AOV Light Group in Arnold attributes of light
2. Create an AOV and select it to show it in the attribute editor (in this case we have used a diffuse AOV).
3. Render the scene. The AOVs should now be visible in the RenderView by selecting them in the Light Groups List.

A scene file that demonstrates light group AOVs (with denoising) can be downloaded here.