
This Show menu displays above the scene view, or above each view panel in a layout with multiple scene views.
| Hotkey | Toggles visibility |
|---|---|
| Alt + 1 | NURBS curves |
| Alt + 2 | Polygon meshes |
| Alt + 4 | Image planes |
| Alt + 5 | Wireframe/Shaded |
Isolate Select
-
Lets you show only certain objects or components in your scene. Each panel maintains its own Isolate Select settings.
Unlike the Hide commands, Isolate Select lets you isolate components (polygon vertices, faces and edges, NURBS CVs, or subdivision surface mesh faces) and objects, and only affects the display, not rendering.
Note: Isolate Select does not work with vertices or edges on subdivision surfaces. - View Selected
- Activates or deactivates
Isolate Select. When activated, the word Isolate appears at the bottom of the panel, indicating that the current selection is isolated.
Hotkey: Ctrl + 1
- Auto Load New Objects, Auto Load Selected Objects
- Turn on to automatically update the
Isolate Select panel when you add new objects or change your selection. If turned off, you must use the
Load,
Add, or
Remove Selected Objects
options to update the panel.
Note: Auto Load New Objects is on by default.
- Load Selected Objects, Add Selected Objects, Remove Selected Objects
- If the Auto Load options are off, you can use these options to control the Isolate Select display. Select items from the scene and then load, add, or remove them as needed. Note that Load Selected Objects replaces the display with the current selection, while Add Selected Objects adds the current selection to the selections already displaying.
- Bookmarks
- Lets you bookmark an isolated selection. To create a bookmark, select
Show > Isolate Select > Bookmarks > Bookmark Current Objects. Select the option box if you want to name the bookmark; otherwise, a default name is used.
To view bookmarked items, select Show > Isolate Select > Bookmarks > BookmarkName. Select it again to turn it off and return to the previous view. You can view multiple bookmarks at the same time. Bookmarks are saved with the scene as a set.
Playblast Display
Expand this menu to hide elements from any Playblasts.
The default is Show.Viewport
Expand this menu to view elements to hide or show in the viewport. Elements are organized into categories (Curves & Surfaces, FX, Rigging & Animation, Lighting Shading & Rendering, and Viewport Utilities).
Definitions for each element are included below.
Curves & Surfaces
- Construction Planes
- A construction plane is used to snap construction tools.
- Toggle to hide construction planes.
- Dimensions
- Dimensions are the physical size of a fluid container represented by a wireframe.
- Toggle to hide the fluid container wireframe.
- NURBS Curves
- NURBS (Non-Uniform Rational B-Splines) are one geometry type you can use to create 3D curves and surfaces in Maya. The other geometry types that Maya provides are polygon and subdivision surfaces.
- Toggle to hide NURBS curves.
- NURBS CV's
- CVs ( control vertices ) control how the curve is "pulled" from a straight line between edit points. They are the most basic and important means for controlling the shape of a curve. Lines between consecutive CVs form the control hull.
- Toggle to hide NURBS control vertices.
- NURBS Hulls
- As a curve gets more spans and edit points, you might lose track of the order of the CVs. To show the relationship between CVs, Maya can draw lines between them. These lines are called hulls.
- Toggle to hide the NURBS hulls.
- NURBS Surfaces
- NURBS surfaces are intrinsically four-sided patches that do not allow for the creation of holes in the same fashion as polygon surface types.
- Toggle to hide NURBS surfaces.
FX
- Dynamics
- Creates gravity, friction, and collision simulations by applying dynamic forces to the MASH network.
- Toggle to hide dynamics manipulators.
- Dynamic Constraints
- Dynamic Constraints allow you to modify Dynamic effects.
- Toggle to hide dynamics constraint manipulators.
- Fluids
- Maya Fluid Effects is a technology for realistically simulating and rendering fluid motion. Fluid Effects lets you create a wide variety of 2D and 3D atmospheric, pyrotechnic, space, and liquid effects.
- Toggle to hide fluid effects.
- Follicles
- Follicles are individual hairs in a hair system.
- Toggle to hide follicle manipulators.
- Hair Systems
- Also known as hairSystemShape or (nHair) node. Hair systems let you create dynamic nHair on NURBS or polygon surfaces.
- Toggle to hide hair systems manipulators.
- nCloth
- nCloth is a fast and stable dynamic cloth solution that uses a system of linked particles to simulate a wide variety of dynamic polygon surfaces.
- Toggle to hide nCloth manipulators.
- nParticles
- nParticles is a particle generation system that uses Maya® Nucleus™ dynamic simulation framework.
- Toggle to hide nParticle manipulators.
- nRigids
- nRigids are used to create collisions with nDynamics (nCloth, nParticles, etc.).
- Toggle to hide nRigid manipulators.
Rigging & Animation
- Clip Ghosts
- Ghost objects let you see how an animation moves through a scene. You can display clip ghosts that represent the clip animation in 3D space, letting you preview the trajectory of the clip and helping you manually match poses from clip to clip.
- Toggle to hide clip ghosts.
- Controllers
- Dedicated controller nodes identify which models are meant to control animation, control visibility based on mouse proximity, and define custom pickwalk hierarchies.
- Toggle to hide controllers.
- Deformers
- Deformers are tools that let you transform or animate objects in ways that simple manipulation and keyframes cannot.
- Toggle to hide the deformer lattice around your objects.
- IK Handles
- With inverse kinematics (IK), you move an IK handle to pose an entire joint chain. An IK handle is an object you can select and move that affects the joints it is assigned to.
- Toggle to hide IK Handles.
- Joints
- Joints set you set how the joint is drawn in the scene view.
- Toggle to hide IK joint manipulators.
- Locators
- Locators are used to constrain an object to another object that is animated.
- Toggle to hide locators.
- Motion Trails
- Editable motion trails let you preview your animation and interactively adjust keyframes within the 3D scene. Motion trails provide a visual representation of keys right around your animated models, letting you adjust the timing, keys, tangents, and position of animation directly.
- Toggle to hide motion trails.
- Pivots
- The pivot point defines the position around which objects or components are rotated and scaled. By default, the pivot point of an object or group of objects/components is located at its center.
- Toggle to hide pivot points.
Lighting, Shading & Rendering
- Cameras
- When you look at your scene in Maya, you are looking through a camera. Think of it as being a director on a movie set and looking through a camera lens. Your field of view is restricted to what you can see through that lens.
- Toggle to hide cameras in your scene that are not the default four (perspective, top, front, side).
- Image Planes
- You can import an image, a series of image files, or a movie file and map them to an image plane to act as a backdrop for your scene.
- Toggle to hide image planes.
- Lights
- Maya has a number of light sources that let you achieve a wide variety of lighting effects.
- Toggle to hide lights in your scene.
- Strokes
- Strokes are used for 3-d painting in Maya, strokes are three dimensional and editable. Each stroke is an object in your scene.
- Toggle to hide paint strokes.
- Texture Placements
- The Texture Placement tool is set for Label Mapping, which lets you stretch, shrink, move, and rotate a texture as if it were a label.
- Toggle to hide texture placements.
Viewport Utilities
- Blue Pencil
- Blue Pencil is a 2D drawing tool that lets you draw in 3D space.
- Toggle to hide Blue Pencil drawings in the viewport.
- Handles
- Handles can be found in the attribute editor under the Display dropdown. They are used to visualize the center point of your object. They are turned off by default.
- Toggle to hide handles and local axis.
- HUD
- The viewport HUD (heads up display) contains scene information like poly count, object details, etc.
- Toggle to hide the HUD.
- Hold-Outs
- Hold-outs are used to composite CG objects over a real world scene. A hold-out is an object that is used in place of a real world object that captures the lights and reflections of the scene.
- Toggle to hide hold-outs.
- Grid
- Allows you to turn the grid off in a single panel.
- Toggle to hide the grid.
- Manipulators
- The Move Tool, Rotate Tool, and Scale Tool.
- Toggle to hide the Move, Rotate, and Scale tool manipulators.
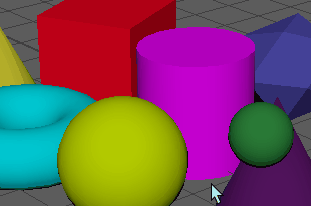
- Selection Highlighting
- Toggles the highlighting of elements that are clicked on or off. The default setting is on, where objects are highlighted when you select them. See the example below for an example of selection highlighting
activated, followed by selection highlighting
disabled.
Note: If you want components such as vertices, edges, faces and so on, highlighted as you mouse over them, see the Preselection Highlight option in the Selection preferences.
-
 The selection highlighting menu is found at the bottom of the Show panel menu.Toggle to hide selection highlighting.
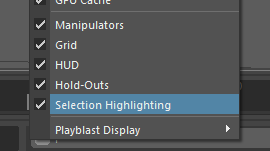
- GPU Cache
- GPU cache files are optimized for fast playback performance in Maya. You can create Alembic-based GPU cache files from the polygon or NURBS objects in your scene. You can save all the scene objects to a single cache or create a cache file for each selected object.
- Toggle to hide all GPU cache files in your scene.
Presets
Use presets to save which elements you want to show in the viewport.
- Creating Presets
-
You can save preset selections in the Show panel. First:
-
Select the objects you want to show in the viewport from the Show menu.
-
Click Save Current Selection.
-
Name your preset and select OK.
You can now view and select your preset in the Presets menu.
-
- Reset a Preset
- If you make unwanted changes to a preset in the Show menu, click Reset Current Preset.
Selection Highlighting