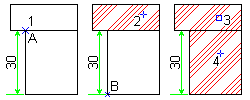
The hatch pattern used in the second illustration is a predefined hatch pattern. In this example the lower rectangle has to be hatched with the same hatch pattern that is used in the upper rectangle. The hatch in the upper rectangle will pass through point A (UCS origin), and the hatch in the lower rectangle will pass through point B.
- Move UCS origin to point A, which is the point through which a hatch line will pass, by typing UCS in the command line and by clicking the point (1) and accepting UCS X-axis direction.
- At the Command prompt, enter AMUSERHATCH.
- In the Hatch dialog box, select Predefined as the pattern type.
- Select a pattern in the Hatch Pattern Palette dialog box. In this example, we selected ANSI 34.
- Choose OK, and click a point in the upper rectangle (2). The hatch is created and passes through the defined UCS origin.
- Repeat Step 2.
- In the Hatch dialog box, click Offset <.
- Select the hatch in the upper rectangle (3).
- In the Offset field, enter the relative coordinates, in this case 0,-30.
- Choose OK.
- Click a point in the lower rectangle (4). The hatch is created, passing through point B.
Note: You will get the same result if you type UCS in the command line and specify a point after step 5. Repeat step 2 and choose OK in the Hatch dialog box. Click in the lower rectangle.