A basic fill pattern consists of a series of parallel or orthogonal lines; examples include Diagonal Crosshatch or Vertical Siding.
 Video: Create a Fill Pattern
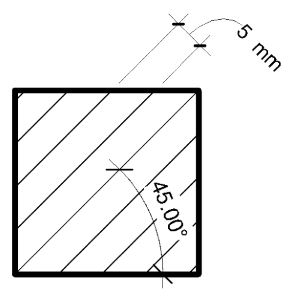
To create a fill pattern using parallel lines
- Click Manage tab
 Settings PanelAdditional Settings drop-down
 (Fill Patterns).
- In the Fill Patterns dialog, under Pattern Type, select Drafting or Model.
If you are using the structural features of Revit, select Drafting only.
- Click
 (New fill pattern).
The New Pattern dialog displays.
- Enter a name for the pattern.
- Select Basic.
- Select Parallel lines.
- Enter values for Line angle and Line spacing 1.
For a drafting pattern, these values affect spacing on the sheet.
For a model pattern, these values affect spacing on the model.
- If you are creating a drafting fill pattern, specify how to orient the fill pattern in the host layers. See About Fill Pattern Host Orientation for details.
- Click OK.
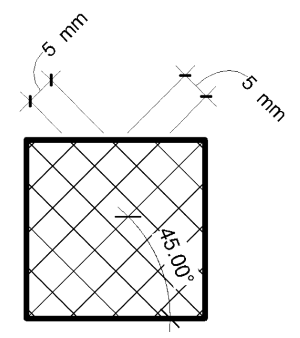
To create a crosshatch fill pattern
- Follow steps 1-5 of the previous procedure.
- Select Crosshatch.
- Enter values for Line angle, Line spacing 1, and Line spacing 2.
For a drafting pattern, these values affect spacing on the sheet.
For a model pattern, these values affect spacing on the model.
- If you are creating a drafting fill pattern, specify how to orient the fill pattern in the host layers. See About Fill Pattern Host Orientation for details.
- Click OK.