Camera Tracker: Object Pinning Rollout
Object Pinning lets you use the 2D image feature tracking data to directly animate objects in the 3ds Max scene. This is useful for replacing moving features in the scene with 3D objects when the movement is approximately planar.
 Utilities panel > Utilities rollout > More button > Utilities dialog > Camera Tracker > Object Pinning rollout
After the tracking data is created, you can use this function to do such things as synchronizing the movement of 3D objects with feature movements in the background movie. If the 3D objects directly cover the background features, they will appear to replace them. For example, you could take the video of a juggler juggling balls and replace the balls with 3D balls of fire or synchronize the movement of an animal's head with a 3D jaw to create talking animal animations.
Procedures
Example: To create a juggler juggling 3D balls of fire:
This assumes you already have a video of a juggler. Otherwise, find a juggler and a video camera.
- Load a video of a juggler.
- Create tracker gizmos to associate with the juggling balls.
- Use the Movie Stepper to track the gizmos.
- Go to Object Pinning and choose the tracker.
- Under Object To Pin, associate an object with a tracker. In this case, create a 3D ball of fire using fire or an animated map to generate the fire.
- Adjust the Pin Range, and then click the Pin button to move the object to follow the tracker.
Interface
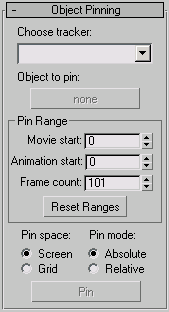
Choose Tracker
Shows all the current trackers as set up in the Motion Trackers rollout. Use this to select the tracker whose feature movements you will use to control the pinned 3ds Max object. The feature must have been tracked already over the frames you want to use, with the Track and/or Movie Stepper rollouts. Note that the accuracy of the pinning is determined by the accuracy of the match, so subpixel tracking is highly recommended.
Object To Pin
Lets you choose the object in 3ds Max scene for pinning and animating. By default the tracking object associated with the selected tracker is preloaded into this button. You can use this picker if you wish to pin a different object.
Pin Range group
Movie Start
The movie frame from which to start using tracked feature positions.
Animation Start
The frame in the 3ds Max animation at which to start keyframing the move of the pinned object.
Frame Count
The number of frames to animate. There must be enough tracked positions in the selected tracker to cover this number of frames.
Reset Ranges
Reloads the maximum frame number and count ranges into the above spinners from the current movie and 3ds Max scene settings.
Pin Space
Lets you select the plane of motion in which the keyframed pinning will occur.
- Screen Moves and animates the pinned object in the plane of the screen at its current depth in the scene. This is equivalent to dragging an object around in the Screen reference coordinate system in 3ds Max.
- Grid Moves and animates the pinned object in the plane of the active grid. This lets you set up an arbitrary plane of motion for the pinning by constructing a grid helper object in the desired place and making it the active grid. If you don't have a grid helper set up and active, the pinning will occur on the 3ds Max Home Grid.
Pin Mode
Lets you choose between two different pinning modes: absolute and relative.
- Absolute Places and moves the pinned object exactly over the tracked feature. If combined with grid space, the object is also placed and moved directly on the active grid plane.
- Relative Leaves the pinned object at its current position in space and moves it so that its projected position relative to the tracked feature remains the same throughout the pinning frame range. This makes it possible to animate an object that you don’t want placed exactly over a feature, or to animate an object using several features in successive frame ranges. (For example, a computer generated jaw can track an ear for some frames, then a nose for others in a talking animal shot). If combined with grid space, the object is not moved onto the grid plane, but keeps its height above the grid and is moved parallel to it.
Pin
Performs the actual pinning, moves the object to follow the selected feature and places a keyframe at each frame in the pin frame range. As with the other keyframing operations in the tracker, you can undo a pin using the 3ds Max Undo function. You might also find it useful to perform keyframe reduction afterwards in Track View.