Display Floater
This modeless dialog contains most of the functions on the Display panel. You can keep the Display floater open while you work in your scene, making it easier to adjust viewport display settings without using the Display panel.
- Edit menu > Object Properties > Manage Object Display
Interface
The Display floater has two panels: Hide/Freeze and Object Level.
Hide/Freeze panel
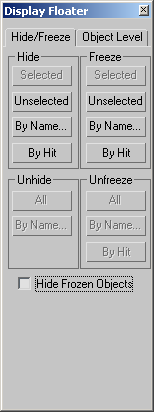
Hide group
Selected
Hides the selected objects.
Unselected
Hides all visible objects except the selected ones. Use this to hide all the objects except the one you are working on.
By Name
Lets you select the objects to hide by name.
By Hit
Causes any object you click in the viewport to be hidden. If you hold down the Ctrl key while selecting an object, that object and all of its children are hidden. To exit Hide By Hit mode, right-click, press Esc or select a different function. This mode is automatically turned off if you hide all objects in the scene.
Unhide group
All
Unhides all hidden objects. The unhide buttons are only available when you have specifically hidden one or more objects. They won't unhide objects hidden by category.
By Name
Displays a dialog in which you can unhide objects you select from a list.
Freeze group
Selected
Freezes the selected objects so they cannot move in the viewport.
Unselected
Freezes all visible objects except the selected ones. Use this to quickly freeze all the objects except the one you're working on.
By Name
Lets you select the objects to freeze by name.
By Hit
Causes any object you click in the viewport to be frozen. If you hold down the Ctrl key while selecting an object, that object and all of its children are frozen. To exit Freeze By Hit mode, right-click, press Esc, or choose a different function. This mode is automatically turned off if you freeze all objects in the scene.
Unfreeze group
All
Unfreezes all frozen objects.
By Name
Displays a dialog in which you can unfreeze objects you select from a list.
By Hit
Causes any object you click in the viewport to be unfrozen. If you hold down the Ctrl key while selecting an object, that object and all of its children are unfrozen.
Hide Frozen Objects
Toggles display of frozen objects on and off. You don’t have to unfreeze objects to hide them; you can use Hide Frozen Objects instead to hide or unhide frozen objects in a single step.
Object Level panel
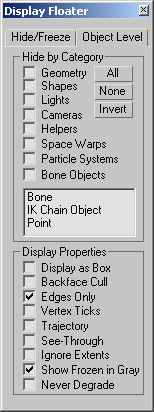
Hide by Category group
Toggles the display of objects by their category (objects, cameras, lights, and so on). Choose the checkboxes to hide objects of that category. Use the All, None, and Invert buttons to change the settings of the checkboxes.
Display Properties group
Provides controls that alter the display of selected objects.
Display as Box
Toggles the display of selected objects, including 3D objects, 2D shapes, and particle systems, as bounding boxes. Produces minimum geometric complexity.
Particle systems appear as bounding boxes when adaptive degradation takes effect. Since particle systems naturally exist in world space, their bounding box is always oriented parallel to the world planes.
Backface Cull
Toggles the display of faces with normals pointing away from view. When selected, you see through the wireframe to the back faces.
Edges Only
Toggles the display of hidden edges and polygon diagonals. When on, only outside edges appear. When off, all mesh geometry appears. Applies to Wireframe viewport display mode, as well as other modes with Edged Faces turned on.
Vertex Ticks
Displays the vertices in the selected geometry as tick marks.
If the current selection has no displayed tick marks, the checkbox is clear. If some of the vertices in the current selection display tick marks, the checkbox contains a gray X. If all vertices in the current selection display tick marks, the checkbox contains a black X.
Trajectory
Toggles trajectory display for the selected object so you can display its trajectory wherever you are in 3ds Max.
See-Through
When on, makes the object or selection translucent in viewports. This setting has no effect on rendering: it simply lets you see what’s behind or inside an object in a crowded scene, and especially to adjust the position of objects behind or inside the see-through object. Use this when you need to see inside an object, such as a character with bones inside. Default=off.
You can customize the color of see-through objects by using the Colors panel of the Customize > Customize User Interface dialog. Choose Geometry from the Elements list, and then choose See-Through.
Keyboard shortcut (default): Alt+X
Ignore Extents
Allows an object to be excluded from a zoom extents operation. Choose this when you have lights or other distant objects that you don’t want to use when you do a Zoom Extents.
Show Frozen in Gray
When on, the object turns gray in viewports when you freeze it. When off, viewports display the object with its usual color or texture even when it is frozen. Default=on.
Never Degrade
When on, the object is not subject to adaptive degradation.