Point-Of-View (POV) Viewport Label Menu
Use this menu to change the active point-of-view and enable other integrated viewport elements.
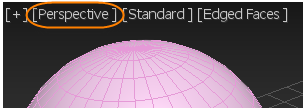
Point-Of-View (POV) menu
Interface
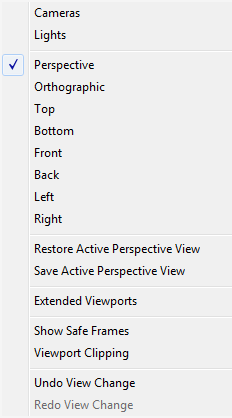
Cameras
If the scene contains cameras, they are listed in this submenu. If no cameras exist, the submenu does not open. Choosing a camera name changes the viewport to the camera POV.
Lights
If the scene contains spotlights or directional lights, they are listed in this submenu. If no lights exist, the submenu does not open. Choosing a light name changes the viewport to the light POV.
Point-Of-View Options
The following menu items let you specify the current point of view in the selected viewport:
- Perspective (
P) - Orthographic (
U) - Top (
T) - Bottom (
B) - Front (
F) - Back (No default hotkey)
- Left (
L) - Right (No default hotkey)
Restore Active View
Restores the currently saved active view.
Save Active View
Stores the active view to an internal buffer. If you have framed a shot in any view other than a camera, use Save Active View to preserve the viewport's appearance. The saved active view is saved with the scene file.
Extended Viewports
Displays an Extended Viewports submenu with additional viewport options.
Show Safe Frames
Turns on and off the display of safe frames. Safe frames are defined in the Viewport Configuration dialog. The safe frame proportions conform to the Width and Height of the output size of your rendering image output.
Hotkey: Shift+F
Viewport Clipping
Lets you set a near and far visibility range for the viewport interactively. Geometry within the viewport clipping range is displayed. Faces outside the range are not displayed. This is useful in complex scenes where you want to work on details that are obscured from view.
This option is a toggle: the first time you choose it, Viewport Clipping is turned on. Choosing the option a second time turns Viewport Clipping off, and so on.
When you turn on Viewport Clipping, the viewport displays two yellow slider arrows on the right side. Adjusting the lower arrow sets the near end of the range, and adjusting the upper arrow sets the far end. Tick marks on the range slider indicate the extents of the viewport.
You can also toggle Viewport Clipping on the Viewport Configuration dialog.
Select Camera / Select Light
If the viewport is showing a Camera or a Light view, this option appears. It lets you select the Camera or Light object that displays the view.
Select Camera Target / Select Light Target
If the viewport is showing a Camera or a Light view, and that Camera or Light has a target, this option appears. It lets you select the Camera Target or Light Target object associated with the Camera or Light that displays the view.
Undo View Change
Undoes the last viewport change.
Keyboard shortcut: Shift+Z
Shift+Y.Extended Viewports submenu
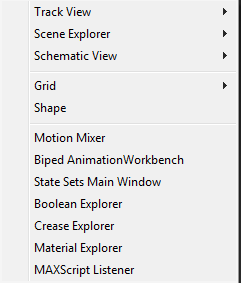
Track View
Displays a submenu that lists existing Track Views, if any. Choose a Track View to display it in the viewport.
The submenu also has a New option that lets you create a new Track View.
To change the viewport from a Track View back to another POV, select Viewport from the menu bar and choose a new option.
Scene Explorer
Displays a submenu that lists existing Scene Explorers, if any. Choose a Scene Explorer to display it in the viewport.
The submenu also has a New option that lets you create a new Scene Explorer.
To change the viewport from a Scene Explorer back to another POV, right-click the menu bar and choose a new option.
Schematic View
Displays a submenu that lists existing Schematic Views, if any. Choose a Schematic View to display it in the viewport.
The submenu also has a New option that lets you create a new Schematic View.
To change the viewport from a Schematic View to another POV, right-click the menu bar and choose new option.
Grid
Displays a submenu that changes the POV based on the active grid. These options are meant mainly for use with Grid objects. If no Grid object is activated, they operate on the Home grid.
- Front: changes the view to a Front view for the grid.
- Back: changes the view to a Back view for the grid.
- Top: changes the view to a Top view for the grid.
- Bottom: changes the view to a Bottom view for the grid.
- Left: changes the view to a Left view for the grid.
- Right: changes the view to a Right view for the grid.
- Display Planes: changes the view to the active display plane for the grid. You set the active plane on the Modify panel > Parameters rollout > Display group > XY Plane, YZ plane, or ZX plane.
Shape
Aligns the view to the extents of a selected Shape object and its local XY axes.
If you have not selected a Shape object before you choose Shape, this option can have peculiar results.
Motion Mixer
Displays the Motion Mixer.
Biped AnimationWorkbench
Displays the Biped Animation Workbench.
If you haven’t selected a biped before you choose this option, the viewport displays a warning to that effect. Selecting a biped body part in another viewport updates the Workbench view.
State Sets Main Window
Displays the State Sets dialog.
Boolean Explorer
Displays the Boolean Explorer.
Crease Explorer
Displays the Crease Explorer.
Material Explorer
Displays the Material Explorer.
Scripting Listener
Displays the Scripting Listener.
Procedures
To change a viewport to Camera view:
This procedure requires at least one camera object in your scene. As an alternative, to create a camera and set it to a viewport at the same time, activate a Perspective viewport and then press Ctrl+C.
Click or right-click the POV viewport label.
Choose Cameras > camera name.
This assigns the camera to the viewport and changes the POV label to the camera name.
A camera viewport tracks the view through the POV of that camera. As you move the camera (or target) in another viewport, you see the view change accordingly. If you alter the camera's field of view, you see the changes as they are applied.
Tip: You can also pressCas a shortcut to change any active viewport to an existing camera view.
To change a viewport to a shape view:
This procedure requires at least one shape object in your scene. (If the shape is not selected, or if you select 3D geometry instead, the resulting view appears distorted.)
- Select the shape you want to view.
- Click or right-click the POV viewport label.
- Choose Shape from the menu.
To use viewport clipping:
Click or right-click the POV viewport label.
Choose Viewport Clipping.
The viewport displays the viewport clipping controls.
Move the lower slider up until the geometry is clipped in the viewport by the near clipping plane.
Adjust the upper slider to clip the geometry with the far clipping plane.
To display Schematic View in a viewport:
- Click or right-click the POV viewport label.
- Choose Schematic > New, or choose the name of the Schematic View to display.
To display Track View in a viewport:
- Click or right-click the POV viewport label.
- Choose Track > New, or choose the name of the Track View to display.
To display the Scripting Listener in a viewport:
Click or right-click the POV viewport label.
Choose Extended Viewports > Scripting Listener.
The Scripting Listener is displayed in the viewport.
To return to a Geometry view, or change to another editor window, right-click the menu bar or toolbar and choose the POV.
Note: When you open the Scripting Listener in this way, and then change the viewport POV, 3ds Max opens the Listener in a window of its own.
To display the Biped Animation Workbench or the Motion Mixer in a viewport:
Click or right-click the POV viewport label.
Choose Extended Viewports > Biped AnimationWorkbench or Motion Mixer.
The window you chose is displayed in the viewport.
Note: If you haven’t selected a biped before you choose Biped AnimationWorkbench, the viewport displays a warning to that effect. Selecting a biped body part in another viewport updates the Workbench view.To return to a Geometry view, or change to another editor window, right-click the menu bar or toolbar and choose the POV.
To display the Material Explorer in a viewport:
Click or right-click the POV viewport label.
Choose Extended Viewports > Material Explorer.
The Material Explorer is displayed in the viewport.
To return to a Geometry view, or change to another editor window, right-click the menu bar or toolbar and choose the POV.
To turn on safe frame display, do one of the following:
- Click or right-click the POV viewport label, and then choose Show Safe Frames.
- Press
Shift+F. - Open the Viewport Configuration dialog > Safe Frames panel, and turn on Show Safe Frames In Active View.
To customize the Point-of-View (POV) Viewport Label menu:
- From the Menu bar, choose Customize > Customize User Interface....
- From the Custom User Interface dialog, click the Menu tab.
- From the Menu panel, click the drop-down menu on the top right and choose Viewport Menu Label Bar.
- In the Menu window, add and remove commands as required under Views - POV Viewport Label Menu.