Admin Change Workspace Guide
- Overview
- What is a Desktop Connector Workspace?
- Change Workspace Requirements
- Best Practices for deploying a Change Workspace as an Admin
- How to Deploy Desktop Connector with a New Workspace
- Exporting the Registry Keys and Creating the Script
- Admin Experience and Troubleshooting
- Individual User Experience and Troubleshooting
Overview
This page contains instructions for deploying an alternate location for the Desktop Connector Workspace. These instructions are intended for IT specialists with an understanding of deploying software products and changing registry keys for creating deployments.
For additional information about local change workspace refer to Change Workspace as an Individual User.
The Desktop Connector lets users modify where their workspace (local cache) is stored. You can find out how to do this in the User Change Workspace Guide. If you are an admin aiming to deploy Desktop Connector for multiple users, this Admin Change Workspace Guide will illustrate the process of synchronizing everyone's workspace to a uniform location.
What is a Desktop Connector Workspace?
A workspace in Desktop Connector is defined as the physical location on the hard drive where your projects are stored and then synced to the cloud in a Forma, Drive, or Fusion Connector.
When Desktop Connector is installed the local workspace (cache) will be located at C:\Users\<username>\DC. Your cloud project folder and file structures are replicated in the relevant connector for your data source.
- In the
DCfolder you will now find folders for each connecter you have access to.
The default path for the Forma, Fusion, and Drive connectors are:
- Forma workspace is:
C:\Users\<username>\DC\ACCDocs\ - Autodesk Drive workspace is:
C:\Users\<username>\DC\Drive\ - Autodesk Fusion workspace is:
C:\Users\<username>\DC\Fusion\
This guide is designed to provide you with step-by-step details on how to modify your workspace location, in accordance with company standards or preferences. Many companies opt to alter their local workspace due to concerns surrounding limited storage capacity in the current workspace location, or to comply with a company-mandated folder structure.
Many applications often use specific file paths, known as absolute paths, to link or reference files. Desktop Connector's default workspace is uniquely set for each user's Windows profile. This could lead to issues when trying to locate file references using absolute paths. To avoid this issue, you can set the local workspace location to be the same for all users. This way, references to absolute paths can easily be resolved.
Change Workspace Requirements
To ensure a successful admin controlled workspace change for your users consider the following requirements:
- Selections at the root folder level, such as
C:,D:, orE:, are not accepted. We recommend using a specific folder, asD:\DCorE:\ADSKfor your workspace. Before deploying, you should test this implementation to verify that it functions as expected. - The user must have read/write access to the selected folder (directory).
- The Workspace folder (directory) must be on a permanent local storage drive.
- The users destination folder (directory) must be empty for you to change the workspace. Failure to choose an empty folder will result in the user seeing following dialog box.
If these conditions are not met, Desktop Connector will keep using the old workspace.
Best Practices for deploying a Change Workspace as an Admin
The following instructions will use an example of setting the workspace to C:\ADSK
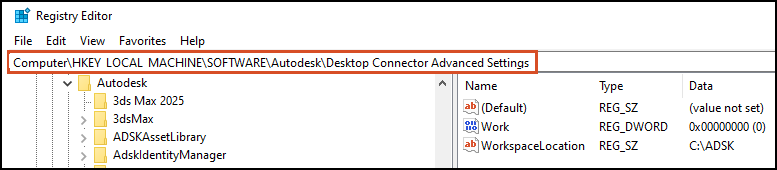
The Registry key (HKLM) can be found at Computer\HKEY_LOCAL_MACHINE\SOFTWARE\Autodesk\Desktop Connector Advanced Settings > WorkspaceLocation = C:\ADSK
To apply only to the current user, you can set the registry key (HKCU) at Computer\HKEY_CURRENT_USER\SOFTWARE\Autodesk\Desktop Connector Advanced Settings > WorkspaceLocation = C:\ADSK

- It is possible to use environment variables in defining the workspace location. For instance, you could use
%userprofile%in the string to represent a user's profile directory. - In the scenario of multiple users logging into the same windows machine, it is recommended to use an environment variable that varies by user (like
%userprofile%or%username%) in the workspace path that is specified. If you choose a path that does not vary by user (likeC:\temp) as your workspace, the first user who runs Desktop Connector on the machine will be assignedC:\temp. However, subsequent users will receive the error "Unable to Change Workspace - Directory not empty" error and will be directed to%userprofile%\DC. - When an admin imposes a workspace on a user, they will not be able to change the workspace themselves.
- Once an admin imposes a workspace, a user that has already been using Desktop Connector will still need to unsubscribe from all their projects, restart Desktop Connector and resubscribe.
Modifying the Windows Registry can have serious effects on a system, so these instructions should be followed with caution. It's always good practice to back up the registry before making a change.
How to Deploy Desktop Connector with a New Workspace
In this step administrators will select the custom workspace location. Each end user will receive a dialog notification informing them a workspace change has been imposed by their admin.
Administrators will need to set the WorkspaceLocation as a string that specifies the location for the NEW workspace. This modification can be made at either the HKLM or HKCU level in the registry. The HKLM level will apply the modifications to all users of the machine, while the HKCU level only applies to the current user.
In the search box on the taskbar, type regedit, then select Registry Editor
Navigate to location:
Computer\HKEY_LOCAL_MACHINE\SOFTWARE\AutodeskRight click Autodesk and Select New > Key
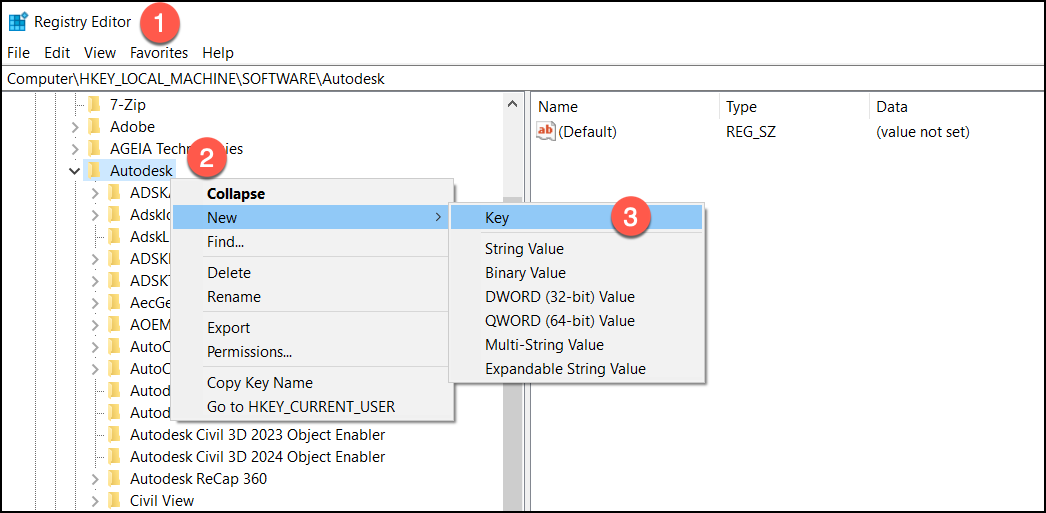
Create
Desktop Connector Advanced SettingsKeyCreate a string value
WorkspacelocationSet the value of WorkspaceLocation =
C:\ADSK(this folder is used as an example only)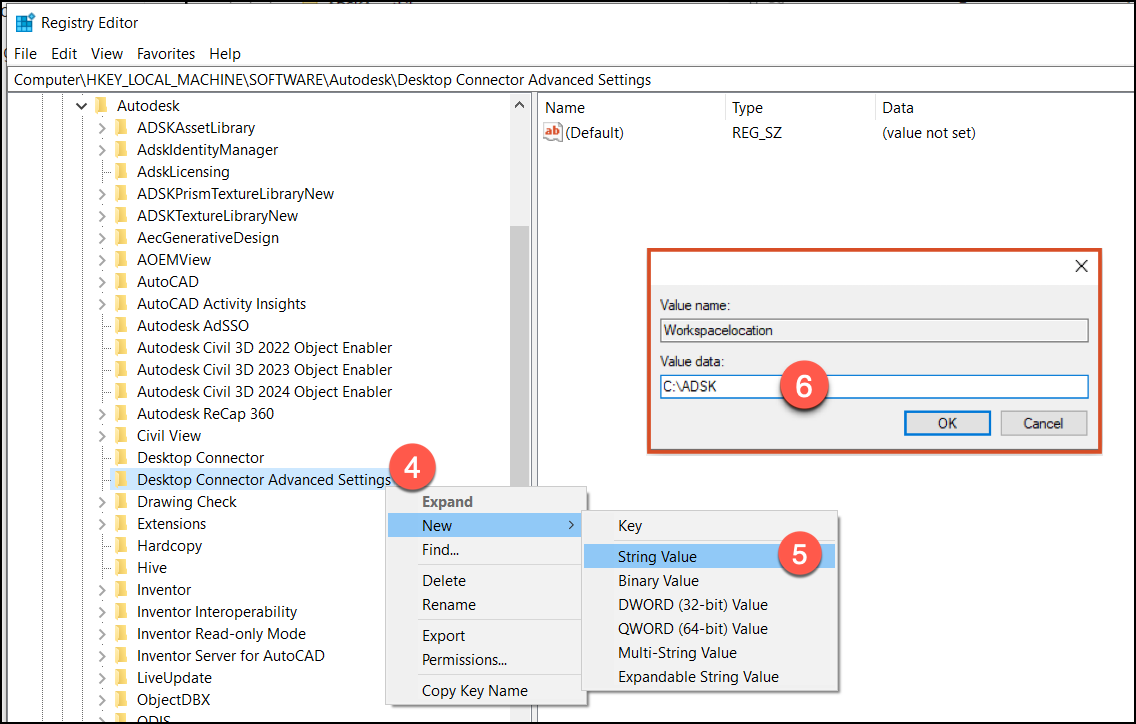
Restart Desktop Connector

After Restarting Desktop Connector you will have a new workspace location.
Exporting the Registry Keys and Creating the Script
OPTIONAL STEP: Create a
DCWorkspace.regto add and set the registry values[HKEY_LOCAL_MACHINE\SOFTWARE\Autodesk\Desktop Connector Advanced Settings]to apply to all users on the machine or[HKEY_CURRENT_USER\SOFTWARE\Autodesk\Desktop Connector Advanced Settings]to apply to the current user."WorkspaceLocation"="C:\ADSK"Visual example image of
DCWorkspace.reg
Create a
Install.cmdfile to install Desktop Connector:regedit /s .\DCWorkspace.regTaskkill /IM desktopconnector.applications.tray.exe /f.\Setup.exe -i install --silentVisual example image of
DCWorkspace.reg
Place the
Install.cmdandDCWorkspace.regin the same location as the install executable.Include
Install.cmdandDCWorkspace.regin the SCCM deployment package.
Admin Experience and Troubleshooting
How do I Reset Desktop Connector after an Admin Workspace Change
When there is a workspace change uninstalling does not eliminate the registry key associated with the admin workspace changes. To return the Desktop Connector to a state resembling a fresh installation, and to restore the default workspace, administrators must manually delete this registry key.
As an administrator, using the Reset Utility and Uninstall Desktop Connector will not reset the workspace location if it has been previously set by you or an individual user. If there is a need to reset a user's workspace, follow these steps to resolve:
Shut down Desktop Connector.
Backup your registry
Navigate to the registry key
Computer\HKEY_LOCAL_MACHINE\SOFTWARE\Autodesk\Desktop Connector Advanced SettingsorComputer\HKEY_CURRENT_USER\SOFTWARE\Autodesk\Desktop Connector Advanced SettingsDelete WorkspaceLocation
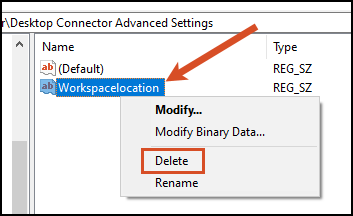
Navigate to
C:\Program Files\Autodesk\Desktop Connector\Reset\ResetDesktopConnector.exeand run ResetDesktopConnector.exe
Restart Desktop Connector
After you restart Desktop Connector your workspace will be located at the default location C:\%userprofile%\DC
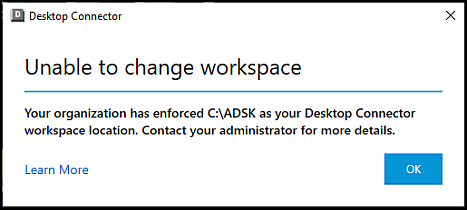
Admin deploys to Invalid Workspace Path
If the admin selects an invalid workspace location path, then all end users will receive the following dialog when they first restart Desktop Connector.
There is no action needed on the end-user's part.
The administrator must redeploy with a valid workspace location to successfully change their organizations desired location.
Desktop Connector will continue to use the default workspace location.

Examples of invalid paths include:
C:
D:
E:
C:\Invalid:Path
C:\Invalid*Path
C:\Invalid<Path
C:\Invalid|Path
C:\EndsWithPeriod.
\some\path\without\a\drive
To select a valid folder path, the admin must follow the steps provided in the How to Deploy Desktop Connector with a new Workspace.
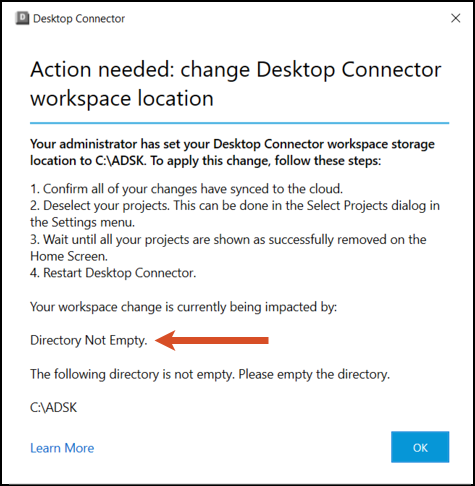
Admin deploys to Directory that is not Empty
The Desktop Connector workspace location chosen by your admin is not empty and needs to be cleared.
You will need to empty your folder and clear your workspace before the admin imposed workspace being used.
Individual User Experience and Troubleshooting
User attempts to initiate a change workspace after Admin Change
The admin has mandated a standard that requires the Desktop Connector workspace to be in a predetermined location.
If you attempt to alter the workspace location, you will receive an error message.
This message is to notify you that a change has been enforced by your organization.
User Notification that the Workspace location has changed
Your admin has imposed a standard that requires the Desktop Connector workspace to be in a specific location. If this is a new installation, Desktop Connector will start up using the admin-imposed workspace and no input from the user is required.
If the admin imposes a new workspace location for current Desktop Connector users, they are bound to encounter one of two messages.
If there were no project selections impeding their migration users would be greeted with a success dialog, notifying them of their updated workspace location.
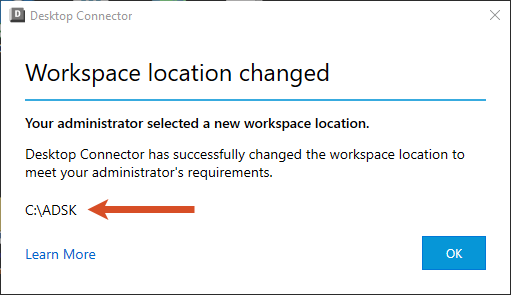
if a user has ongoing project selections or queued jobs, they will be presented with a specific dialog featuring instructions on how to successfully modify their workspace.
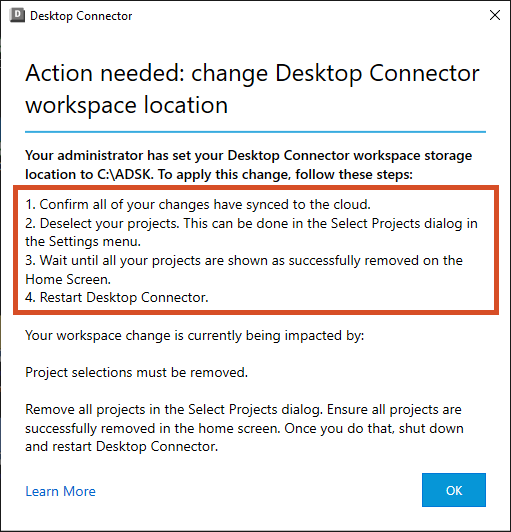
User receives Action Needed about existing Project Selections
Follow these steps to remove your projects.
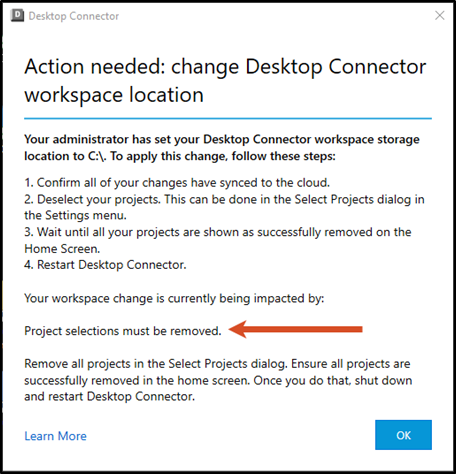
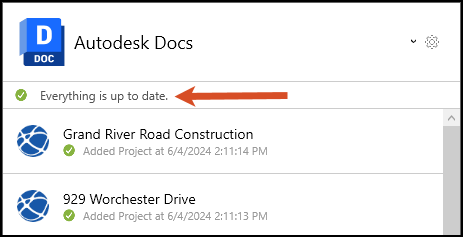
Check the Home Screen to see if there are any pending actions and if everything is up to date.
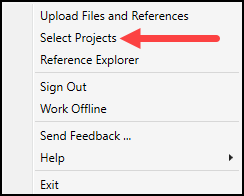
Right-click on the Desktop Connector tray icon and Select Projects.
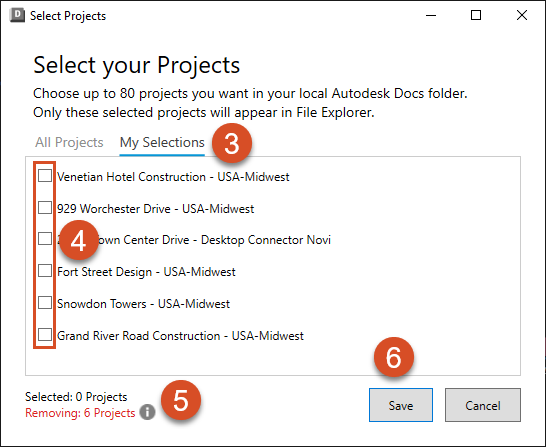
Move to the My Selections tab
Deselect all the projects within this tab
You will receive notification that projects are being removed from the workspace
Select Save
Check that all your projects are successfully removed in the Home Screen.
When you restart Desktop Connector with your new workspace, you will be prompted to select projects you wish to be shown in your local Forma connector.
Related Concepts:
- Desktop Connector Folder needs to be cleared displays after installing or upgrading Desktop Connector
- You must be an administrator on this computer to start services when Autodesk Desktop Connector starts
- Reset Desktop Connector Automated Utility.